| myArmoury.com is now completely member-supported. Please contribute to our efforts with a donation. Your donations will go towards updating our site, modernizing it, and keeping it viable long-term.
Last 10 Donors: Adam James, Piotr H. Feret, Graham Shearlaw, Anonymous, Daniel Sullivan, Chad Arnow, Jonathan Dean, M. Oroszlany, Sam Arwas, Barry C. Hutchins (View All Donors) |
| Author |
Message |
D. Austin
Industry Professional

Location: Melbourne, Australia Joined: 20 Sep 2007
Posts: 208
|
 Posted: Fri 17 Oct, 2008 10:13 pm Post subject: My new scabbard Posted: Fri 17 Oct, 2008 10:13 pm Post subject: My new scabbard |
 |
|
Hi folks,
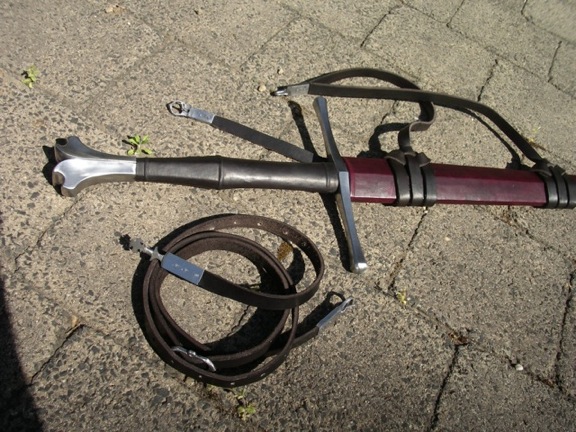
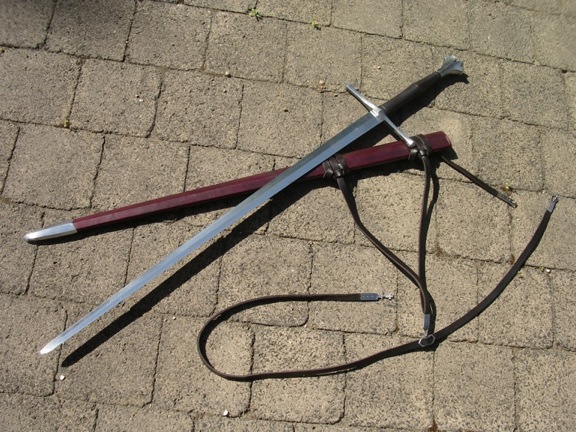
I thought I’d share some pictures of my latest project. The sword is made by Pavel Moc, of the Czech Republic, who I must say was great to deal with. Scabbard is softwood core with veg tanned leather stitched up the back. I thought I’d try it without glue and it seems to be holding fine so far. Chape and belt fittings are steel. I redyed the grip to match the belt and although it’s not quite the same colour, I’m satisfied that with use it will darken and look “right”.
I’d be interested in peoples thoughts as to whether this style of hilt would suit a rain guard/chappe. I know it would be period appropriate but am not 100% decided on the issue for this particular sword. I’ll most probably do a “D” shaped leather flap.
Darren.
 Attachment: 126.31 KB Attachment: 126.31 KB
Attachment: 129.72 KB
|
|
  |
 |
Brian Hook

|
| Posted: Fri 17 Oct, 2008 10:47 pm Post subject: |
|
|
|
Beautiful work Darren! Did you make the belt fittings yourself or did you buy them?
|
|
|
|
|
D. Austin
Industry Professional
Location: Melbourne, Australia Joined: 20 Sep 2007
Posts: 208
|
| Posted: Sat 18 Oct, 2008 4:35 pm Post subject: |
|
|
Hi Brian,
Thanks for the comment. I did make the belt fittings. They are cut and filed from larger stock with face plates soldered on to the pockets into which the leather fits. Thanks to Aaron Schnatterly for suggesting this method. It is a lot of work but definitely worth it.
Darren.
|
|
|
|
|
Julien M

|
| Posted: Thu 23 Oct, 2008 5:35 am Post subject: |
|
|
Well that's truly impressive work Darren.
I'm in the process of making one for a Crecy and I (very humbly) hope to end up with something looking like that  (I don't plan on making suspensions though, just the basic sheath). (I don't plan on making suspensions though, just the basic sheath).
There is a central ridge in the middle. Did you use a raiser (leather or maybe cord) to do this or is that the shape of the woodcore? Same question for the scabbard mouth, from the picture there seems to be a riser too just below the guard. Could you post pictures of the Chape and scabbard mouth (and possibly the stitching if that's not too much to ask? ), I d'be especially curious to see where you stopped the leather at the mouth, does it goes slighlty inside the scabbard or did you cut the leather just at the entry?
Thanks and congrats.
J
|
|
|
|
|
Sean Flynt

|
|
 |
|
D. Austin
Industry Professional
Location: Melbourne, Australia Joined: 20 Sep 2007
Posts: 208
|
| Posted: Sat 25 Oct, 2008 12:52 pm Post subject: |
|
|
| Julien M wrote: | | There is a central ridge in the middle. Did you use a raiser (leather or maybe cord) to do this or is that the shape of the woodcore? Same question for the scabbard mouth, from the picture there seems to be a riser too just below the guard. Could you post pictures of the Chape and scabbard mouth (and possibly the stitching if that's not too much to ask? ), I d'be especially curious to see where you stopped the leather at the mouth, does it goes slighlty inside the scabbard or did you cut the leather just at the entry? |
Hi Julien,
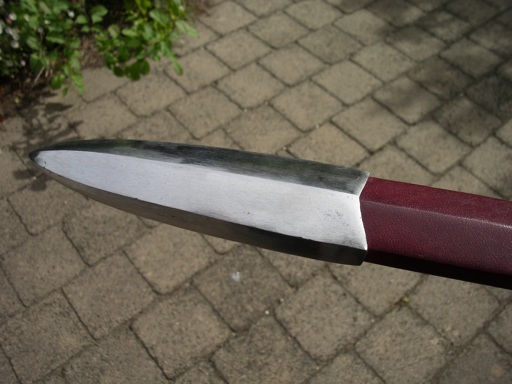
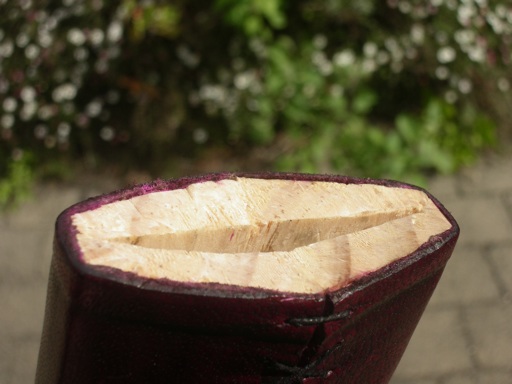
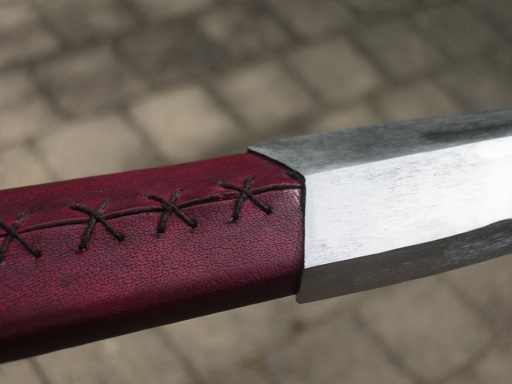
Hopefully these pictures should help to answer your questions. The wood core is 6 sided, to match the upper part of the grip and to fit in with the line down the middle of the guard. This is what provides the ridge line down the center. The mouth of the guard is just basic tooling. I used the point on my silver smithing burnisher to draw a line about 5mm from the mouth then used the "sharp" edge of it to compress the leather below the line. I hope this makes sense.
I did consider using risers either side of the suspension wraps to prevent them from slipping but this doesn't seem particularly prevalent in period artwork so I decided against it. These suspension wraps grip very tightly anyway and I'm not at all concerned about them slipping.
Darren.
Attachment: 60.66 KB
Attachment: 52.76 KB
Attachment: 43.9 KB
|
|
|
|
|
D. Austin
Industry Professional
Location: Melbourne, Australia Joined: 20 Sep 2007
Posts: 208
|
| Posted: Sat 25 Oct, 2008 4:23 pm Post subject: |
|
|
| Sean Flynt wrote: | Impressive work! There's a scabbard in my future as well, so I'm very interested in construction details.
As for a chappe, you might have seen this image in the thread on my Dürer project. The pommel type is similar to yours, so I'd guess that a D-shaped chappe is a reasonable addition. |
Hi Sean,
I'm hoping the scabbard is for your Dürer. I'd love to see that. As for construction details, it's mostly the same as a number of other scabbards described on myArmoury. Wood blank was cut with a hand saw, then hollowed out with a really sharp knife. I found this was actually easier than using a chisel when working with soft wood. It is my belief that this should be done with a chisel, knife, thumb plane, riffler rasp, scraper etc (or a combination of these) but not abrasives as the grit left behind in the timber can scratch the sword blade. I may be being a little too precious about my swords here.
Next the core was glued together with PVA (not particularly historical), then shaped with a block plane. I didn't bother sanding it as it was quite smooth after planing but I will next time as minor ridges in the wood have showed through the leather in some places.
I cut the veg tanned calf skin to shape, punched the sewing holes with an awl, then sewed it on with waxed linen thread whilst the leather was damp. Whilst keeping it moist by dabbing it with a damp cloth, I rubbed it with the smooth curved side of the burnisher to accentuate the angles. As it dried it shrank a little, fitting the core nicely. Next I dyed it with a few coats of raven oil and when I was happy with the colour (and it was dry) sealed it with a beeswax/oil mixture. I'll probably try something else next time but this does help to stiffen the leather a little.
I'm considering using glue beneath the leather on my next scabbard project but I'll see how this one holds up first. It seems tight enough to stay where it is so far.
The suspension straps were made from a thicker cow hide and dyed with raven oil again however I sealed these with neatsfoot oil to keep them flexible.
Before starting this project I read a few topics here and took what I thought most suitable from different people's approaches and I'm happy with the result. I hope this post has added something to the information on this topic.
Regarding the chappe, I also liked this one, from your Dürer thread. I think I'll give it a go with those radiating lines on it. If I don't like it I can always take it off. 
Darren.
Attachment: 64.66 KB
|
|
|
|
|
|
Justin King
Industry Professional
|
| Posted: Sat 25 Oct, 2008 4:43 pm Post subject: |
|
|
|
A quick note-I have had problems in the past with PVA type glues causing corrosion to blades inside the scabbard, even a year or more after the scabbard was glued together. I have solved the problem on my scabbards by pouring tung oil into them and then hanging the scabbard upside down so the excess drips out. Once dried the tung oil seals the glue in and stops the corrosion, but I no longer use PVA glues for scabbards.
|
|
|
|
|
Julien M
|
| Posted: Mon 27 Oct, 2008 2:02 am Post subject: |
|
|
Hi Darren,
Thanks for posting those, it's all very helpfull. What kind of thread did you use for the sewing at the back btw?
Cheers,
J
|
|
|
|
|
D. Austin
Industry Professional
Location: Melbourne, Australia Joined: 20 Sep 2007
Posts: 208
|
| Posted: Mon 27 Oct, 2008 1:03 pm Post subject: |
|
|
Julien, generally a waxed linen of size 18/3 thickness is what you're after. A saddlery or leather supplier will sell it. I found one that is spun quite unevenly and in my opinion, adds to the "authentic" look. It even comes in 15m lengths. See the bottom of this page:
http://www.bowstock.co.uk/acatalog/Line.html#aLTRP318BL
Justin, I made sure the PVA wouldn't form globules or run inside the scabbard by applying it sparsely and to only the outer half of the join so hopefully I'll get away with it. You're right though. I think I'll be using hide glue from now on.
Darren.
|
|
|
|
|
|
|
You cannot post new topics in this forum
You cannot reply to topics in this forum
You cannot edit your posts in this forum
You cannot delete your posts in this forum
You cannot vote in polls in this forum
You cannot attach files in this forum
You can download files in this forum
|
All contents © Copyright 2003-2026 myArmoury.com — All rights reserved
Discussion forums powered by phpBB © The phpBB Group
Switch to the Basic Low-bandwidth Version of the forum
|