Spear went into the salt baths at 3:00, came up to temp at 3:01, and will be qunched after a nice soak and when the downward cycle begins and is closest to the 10min. mark. I'll be updating soon.
Update: The file skates on the blade and lugs and upon first inspection there are no signs of any cracks or potential problem spots. Time for some tempering and will pick it up again tomorrow. :) I don't know about Jean but this makes me very happy! ;) :lol:
This piece looks great! It looks awesome with the addition of the shaft. I am looking forward to seeing the languettes!
| Tim Lison wrote: |
| This piece looks great! It looks awesome with the addition of the shaft. I am looking forward to seeing the languettes! |
Yes me too for obvious reasons. ;) :D :cool:
Thanks guys! Here are some process pics as promised. I ended up upsetting the socket on a drift to open up the bottom of the socket and it turned out great. If there are any question about how or why I did something please feel free to ask!
 Attachment: 90.51 KB
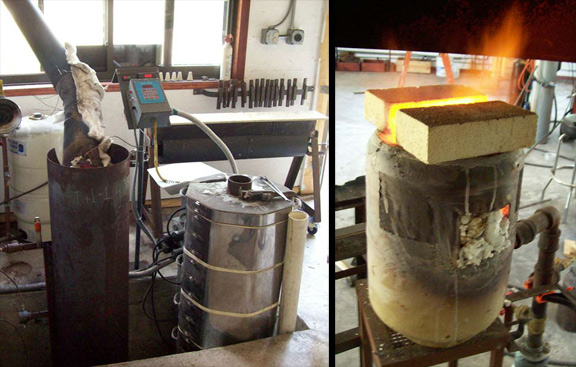
The heat treat setup, first the salt baths, then the forge with closed off doors and top removed for normalizing the socket and lugs.
Attachment: 89.53 KB
A look at the socket/lugs normalizing, in the forge, and cooling in air
Attachment: 66.04 KB
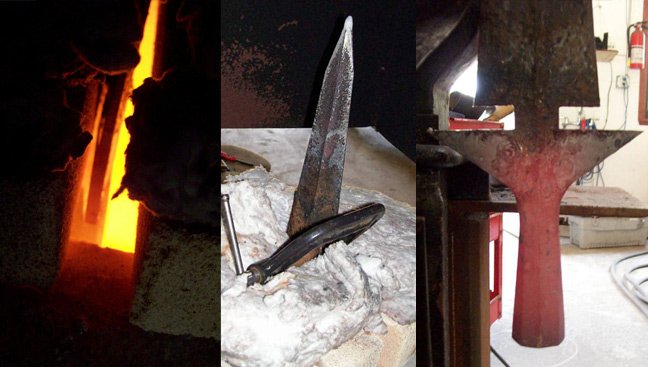
The blade normalizing in the air. The black marks are decarb from the previous cycles. As the salt drips away when cooling a small amount of O2 comes into contact with the surface. When doing only one heat and then quenching you get very little to no mark
Attachment: 84.44 KB
Post normalizing and first step in draw filing
Attachment: 95.74 KB
After draw filing the distal taper and the edge bevel/establishing the edge. I go to the grinder to push the face down and regrind the mid rib.
Attachment: 94.12 KB
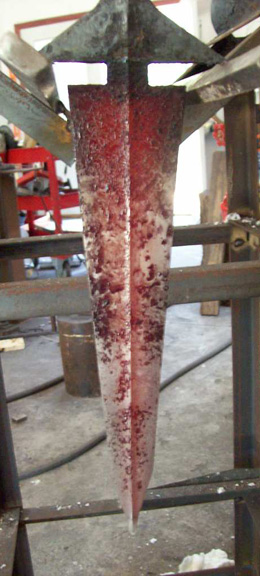
Here you can start to see the amount of material removed, how the final thickness is coming in.
Attachment: 95.92 KB
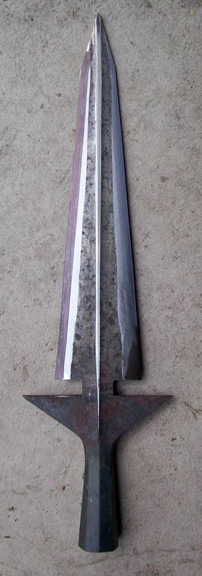
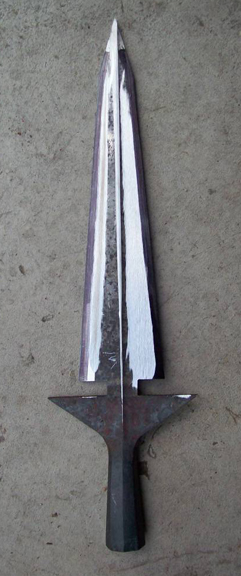
Here is the spear preheat treat, you can see the final thickness. The bevel between the face and the edge will get worked down in the final grind.
Attachment: 96.65 KB
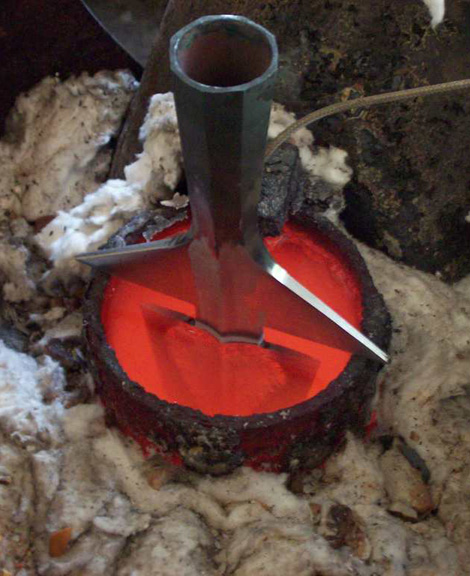
Here is the spear coming up to temp for the final time. Note the thickness of the socket at the base. Also nothing says I love you like a hot heart! :)
The heat treat setup, first the salt baths, then the forge with closed off doors and top removed for normalizing the socket and lugs.
A look at the socket/lugs normalizing, in the forge, and cooling in air
The blade normalizing in the air. The black marks are decarb from the previous cycles. As the salt drips away when cooling a small amount of O2 comes into contact with the surface. When doing only one heat and then quenching you get very little to no mark
Post normalizing and first step in draw filing
After draw filing the distal taper and the edge bevel/establishing the edge. I go to the grinder to push the face down and regrind the mid rib.
Here you can start to see the amount of material removed, how the final thickness is coming in.
Here is the spear preheat treat, you can see the final thickness. The bevel between the face and the edge will get worked down in the final grind.
Here is the spear coming up to temp for the final time. Note the thickness of the socket at the base. Also nothing says I love you like a hot heart! :)
| Tim Lison wrote: |
| This piece looks great! It looks awesome with the addition of the shaft. I am looking forward to seeing the languettes! |
I have to agree with TIm. You do not get the full impact until you do see it on the haft. It goes from being a great looking piece to a truly awesome looking piece. I would hate to have to face this on the field in a life or death struggle. Thank God I will never have. Unless I decide to invade Canada for some reason. :D
Scott
| Scott Kowalski wrote: | ||
I have to agree with TIm. You do not get the full impact until you do see it on the haft. It goes from being a great looking piece to a truly awesome looking piece. I would hate to have to face this on the field in a life or death struggle. Thank God I will never have. Unless I decide to invade Canada for some reason. :D Scott |
Yup, I'll be the guy in the middle of the bridge stopping the Abrams Tanks with my magic metal cutting partisan. ;) :D :cool:
Seriously: This is a SERIOUSLY awesome looking spear and the pics showing the whole thing take shape is very educational and fascinating. :D :cool:
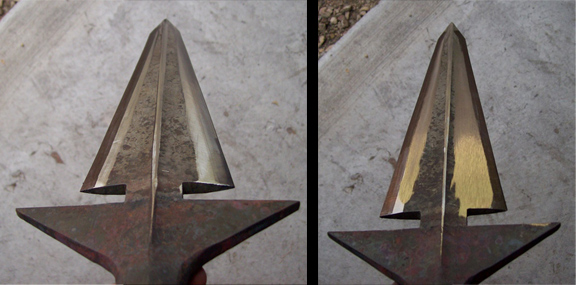
Designwise the central ridge does what I want it to do and that is making the head strong especially where the head narrows between the main blade and the lugs: The ridge stays at maximum thickness over this gap that would be a weak point without a ridge.
I started cutting in my edge today and as always I did a little test to make sure I've got the hardness I want. Of course I always get a little nervous prior to testing since if it fails, 9 times out of 10 it means start over. I struck the edge into the corner of a steel plate, lightly at first, then working my way up to a good firm strike, then running my finger nail on the edge to see if there is any damage to the edge. No damage today!
I'll continue to work on the final grind today and tomorrow. There is so much going on at the socket to lug transition that getting the area to visually balance has proven to been a task, but it is getting there. When taking measurements everything is within .5mm which is pretty good, but visually it is still a touch off balance.
I'll probably do an update on Thursday as to how things are going. There isn't much to talk about when doing finishing work, and I'm still thinking about the best way to make the languetts so hopefully I'll have that worked out when the head is done.
| Jean Thibodeau wrote: | ||||
Yup, I'll be the guy in the middle of the bridge stopping the Abrams Tanks with my magic metal cutting partisan. ;) :D :cool: Seriously: This is a SERIOUSLY awesome looking spear and the pics showing the whole thing take shape is very educational and fascinating. :D :cool: Designwise the central ridge does what I want it to do and that is making the head strong especially where the head narrows between the main blade and the lugs: The ridge stays at maximum thickness over this gap that would be a weak point without a ridge. |
Remind me I want to be on your side Jean. That or get a nice bow and pick you off from a distance. I do not think that either of my A&A spears would hold up in a fight against that thing!
Scott
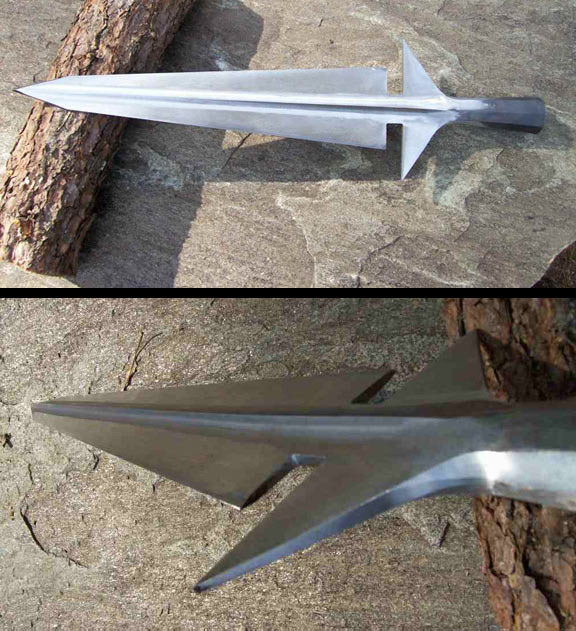
Hey Jean, we talked about "sharpening" the lugs on the spear to a chisel type point. I am thinking that the edge should flow on the bottom/angled edge of the lug so that it could be used in a "draw cut" fashion. This would leave the top, the face running parallel with the base of the blade dull and flat so if used to catch a blade or parry it won't cause damage to the lugs.
Are these your thoughts as well?
BTW, we are 5/8ths of an oz. over 2lb at the moment.
Are these your thoughts as well?
BTW, we are 5/8ths of an oz. over 2lb at the moment.
| Michael Pikula wrote: |
| Hey Jean, we talked about "sharpening" the lugs on the spear to a chisel type point. I am thinking that the edge should flow on the bottom/angled edge of the lug so that it could be used in a "draw cut" fashion. This would leave the top, the face running parallel with the base of the blade dull and flat so if used to catch a blade or parry it won't cause damage to the lugs.
Are these your thoughts as well? BTW, we are 5/8ths of an oz. over 2lb at the moment. |
Sounds good: Could be a fairly obtuse but sharp edge like a thick apple seed axe edge but not so fine as to be fragile.
It would also have a bit more bite against armour like a sharpened mace flange ?
Visually should also look good.
It has been a long day but I wanted to post a few shots of the spear, and proposed languetts. The spear is ready for final surface finishing (shape and lines are done), and the languetts (if Jean likes them) need to be cleaned up and recessed into the haft, then it is just make and add the nails and pins.
By the way, Jean, if you don't mind me asking, how tall are you? I am 6'1" and the point of the lugs are an inch or so above my eye, kind of made me start thinking of being very safe and careful!
Attachment: 129.14 KB
[ Download ]
Attachment: 164.84 KB
[ Download ]
Attachment: 129.9 KB
[ Download ]
Attachment: 144.39 KB
[ Download ]
By the way, Jean, if you don't mind me asking, how tall are you? I am 6'1" and the point of the lugs are an inch or so above my eye, kind of made me start thinking of being very safe and careful!
[ Download ]
[ Download ]
[ Download ]
[ Download ]
Beautiful work, Michael!
Better get your commisions ordered folks. It looks to me that the wait times and prices are going up!
Better get your commisions ordered folks. It looks to me that the wait times and prices are going up!
Looks great Michael! I love the languettes, the ridge and points are a great touch. Looking forward to seeing this one finished! You've got to be getting excited Jean!
Thanks for the kind words guys! I am looking at the spear right now and one thing that I am thinking about is if the edge languetts are too long compared to the flats... I can grind off the top set of points and move the edge languetts up so that they extend 3 inches below the other set, instead of the 8 inches they are now. I think in regard to function there will be no loss, but I think if they are longer they can act as a orientation guide for the hand.
Your thoughts?
Your thoughts?
I continue to shake my head in wonder. It's forged and properly heat treated. Not cast. Not MIM. It's beautiful from one end and terrifying facing the other. Fantastic work, Michael.
Looking really good Michael. These pictures really give a sense of just how intimidating this thing is. And beautiful as well.
RD Moore is correct people. I can only see Michael's line getting longer at this point. Especially after seeing this.
Scott
RD Moore is correct people. I can only see Michael's line getting longer at this point. Especially after seeing this.
Scott
That is beautiful work. I think "surrender" when I see it. Like the languettes (sp)
| Michael Pikula wrote: |
| Thanks for the kind words guys! I am looking at the spear right now and one thing that I am thinking about is if the edge languetts are too long compared to the flats... I can grind off the top set of points and move the edge languetts up so that they extend 3 inches below the other set, instead of the 8 inches they are now. I think in regard to function there will be no loss, but I think if they are longer they can act as a orientation guide for the hand.
Your thoughts? |
The languettes look fine as they are now and I like the idea that they give information about blade orientation.
( Longer also protects more of the shaft from cuts and I like the contrast with the alternating shorter languettes ).
Oh, I'm 5' 9" so the points of the lugs should be higher than eye level.
Had a look at the pics in the previous post and I'm seriously pleased and impressed. :D :cool:
The details of the languettes is one of those nice surprises I was talking about in previous posts and why it's a good thing I didn't micromanage the fine details while at the same time the things I liked best about the original I based my design on are all there and even " better ".
The only thing I haven't seen yet is the butt plate that should function mostly as a protection to the wood of the haft at the butt and also to be able to strike. A bit of weight to it also to act as a counterweight to the head but should not be too massive either.
I agree with Scott that it has a really intimidating presence as well as " killer " aesthetics. :D :cool:
absolutly splendid work !!! :)
...looks very hard,strong ...and murder :D ....pure evil !
...looks very hard,strong ...and murder :D ....pure evil !
Not only is that an outstanding spear, but Michael uses cowboy lump charcoal. That stuff is GREAT! :lol:
Page 3 of 6
You cannot post new topics in this forumYou cannot reply to topics in this forum
You cannot edit your posts in this forum
You cannot delete your posts in this forum
You cannot vote in polls in this forum
You cannot attach files in this forum
You can download files in this forum
All contents © Copyright 2003-2006 myArmoury.com — All rights reserved
Discussion forums powered by phpBB © The phpBB Group
Switch to the Full-featured Version of the forum
Discussion forums powered by phpBB © The phpBB Group
Switch to the Full-featured Version of the forum