I would like to know what knowledgeable scabbard makers assert is the correct way to finish the mouth or opening area. None of the beautiful examples at Albion's web site show the top scabbard area between the sword's guard and the scabbard core.
A local craftsman-knifemaker, who has seen many collectors' swords in Europe (his family is German and he returns often for European knife and trade shows), tells me that a piece of leather was slid onto the sword blade, trimmed to the smaller of the guard or scabbard top perimeter, and simply left on the sword to serve as a bumper when sheathing the sword. I have seen some photos on the internet of antique Naval swords for sale where there is indeed a piece of leather remaining on the blade.
I have recently recieved my Albion Crecy Grete (one of the last ones shipped just about 2 weeks ago) and am very pleased with it. I can not afford to purchase one of the custom scabbards at this point, but have made a wood core. This is a poplar wood core made from two hollowed slats. I have glued natural felt (sewn as a well fitted sock to the sword) to the interior, and nicely shaped the exterior. For better durability I laminated epoxy/ fiberglass over the exterior of the core. It looks good as is, but I want the authentic leather look similar to Albion examples. I have the vegtable tanned leather, some relatively medieval looking stampling tools (celtic know pattern, mariner's cross, etc.) that I plan to use to embellish the covering. Some type of a very thin sleeve to help guide the sword into the cloth (not accidentally catch and tear the felt away from the wood interior) would seem like a good idea.
Any tips or top view photos of a high quality scabbard (such as an Albion) would be very greatly appreciated.
Jared Smith
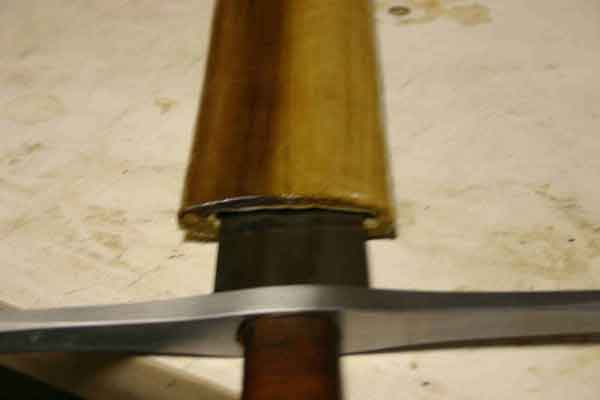
Here's a couple of photos of the mouth of the scabbard for my sword made by Peter Johnsson. They're a bit dark but I think you can see what's going on there.
[ Linked Image ]
[ Linked Image ]
I believe that the addition of a leather pad at the base of the swords blade is a fairly late development, and not something that would have been seen in the medieval period.
[ Linked Image ]
[ Linked Image ]
I believe that the addition of a leather pad at the base of the swords blade is a fairly late development, and not something that would have been seen in the medieval period.
Thanks for posting the photos.
The wood core appears to be stained, but otherwise no special treatment of the top end.
The quality of sculpting is extremely good on the Albion scabbard. That would add several hours work with a Dremel tool for most do it your selfers!
I have attempted to attach a photo of my home made effort.
Jared Smith
 Attachment: 7.57 KB
sword in core
The wood core appears to be stained, but otherwise no special treatment of the top end.
The quality of sculpting is extremely good on the Albion scabbard. That would add several hours work with a Dremel tool for most do it your selfers!
I have attempted to attach a photo of my home made effort.
Jared Smith
sword in core
| Quote: |
| The quality of sculpting is extremely good on the Albion scabbard. That would add several hours work with a Dremel tool for most do it your selfers! |
Just to clarify: that scabbard was also made by Peter.
The top of the scabbard is either stained or oiled, but the interior of the core isn't.
Jared-
The scabbard looks pretty good! If you happened to take "in progress" pics up to this point, I'd definitely be interested in seeing them. I'd guess others would as well.
I would assume that grinding/gouging/routing out the scabbard halves would be more difficult in order to better fit the fuller on this piece, though through a series of test-fits, it may be doable with some practice and patience. I may try...
One thing that should be mentioned is that only the mouth of the PJ scabbard is shaped to the blade not the whole interior..
| Patrick Kelly wrote: |
| One thing that should be mentioned is that only the mouth of the PJ scabbard is shaped to the blade not the whole interior.. |
How far down into the scabbard does this go, Patrick? My guess on why would be to decrease friction on the draw? I can see good purpose for the fit - security, less trash or rain gets down... am I on target here?
| Aaron Schnatterly wrote: |
| How far down into the scabbard does this go, Patrick? My guess on why would be to decrease friction on the draw? I can see good purpose for the fit - security, less trash or rain gets down... am I on target here? |
Yes, it's to aid in locking the sword in place while in the scabbard. There wouldn't be any need for it to run the full length of the scabbard. It appears to run perhaps one half of an inch down the interior.
Sorry I did not think to take photos. I may make another, and will photograph slats in progress if I do. The glass lamination is almost invisible and most people I have shown it too think it is a shame to cover it. I really wish the sword would just stay put if the scabbard were tipped upside down. Right now it slides at a rate of about 1" per second for the first second (turned completely upside down), then accelerates as the thickness of the sword's distal taper progressively clears more and more of the scabbard.
This is a description of how I made the wood core after reading several SCA web site suggestions for "kits";
I folded 100% cotton felt ($1.00 worth of 1/16" thick undied natural cotton felt from Wal Mart) over the sword edge, pinned it close to one edge, and used a sewing machine to create a single seamed sock within 1/8" of the sword's edge. The sewn sock was turned inside out with machine stiching located on the flat of the blade (not the edge as it was oriented when I pinned it and sewed it), but not aligned dead center where the sword point might cut the felt sock stiches each time it is sheathed.
I traced closely around the sock and sword to create the outline of a hollowed out area on 3/8" thick (planed from two $5.00 each 1/2" thick 4" x 48" slats purchased at Lowes) poplar slats. I also repeated the tracing on the back sides of the slats so that I would know where not to remove wood when shaping the glued core later. The Crecy Grete is over 1/4" thick on the ridges of the fuller near the guard, but averages about 1/4" thick at the diamond shaped center line where the fuller ends. Based on this, I used a 1/2" thick straight bit set to cut 1/8" deep and free hand routed the entire profile on each of two poplar slats. This is too deep at the tip (leaving the felt pretty loose when the slats are sandwhiched togather, and not deep enough on the edges of the fuller near the grip. I set the router bit to about 3/16" deep and milled a deeper channel just about 3/4" wide down the center line of the hollowed out area (only about half way down the sword length.) Using a Dremel type tool and grinding burr, I tapered from the deeper channel to the initial shallow channel. To pad this and make it fit better, I glued some narrow (about 1/4" wide) ribbons of felt into the taper and all the way down to the point on just one of the slats. I wrapped the sword and guard in wax paper and Scotch taped the wax paper seams. The interior hollowed out wood slats were liberally coated with excess wood glue that squeezed into and filled up the voids when clamped. Clamp pressure was needed when gluing, but the felt relaxes over time, plus resheathing of an oiled sword.
Subsequent shaping was done with a belt sander, then rotary orbit disc sander. Model airplane fiberglass cloth (3/4" ounce weight per yard nylon mesh costing around $5.00 for a yard) was wrapped over a coating of 30 minute epoxy. I fiberglassed this twice over 2 days. I can stand on the center of the core with my heel and not break it. I weigh right at 200 lbs. It will not break if my soft arse sits on it.
If anyone is interested, I will post a photo of the covered version of the scabbard.
Jared Smith
If I am understanding you concern correctly, my solution would be to have made the felt "sock" longer than needed and fold it over the top of the scabbard. You could then cover it in leather, and the felt would only show when they looked right at the mouth scabbard. If you did the triangular extention covering the guard (like on Albion's version), then the felt would be even less noticable. The down side to this is that the thickness of the felt would increase the outside diameter of the scabbard at the mouth and you might end up with a slightly raised locket-like effect. You might be able to chisel out a bit of the top of the scabbard so that there is a reccess to accept the felt and thus avoid this problem, but that will be dependant on how much material you left in the scabbard walls (I think you should have enough, though).
Thanks for all the info on how you made your scabbard. That is a project that I have been contemplating, but I'm not really in a possition to do it right now.
-Grey
Thanks for all the info on how you made your scabbard. That is a project that I have been contemplating, but I'm not really in a possition to do it right now.
-Grey
to answer a small question
I would assume that grinding/gouging/routing out the scabbard halves would be more difficult in order to better fit the fuller on this piece, though through a series of test-fits, it may be doable with some practice and patience. I may try...
One trick I would use is inletting black, its a transfer medium that is used in fitting gun actions to a stock when inletting, used just like prussian blue, to fit a scabbard to a ornate crossguard I would coat the crossguard in inletting black, slide it home to the scabbard, and tap it lightly with a rawhide or rubber mallet tight on the pommel, wich would impart the black to the scabbard mouth, then simply scrape away the blackened spots on the scabbard til it all fit well. You will know it fits well when you tap the pommel, withdraw the sword, and have a full blackened scabbard mouth, then just clean the black off the scabbard and crossguard and your done.
| Robin Buck wrote: |
| One trick I would use is inletting black, its a transfer medium that is used in fitting... |
Lots of uses for this similar concept, and one I had thought about late last night. Dentists also use this concept when finishing root canals or crowns, probably dentures, as well. Put a piece of something like carbon paper between the teeth, bite down. Any marks on the tooth show pressure/contact points from the tooth below. I'd bet it would work great. Could probably use carbon paper from an office supply store easily and get the desired result.
Another thought I had was to use a cuttlefish bone (what birds chew on - check the petstore). Press it down on the blade and you will get a good impression of the contour of the fuller. It's a one use and toss it away process, but it is clean.
Thanks for bringing this up!
what wood do you use? What tools to use? any online courses on the process?
I am of course referring to the carving of the two scabbard halves. I have no idea on how to make a scabbard.
thanks!
I am of course referring to the carving of the two scabbard halves. I have no idea on how to make a scabbard.
thanks!
Page 1 of 1
You cannot post new topics in this forumYou cannot reply to topics in this forum
You cannot edit your posts in this forum
You cannot delete your posts in this forum
You cannot vote in polls in this forum
You cannot attach files in this forum
You can download files in this forum
All contents © Copyright 2003-2006 myArmoury.com — All rights reserved
Discussion forums powered by phpBB © The phpBB Group
Switch to the Full-featured Version of the forum
Discussion forums powered by phpBB © The phpBB Group
Switch to the Full-featured Version of the forum