| Author |
Message |
Boris Bedrosov
Industry Professional

|
 Posted: Wed 15 May, 2013 1:42 pm Post subject: Posted: Wed 15 May, 2013 1:42 pm Post subject: |
 |
|
Although I haven't made any progress recently, I finally decided what the khanjar would look like:

Black horn, combined with brass fittings and floral-shaped washers (both represented in yellow); and inlaid mother-of-pearl diamonds (in white).
Also, I was lucky to find extremely cheap pieces of mother-of-pearl

Although they aren't the best mother-of-pearl I've ever seen and would need some additional sanding and polishing, the price for all four is just 1 Euro - far less than what I had had to pay if I've ordered them from abroad.
"Everyone who has the right to wear a long sword, has to remember that his sword is his soul,
and he has to separate from it when he separates from his life"
Tokugawa Ieyasu
Find my works on Facebook:
Boris Bedrosov's Armoury
|
|
   |
 |
Boris Bedrosov
Industry Professional
|
| Posted: Fri 26 Jul, 2013 3:30 pm Post subject: |
|
|
Although my intend is to continue to use my faithful pallash as a main weapon during the events, I decided to make another, totally new sword, as a part of this project.
I hadn't any doubts at all, what this weapon would look like. Targeting the middle of the 15th C. as a time period, there is a wonderful specimen, now kept it the Topkapi Palace Museum. This is the kilic of Sultan Mehmed II Fatih (The Conqueror)
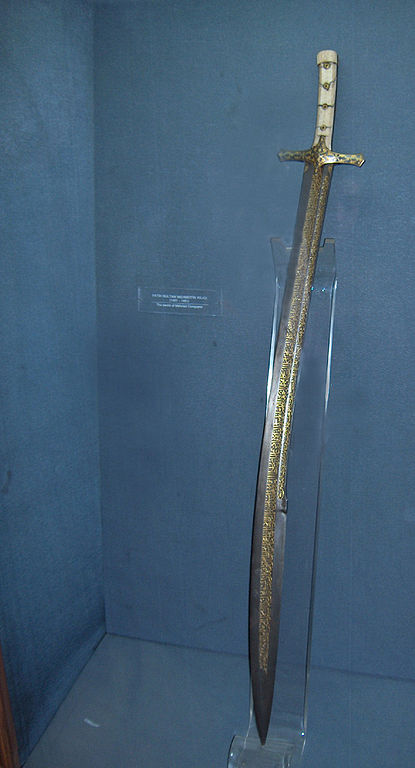
Picture taken from Wikipedia (http://upload.wikimedia.org/wikipedia/commons...api082.jpg)
Its dimensions - blade length of 104 cm and overall of 126, and the extensive gold inlay have always made me think that this sword is ceremonial. That's why I designed a smaller version with 88 cm long blade, keeping the proportions between blade-length and blade-wight.
So, the real work began......
After tracing the contours with a paper pattern

the blade was cut from 6 mm 65G leaf-spring steel.

Grinding, grinding and even more ..... grinding  , and the right side of the sword was ready. , and the right side of the sword was ready.

After restoring the blade-thickness margins (this helps me when working on the other side)

guess what followed - yes, more grinding again.
As on the right side, here on the left the most labour-intensive part was to grind the yelman.

This is because, in the kilic (and all kilic-like swords) the yelman is the broadest and the thinnest part of the blade, so a lot of metal have to be removed.
After the yelman the work was far more quicker and soon the blade got its distal taper.

"Everyone who has the right to wear a long sword, has to remember that his sword is his soul,
and he has to separate from it when he separates from his life"
Tokugawa Ieyasu
Find my works on Facebook:
Boris Bedrosov's Armoury
|
|
|
|
|
Randall Moffett

|
| Posted: Sat 27 Jul, 2013 5:32 am Post subject: |
|
|
You are a master. Just love seeing your updates! The dagger looks wonderful. I cannot wait to see the sabre finished!
RPM
|
|
|
|
|
Boris Bedrosov
Industry Professional
|
| Posted: Sun 28 Jul, 2013 12:05 pm Post subject: |
|
|
What I did next was to trace all the lines on the blade. These lines mark the boundaries between the fullers and the edges.

The work was a little bit tricky - some of the lines run parallel of the cutting edge, some are parallel of the spine, while third aren't parallel of nothing. But regardless this the work was done on both sides.
Some more grinding took place and the cutting edges - the main and that of the yelman - were soon ready.

This pictures was taken after the central line of the main fuller was made; that's why its visible here.
Speaking about the fullers, I tried to make the upper ones with scrabbler (I don't know if this is the real word used in English for this tool, or I've just invented it). So, I mean I tried to cut them with a cutting tool, which goes up and down along the blade, parallel to one of the edges, in this particular case - the spine.

It was very interesting to me to work in this manner - you maybe know, I like to do the things in the old-fashion ways, and this was something new to me - but unfortunately, the tool I used didn't allow me to work very close to the spine, while its cutting edge was not of best quality and quickly gave way. Although these constrains, this was a good experience and new knowledge to me.
The main fuller was made in already tested consequence - the central line was marked and cut with 1 mm cutting disc, widened with 3 mm one and after that with grinding disc I removed as much metal as it was possible.

On this closer image

you could see both fullers. Of course, there is a lot of work that has to be done on them.
"Everyone who has the right to wear a long sword, has to remember that his sword is his soul,
and he has to separate from it when he separates from his life"
Tokugawa Ieyasu
Find my works on Facebook:
Boris Bedrosov's Armoury
|
|
|
|
|
Boris Bedrosov
Industry Professional
|
| Posted: Thu 01 Aug, 2013 2:38 pm Post subject: |
|
|
The kilic finally took shape

The tang

The four rivets at the left are for the eventual pommel - I'm not sure if I would be able to balance the weapon just with the guard and grip. So, I'm ready to add a little pommel at the far end.
The fullers at close range

And the yelman

And another shot of the whole blade, this time from strange, but interesting point of view

There is a quite more work to be done additionally, especially on the fullers, but my intend is do it after the heat-treatment. For now, I want just to normalize the blade before shipment.
"Everyone who has the right to wear a long sword, has to remember that his sword is his soul,
and he has to separate from it when he separates from his life"
Tokugawa Ieyasu
Find my works on Facebook:
Boris Bedrosov's Armoury
|
|
|
|
|
|
Henrik Granlid
|
| Posted: Sat 03 Aug, 2013 1:24 am Post subject: |
|
|
|
Would it, perhaps, be possible to balance it with some sort of lead or steel inlay in the wooden core? Or would this make the core too fragile?
|
|
|
|
|
Boris Bedrosov
Industry Professional
|
| Posted: Sat 03 Aug, 2013 6:27 am Post subject: |
|
|
This could be possible indeed, but what amount?
In any case, there will be some additional metal at the grip - brass washers for the rivets and copper and brass plates between the tang and the scales of the grip (this is traditional way here on the Eastern Balkans, especially at the expensive weapons).
And although I made the distal tapper solely "on feelings" (I didn't have any information about the tapper of the original), the result is very good. Now, the PoB is at about first one-third from the guard, which for the weapon with such yelman is very good.
I made some crude test, putting a makeshift guard on the blade. Although this was just a piece of steel, the result was very good - the PoB moved to about 10-15 cm from the guard, the kilij was quite hand-able and agile, relatively easy to control. The strike was powerful and potent - without sharpened edge the weapon easily cut half an inch branch of relatively soft wood.
"Everyone who has the right to wear a long sword, has to remember that his sword is his soul,
and he has to separate from it when he separates from his life"
Tokugawa Ieyasu
Find my works on Facebook:
Boris Bedrosov's Armoury
|
|
|
|
|
|
Isaac D Rainey
|
| Posted: Sat 03 Aug, 2013 8:16 am Post subject: |
|
|
|
What kind of tools do you use to make the sword?
|
|
 |
|
Boris Bedrosov
Industry Professional
|
| Posted: Mon 05 Aug, 2013 4:19 pm Post subject: |
|
|
The primary tool is my angle-grinder. Matched with appropriate discs, I use it for cutting, grinding and all such heavy-duty activities. I use relatively small (in order to work with one hand when necessary) BOSCH machine with 750 Watts electric motor.
The finishing is combined - up to the grit 180 on a belt-sander, after that - by hand with appropriate stones and sanding papers (with hard-wood blocks).
The fullers are made mainly with a DREMEL rotary tool with different accessories attached. The sets and working steps were discussed here (the post you want to see is somewhere in the middle)
http://www.myArmoury.com/talk/viewtopic.php?t...highlight=
Some measuring and drawing tools - caliper (absolutely mandatory), rulers, permanent markers, pencils.
Some additional tools - files, central punch, drill-press, vice, C-clamps, long wooden block, buffing wheel with polishing compounds and all stuff like this I might use during work.
And last, but not least - my protective gear.
"Everyone who has the right to wear a long sword, has to remember that his sword is his soul,
and he has to separate from it when he separates from his life"
Tokugawa Ieyasu
Find my works on Facebook:
Boris Bedrosov's Armoury
|
|
|
|
|
Boris Bedrosov
Industry Professional
|
| Posted: Wed 07 Aug, 2013 2:04 pm Post subject: |
|
|
For the normalization process I constructed this

scratch-built furnace. In German language there's a special word for such - "ersatz" or an inferior substitute for an item. In this case the "ersatz" was built by several autoclaved aerated concrete blocks, bricks and roof-tiles.
Although at the back my Dad smiles at my bright idea, in one or another way, with some flaws (due to the design), it works

The chamber is too big and the propane torch is only one, but with some help the blade took its baptism by fire.

I expected even greater bending after first normalization, so now everything was OK.
This was followed by an alignment and a second pass in the furnace. After it the bent was lesser - yeah, the "ersatz" actually works.
So, now the blade is packed and ready to be shipped for the heat-treatment.
"Everyone who has the right to wear a long sword, has to remember that his sword is his soul,
and he has to separate from it when he separates from his life"
Tokugawa Ieyasu
Find my works on Facebook:
Boris Bedrosov's Armoury
|
|
|
|
|
|
Bartlomiej Jakubiec
|
| Posted: Sun 18 Aug, 2013 4:18 am Post subject: |
|
|
|
Dear Boris, please, can you tell how your scrabbler tool works? I mean, how it is supposed to grind metal, and i consequence make fuller?
|
|
|
|
|
Boris Bedrosov
Industry Professional
|
| Posted: Mon 19 Aug, 2013 11:59 am Post subject: |
|
|
The construction of the scrabbler is similar to an ordinary carpenter's bench plane and in many ways it works similarly to it.
They both share the same basic ideas - as the scrabbler/plane glides over the metal/wood, the angled blade shaves the surface, thus creating the desired finish - flat and smooth on the wood or a fuller (in our case) on the metal.
The scrabbler on the picture is of very basic design - it was created from scrap without any technical plan in a matter of a couple of hours. On the left is the cutting tool, bolted between two vertical metal planks; with the slotted horizontal plank on the right you could adjust the distance from the weapon's edge - this is done with the wingnut. On the reverse side (not visible on this picture) a ball-bearing is bolted to the horizontal plank - its purpose is to facilitate the movement up-and-down alongside the edge.
"Everyone who has the right to wear a long sword, has to remember that his sword is his soul,
and he has to separate from it when he separates from his life"
Tokugawa Ieyasu
Find my works on Facebook:
Boris Bedrosov's Armoury
|
|
|
|
|
Boris Bedrosov
Industry Professional
|
| Posted: Tue 20 Aug, 2013 12:38 pm Post subject: |
|
|
Some work on the washers for the khanjar and the kilij (actually, recently I decided to make them as a pair - a saber and a dagger with as much as possible resemblance in their hilts)

From top left clockwise: the disks are drawn on a bronze sheet and drilled; cut and edges beveled; after the initial sanding; lines marked; the disk is chiseled; the leaves of the flower are initially cut (down) then filed (up)
In the middle: the coin has a size aprox. the size of one Euro.
"Everyone who has the right to wear a long sword, has to remember that his sword is his soul,
and he has to separate from it when he separates from his life"
Tokugawa Ieyasu
Find my works on Facebook:
Boris Bedrosov's Armoury
|
|
|
|
|
|
Bartlomiej Jakubiec
|
| Posted: Sun 25 Aug, 2013 2:03 am Post subject: |
|
|
|
But what is the cutting tool in scrabbler? Grinding stone?
|
|
|
|
|
Boris Bedrosov
Industry Professional
|
| Posted: Mon 26 Aug, 2013 11:39 am Post subject: |
|
|
Oh, sorry! I knew, I've missed something in my previous post.
The cutting tool is made from some HSS (high-speed steel) tool - in this particular case from drill-bit. As I was not satisfied by its performance (although it's possible the drill-bit itself was not from best quality) for the next time I plan to use some metal lathe tool-bit.
"Everyone who has the right to wear a long sword, has to remember that his sword is his soul,
and he has to separate from it when he separates from his life"
Tokugawa Ieyasu
Find my works on Facebook:
Boris Bedrosov's Armoury
|
|
|
|
|
Alex Cerioli

|
| Posted: Mon 26 Aug, 2013 12:08 pm Post subject: |
|
|
|
Amazing thread...regarding the scimitar, didn't the Turk get the curvature through differential hardening like in the japanese swords?
|
|
|
|
|
Boris Bedrosov
Industry Professional
|
| Posted: Tue 27 Aug, 2013 2:32 pm Post subject: |
|
|
| Alex Cerioli wrote: | | Amazing thread...regarding the scimitar, didn't the Turk get the curvature through differential hardening like in the japanese swords? |
I've never heard about this. But I'll check some sources, and if come with a result I would post here.
Also, if the blade was differentially hardened there should be some kind of border (like the hamon in the Japanese swords). There is no such thing in all kilij swords I've ever seen - both in the museums and on high-quality (with great detail) pictures.
"Everyone who has the right to wear a long sword, has to remember that his sword is his soul,
and he has to separate from it when he separates from his life"
Tokugawa Ieyasu
Find my works on Facebook:
Boris Bedrosov's Armoury
|
|
|
|
|
Boris Bedrosov
Industry Professional
|
| Posted: Mon 09 Sep, 2013 5:52 am Post subject: |
|
|
For the fittings of the khanjar I used pieces of standard brass pipe. As its perimeter was just a bit bigger than needed (approx. with 4-5 mm), I cut the pieces lengthwise and silver brazed them again.
After some minor filing, the tubes were fitted in their places.

The scales and the separator were glued with epoxy, temporary bolted to the blade and clamped with G-clamps. Before that the separator was filed with some decorative work - actually nothing special, just straight cut - half-moon left - straight cut - half-moon right.

The separator doesn't look much good - the sheet is somewhat thin and the cuts are widely-spaced; but in anyway it's better than nothing.
"Everyone who has the right to wear a long sword, has to remember that his sword is his soul,
and he has to separate from it when he separates from his life"
Tokugawa Ieyasu
Find my works on Facebook:
Boris Bedrosov's Armoury
|
|
|
|
|
Boris Bedrosov
Industry Professional
|
| Posted: Mon 09 Sep, 2013 12:06 pm Post subject: |
|
|
Originally, this post should be a part from the previous one, but while writing it my daughter rushed into the room like a hurricane, so I haven't nothing to do but to post what I had done so far rather than losing everything.....
These

are the parts of the fittings before brazing. The silver ring in the middle will be destroyed in order to be mounted on the upper fitting.
As I have quite limited experience with silver so far, this will be done by a friend of mine, who is a silversmith.
"Everyone who has the right to wear a long sword, has to remember that his sword is his soul,
and he has to separate from it when he separates from his life"
Tokugawa Ieyasu
Find my works on Facebook:
Boris Bedrosov's Armoury
|
|
|
|
|
Boris Bedrosov
Industry Professional
|
| Posted: Fri 13 Sep, 2013 1:37 pm Post subject: |
|
|
The horn grip of the khanjar after finishing and first crude polish

I've got some white fibers - they are quite visible on the reverse side. Most of them will be covered by the mother-of-pearl inlays and the fittings.

These fibers usually are considered as a flaw in the horn (at least here in Bulgaria), but in anyway they make it to look good.
The washers were finished also (here are shown all of them - not only for the khanjar itself, but for the kilij). Some of them need additional cleaning - they've got some dirt between the leaves.

The first slot for the washer was cut - I have five more to do

And finally - this is it

It's missing only the rivet.
"Everyone who has the right to wear a long sword, has to remember that his sword is his soul,
and he has to separate from it when he separates from his life"
Tokugawa Ieyasu
Find my works on Facebook:
Boris Bedrosov's Armoury
|
|
|
|
|
|
|
You cannot post new topics in this forum
You cannot reply to topics in this forum
You cannot edit your posts in this forum
You cannot delete your posts in this forum
You cannot vote in polls in this forum
You cannot attach files in this forum
You can download files in this forum
|
All contents © Copyright 2003-2024 myArmoury.com — All rights reserved
Discussion forums powered by phpBB © The phpBB Group
Switch to the Basic Low-bandwidth Version of the forum
|

