| Author |
Message |
Kai Lawson

|
 Posted: Fri 13 Sep, 2013 6:50 pm Post subject: Posted: Fri 13 Sep, 2013 6:50 pm Post subject: |
 |
|
Oh man oh man--how that pops! What a great visual contrast, in terms of shape and color and texture. This is going to look GOOD (but we knew that, all of Mr. Bedrosov's creations look great)
"And they crossed swords."
--William Goldman, alias S. Morgenstern
|
|
  |
 |
Boris Bedrosov
Industry Professional

|
| Posted: Mon 16 Sep, 2013 12:54 pm Post subject: |
|
|
Some good progress was made yesterday and today.
All slots were cut off

and the remaining leaves were glued in

From mother-of-pearl were cut four diamonds

and a matching slot

This slot is almost only for technology test (yeah, I'm trying to remember what I've done a couple of years ago - it's almost the same as the dagger with camel bone grip with red coral inlays), so for now it's quite shallow.

Being almost a test, there are a lot more things to be done - for example my intend is to enclose the mother-of-pearl diamonds in brass cassette (again, I don't know if this is the correct English term - this means that at the end there will be a brass strip surrounding the diamond, which will result a metal boundary between the white and black).
"Everyone who has the right to wear a long sword, has to remember that his sword is his soul,
and he has to separate from it when he separates from his life"
Tokugawa Ieyasu
Find my works on Facebook:
Boris Bedrosov's Armoury
|
|
 |
|
Boris Bedrosov
Industry Professional
|
| Posted: Mon 23 Sep, 2013 1:31 pm Post subject: |
|
|
Well, the four slots for the mother-of-pearl inlays were already cut

And this

is what the grip will look like when finished.
On the next images you could see the famous cassette, enclosing the diamond


As this is only the beginning of this step, the things are quite crude so far.
"Everyone who has the right to wear a long sword, has to remember that his sword is his soul,
and he has to separate from it when he separates from his life"
Tokugawa Ieyasu
Find my works on Facebook:
Boris Bedrosov's Armoury
|
|
|
|
|
Boris Bedrosov
Industry Professional
|
| Posted: Fri 27 Sep, 2013 2:22 pm Post subject: |
|
|
The grip finally riveted with bronze rivets (I wish they were silver ones)


"Everyone who has the right to wear a long sword, has to remember that his sword is his soul,
and he has to separate from it when he separates from his life"
Tokugawa Ieyasu
Find my works on Facebook:
Boris Bedrosov's Armoury
|
|
|
|
|
Boris Bedrosov
Industry Professional
|
| Posted: Tue 01 Oct, 2013 1:08 pm Post subject: |
|
|
The heads of the rivets were filed flush

The first mother-of-pearl inserted and the cassette was closed

Personally for me, this step was interesting and challenging. Although I've made some inlays before (red coral in camel bone), these didn't incorporate any cassettes.
I know, I've made some mistakes here and the work looks somewhat crude and un-even, but as a first time - it's not bad at all.
"Everyone who has the right to wear a long sword, has to remember that his sword is his soul,
and he has to separate from it when he separates from his life"
Tokugawa Ieyasu
Find my works on Facebook:
Boris Bedrosov's Armoury
|
|
|
|
|
Boris Bedrosov
Industry Professional
|
| Posted: Wed 09 Oct, 2013 1:40 pm Post subject: |
|
|
Some progress with the khanjar
- The mother-of-pearls inlays were completed. Some skills, acquired previously with the first one and new, far more rounded tool led to better results:

- The fittings soldered, the ring - cut and straightened out:

"Everyone who has the right to wear a long sword, has to remember that his sword is his soul,
and he has to separate from it when he separates from his life"
Tokugawa Ieyasu
Find my works on Facebook:
Boris Bedrosov's Armoury
|
|
|
|
|
Boris Bedrosov
Industry Professional
|
| Posted: Sat 12 Oct, 2013 6:10 am Post subject: |
|
|
And some more:
* the fittings trimmed to size

* and the grip almost as it will look like soon

"Everyone who has the right to wear a long sword, has to remember that his sword is his soul,
and he has to separate from it when he separates from his life"
Tokugawa Ieyasu
Find my works on Facebook:
Boris Bedrosov's Armoury
|
|
|
|
|
|
Athanasios L
|
| Posted: Sat 12 Oct, 2013 3:44 pm Post subject: Thrilled by the detailed step-by-step work. Keep it up! |
|
|
Hi Boris,
I have been following your work on this project and I am absolutely thrilled. I am very interested in early Ottoman warfare and mail and plates armor in particular.
Do you have any more projects in mind to complete the Ottoman kit? A Tirpan (bardiche-like) axe or some Cirit javelins?
Keep up the good work!
Aἰὲν ἀριστεύειν καὶ ὑπείροχον ἔμμεναι ἄλλων
"Always strive for excellence and prevail over others"
Homer
|
|
 |
|
Boris Bedrosov
Industry Professional
|
| Posted: Thu 17 Oct, 2013 1:53 pm Post subject: |
|
|
Hi Athanasios!
I don't plan to make a tirpan or javelins.
I think the kilij and khanjar are quite enough for this project. For now I don't need other wepons.
"Everyone who has the right to wear a long sword, has to remember that his sword is his soul,
and he has to separate from it when he separates from his life"
Tokugawa Ieyasu
Find my works on Facebook:
Boris Bedrosov's Armoury
|
|
|
|
|
Boris Bedrosov
Industry Professional
|
| Posted: Fri 25 Oct, 2013 11:12 am Post subject: |
|
|
And both fittings of the khanjar - sanded and filed on the top.
The remains of the silver ring are placed over the top of the rear fitting (through matching holes) for a test.

"Everyone who has the right to wear a long sword, has to remember that his sword is his soul,
and he has to separate from it when he separates from his life"
Tokugawa Ieyasu
Find my works on Facebook:
Boris Bedrosov's Armoury
|
|
|
|
|
Boris Bedrosov
Industry Professional
|
| Posted: Fri 25 Oct, 2013 2:30 pm Post subject: |
|
|
Well, it's time to start work over the last major element of this kit - the helmet.
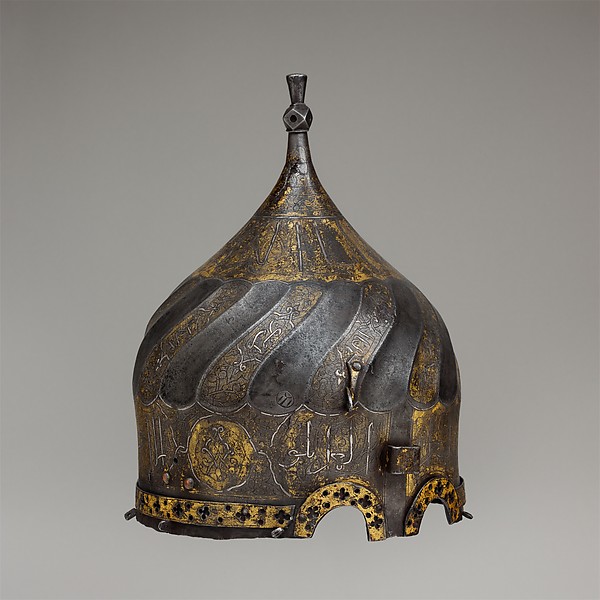
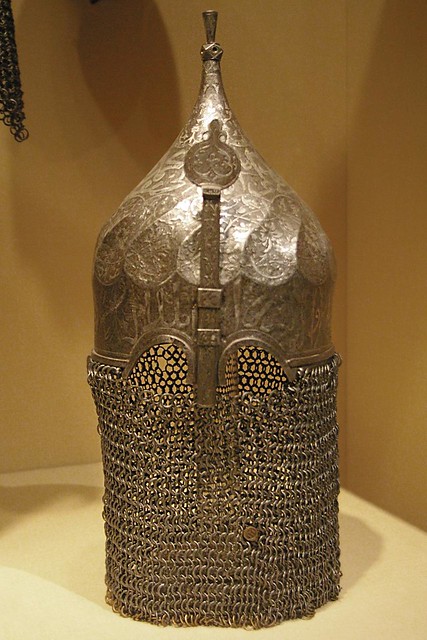
As a type I chose a helmet of very distinctive shape and form, which was also very wide-spread during the course of the whole 15th Century. This is known as a "turban helmet"
Just for a reference - here is a short description: A lower, cylindrical part with cut-off semi-circular eye-slots, which after a distinctive bulge and sharp inward turn becomes a low- to middle-grade cone (middle section). After another turn the helmet ends with a steep (almost as a spire) cone - upper section.
Here are several originals, just to show their outlook - images are taken from various places in the Net:

Well, as this form is not an easy one, I decided to work the steel over a cast, which follows the shapes of the bowl. The lower, cylindrical part was not an issue at all, that's why I excluded it when making the wooden master.
This is the cast, after some grinding - I really don't think I need a better surface.

The real work over the helmet started with marking and cutting of a semi-circular piece of steel (actually, the piece is just a bit bigger than the semi-circle)

This piece was bent into a cone

and the cone was welded with my MIG welding machine (well, don't criticize me much for the seam - I'm just learning how to use this apparatus)

"Everyone who has the right to wear a long sword, has to remember that his sword is his soul,
and he has to separate from it when he separates from his life"
Tokugawa Ieyasu
Find my works on Facebook:
Boris Bedrosov's Armoury
|
|
|
|
|
Boris Bedrosov
Industry Professional
|
| Posted: Sun 27 Oct, 2013 1:08 pm Post subject: |
|
|
And the hammering began....
The first step was to form the area of the future bulge. This was done in the depression of my dishing stump, working from inside of the cone.


As seen on the pictures (and also on these that will follow) the bulge is not yet distinctively shaped. It looks more like a cone, rather than cylinder, but I'll finish this shaping later.
The most important thing now was to "sit" the cone over the cast, because......
..... because, this cone you see actually is my second attempt.
As first-timer of its kind, I learn how to make this helmet in the process of making and respectively - I'm forced to learn from my mistakes. In this case, the mistake was slightly lesser (with about an inch at the perimeter) cone - lesser enough not to fit in the cast after its bulge area was made.
So, now this first cone is on the "shelf of shame" - the special place for my ruined stuff.
"Everyone who has the right to wear a long sword, has to remember that his sword is his soul,
and he has to separate from it when he separates from his life"
Tokugawa Ieyasu
Find my works on Facebook:
Boris Bedrosov's Armoury
|
|
|
|
|
Boris Bedrosov
Industry Professional
|
| Posted: Mon 28 Oct, 2013 2:26 pm Post subject: |
|
|
After the bulge area, I started to form the middle section of the bowl.
The first half was relatively easy, and despite some wrinkles, which I expected, but didn't pay much attention at (although later I wish I've done) , everything was OK

Coming closer and closer to the second turn, the work was getting harder and harder. That's why I introduced my propane-torch and continued working while the metal was red-hot. The middle section gradually was taking shape, while the wrinkles were becoming deeper.

Here I made my second mistake (once again - I'm learning how to make this helmet in the process of making).
About that time I should cut the bowl from the top to approx. the line of heat-bluing - one cut alongside the original welding seam; and another at opposite, 180 degree - in order to let the excessive metal to go somewhere out from the bowl. Then it would be easy to cut and remove it.
As I haven't done so, as a result I got some really nasty and mean wrinkles. I managed to smooth some of them with hot-red hammering, the others will be removed by the sanding, but some need to be filled with metal with the MIG welder before sanding.
Anyway, I made the cuts, then it was relatively easy (hhhm, easy???) to get rid off the excessive metal and to form the upper section of the bowl.


On these two images you could clearly see the cuts, wrinkles and the one half of the spire already formed.
Even closer

And at the end - both halves formed, waiting the cuts to be re-welded again

The black lines are marking some thoughts about the fluting of the helmet. In general, my initial idea is to achieve something similar to the fluting of the second and third of the originals, shown previously.
"Everyone who has the right to wear a long sword, has to remember that his sword is his soul,
and he has to separate from it when he separates from his life"
Tokugawa Ieyasu
Find my works on Facebook:
Boris Bedrosov's Armoury
|
|
|
|
|
Scott Hrouda

|
| Posted: Mon 28 Oct, 2013 7:31 pm Post subject: |
|
|
| Boris Bedrosov wrote: | | ... So, now this first cone is on the "shelf of shame" - the special place for my ruined stuff. |
Boris, you are such a perfectionist that I'd love to see the projects on your "shelf of shame".
(I'm guessing those items surpass the quality if the kit components I currently wear.) 
...and that, my liege, is how we know the Earth to be banana shaped. - Sir Bedevere
|
|
|
|
|
Boris Bedrosov
Industry Professional
|
| Posted: Tue 29 Oct, 2013 1:59 pm Post subject: |
|
|

Well, I think every maker has his own "shelf of shame" and the quality of the items there depends only on his own personal skills.
But I think also, it's quite normal someone to ruin stuff while working, especially when doing something for the very first time.
BTW, I really keep the items on the "shelf of shame" for a relatively short time there. Usually I re-work them when I have time to deal with. For example - I plan to work off a possible  technology for making a bowl of a chichak helmet with this ruined cone. technology for making a bowl of a chichak helmet with this ruined cone.
"Everyone who has the right to wear a long sword, has to remember that his sword is his soul,
and he has to separate from it when he separates from his life"
Tokugawa Ieyasu
Find my works on Facebook:
Boris Bedrosov's Armoury
|
|
|
|
|
David Lewis Smith

|
| Posted: Tue 29 Oct, 2013 2:25 pm Post subject: |
|
|
This is one of the best threads ever, I love following it, and wish I had something more to say than
WOW
your work rocks
David L Smith
MSG (RET)
|
|
|
|
|
Jean Thibodeau

|
| Posted: Tue 29 Oct, 2013 6:56 pm Post subject: |
|
|
Yes it does become difficult to say anything one hasn't already said many times about how impressive this whole Topic has been from the beginning, and continues to be fascinating and impressive, even when mistakes are made, learned from and then corrected or re-done.
There are two skills/talents involved in making a very sculptural object, the first is being able to visualize and control the shape to match the shape one has in one's mind, and the second is learning the way the material can be pushed, cut, stretched or compressed without exceeding it's material limits to obtain the wanted shape.
You certainly have proved in the past many times that you can visualize a shape and get it done in the proportions and symmetry you wish to achieve, and you learn the characteristic of the materials you are using so that you can shape them with the control needed to achieve the wanted shape.
Now, one can always improve with knowledge and practice so that it becomes easier to do with any given material.
You can easily give up your freedom. You have to fight hard to get it back!
|
|
|
|
|
Boris Bedrosov
Industry Professional
|
| Posted: Fri 01 Nov, 2013 2:28 pm Post subject: |
|
|
Thanks a lot, guys!
I really appreciate your positive feedbacks.
One interesting thought, Jean's words brought me through....
One of the best contemporary Bulgarian knife-smiths (who is personal friend of mine) told me once, it took him about 7-8 years to "start to understand the work" - to know what to do and how to do it, knowing the results he wants to achieve at the end.
Well, then I didn't believe neither understand his words, but now 7-8 years later I am about to say the same - knowing the results, I already know what and how to do it.
OK - there always will be a "shelf of shame" - it's quite inevitable; I would say - it's normal. For me personally, is more important to work, to work hard despite the mistakes made but to learn from them; and to read, read, read......
The results - well, they are just a next horizon.
"Everyone who has the right to wear a long sword, has to remember that his sword is his soul,
and he has to separate from it when he separates from his life"
Tokugawa Ieyasu
Find my works on Facebook:
Boris Bedrosov's Armoury
|
|
|
|
|
Boris Bedrosov
Industry Professional
|
| Posted: Sun 05 Jan, 2014 3:08 pm Post subject: |
|
|
Hmmm, very strange!
Likely I've forgotten to post some minor, but important step made a long time ago.
Well, these are the weldind seams of the spire
* the beginning - here I use locking pliers in order to fit two halves

** one of the seams - ready and partialy sanded

"Everyone who has the right to wear a long sword, has to remember that his sword is his soul,
and he has to separate from it when he separates from his life"
Tokugawa Ieyasu
Find my works on Facebook:
Boris Bedrosov's Armoury
|
|
|
|
|
Boris Bedrosov
Industry Professional
|
| Posted: Sun 05 Jan, 2014 3:52 pm Post subject: |
|
|
OK, I already have the upper section of the helmet ready - cut, bent, welded, shaped and formed.
After some re-shaping of the bulge area and some minor planishing (I decided I really didn't need to go further so far) I've got some nice piece of steel.

I tried several variants of the arrangement of the fluting and finaly stopped my choice on the one, well-visible on the picture - some trapezoid pattern with middle-grade inclination.
As my initial idea was to weld wire brackets inside the piece and to form the fluting from the outside, I drew the grid lines

and even cut and shaped 20 wire brackets

When several of them were welded in place and the work - started, I was un-pleasantly surprised that the wire is actually soft (although some initial tests) and deforms relatively quick.
Then I tried another way - I shaped the pattern from thick (3.5 mm) galvanized wire and welded it directly over the steel cast.

As I would move the piece in one direction only when working, I decided I need one side (right on the picture) with really minor, almost drops, weldings; while the other one (on the left), plus top and bottom could get some strong welding seam. Additioally, the "drops" on the right were filed and smoothed.
First two are ready - and the flash reveals each single unevenness of the surface

"Everyone who has the right to wear a long sword, has to remember that his sword is his soul,
and he has to separate from it when he separates from his life"
Tokugawa Ieyasu
Find my works on Facebook:
Boris Bedrosov's Armoury
|
|
|
|
|
|
|
You cannot post new topics in this forum
You cannot reply to topics in this forum
You cannot edit your posts in this forum
You cannot delete your posts in this forum
You cannot vote in polls in this forum
You cannot attach files in this forum
You can download files in this forum
|
All contents © Copyright 2003-2024 myArmoury.com — All rights reserved
Discussion forums powered by phpBB © The phpBB Group
Switch to the Basic Low-bandwidth Version of the forum
|

