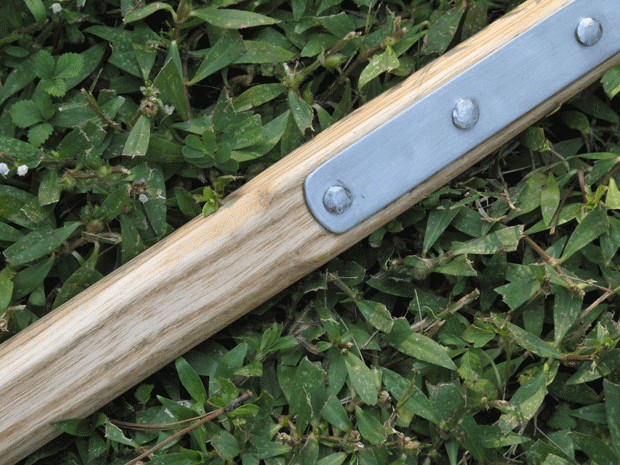
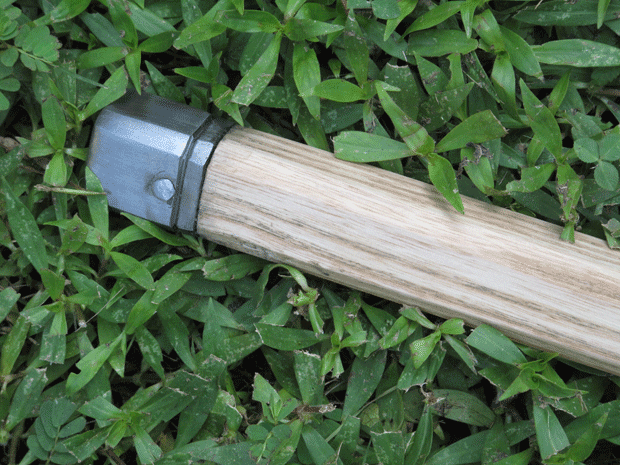
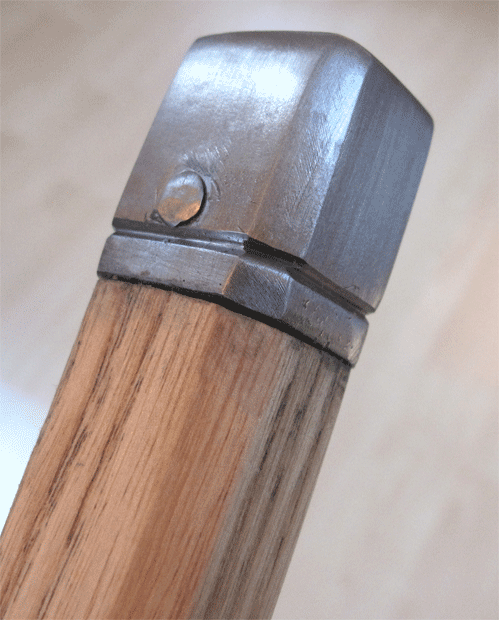
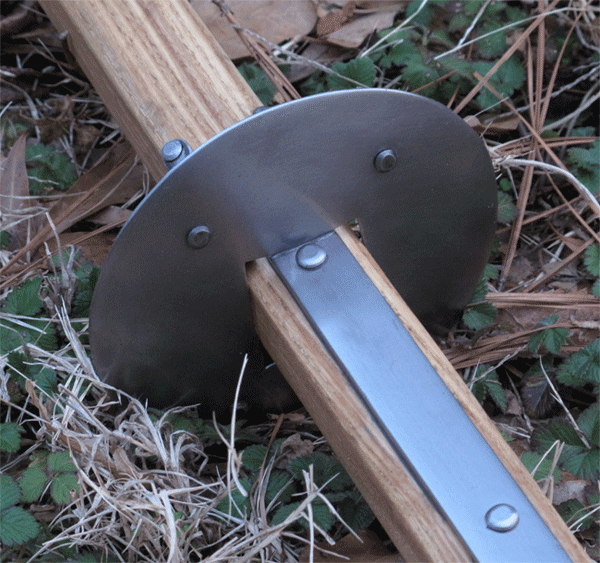
I'm back to nails, and the reason will be relevant to similar projects. The langets on this piece are quite thin (easily deformed by riveting) and the holes are countersunk for the original screw heads. There's almost no support for the rivet (nail) end, and the shaft of the nail is necessarily of small diameter. That spells a fast bend rather than a neat peen, which I discovered the hard way. So, instead of wasting the nails I'd prepared (by peening the head ends to look wrought) I simply cut them back to less than half the thickness of the haft and created an equal number of new nails for the other side. That's how langets were secured originally, but it seems a bit dicey to me (and some period depictions of combat show sprung langets) so I'm going to JB Weld the socket and full length of the langets, then fill the pilot holes with JBW and drive the nails home.
Hi Sean. Probably a little late with this, but I no longer trust the wheelbarrow handles for the sort of thing you're doing. I had the same idea and used one for a godendag, and it quickly started showing cracks under the head. I wasn't using it hard, just destroying a flimsy sheetmetal pail, and within minutes it was no longer safe to swing around.
I see you're in Alabama. If I were you, I'd go out of town a couple of miles and find a small hickory sapling on the side of the road. Way better wood for impact weapons. I've never had one break on me, even with some pretty seriously abused polearms.
I see you're in Alabama. If I were you, I'd go out of town a couple of miles and find a small hickory sapling on the side of the road. Way better wood for impact weapons. I've never had one break on me, even with some pretty seriously abused polearms.
This project is almost complete. Photos soon! Still have some finish work on the steel and then linseed oil for the haft (I know...haft should be oiled before mounting, but I wanted unfinished wood for the epoxy). This is an exciting project and looks/feels great so far. 3lbs8oz. The nails worked out fine. I used about half a package of JB Weld in the head socket, "pommel," down the langets and in the nail holes. This think is NOT going to come apart and the epoxy is invisible. :D
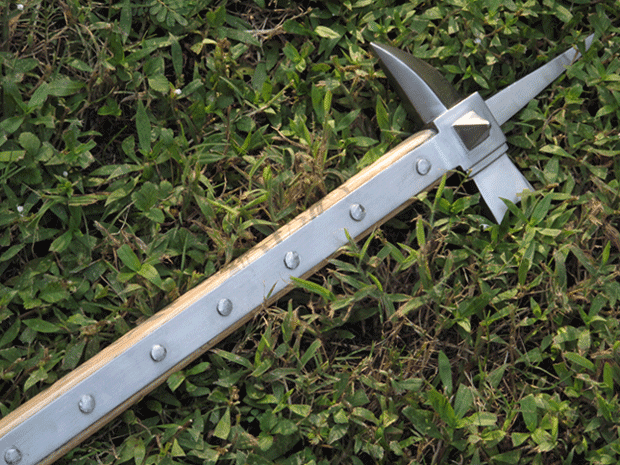
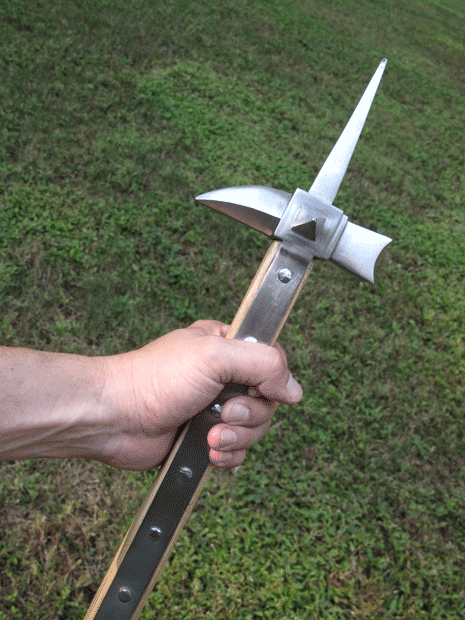
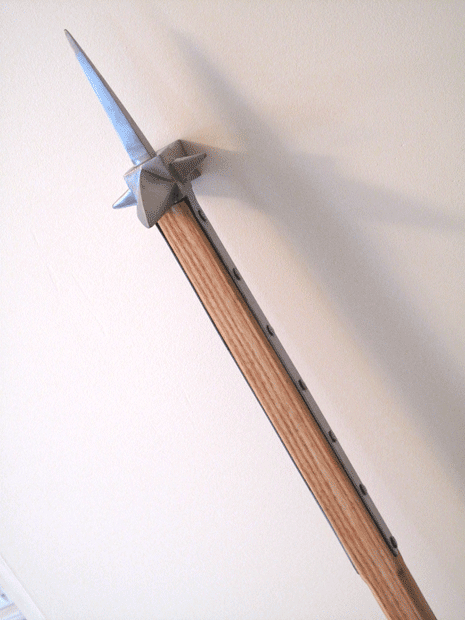
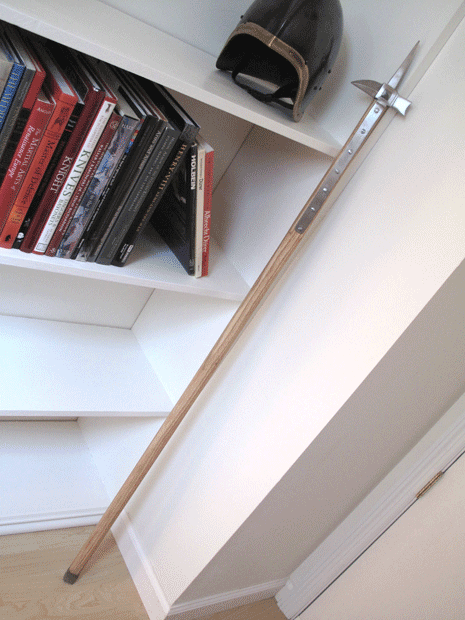
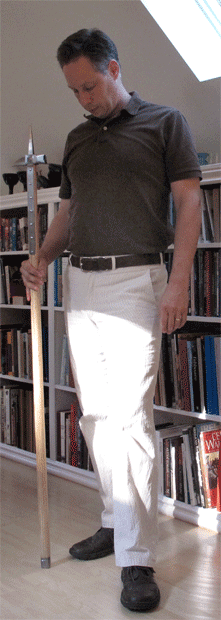
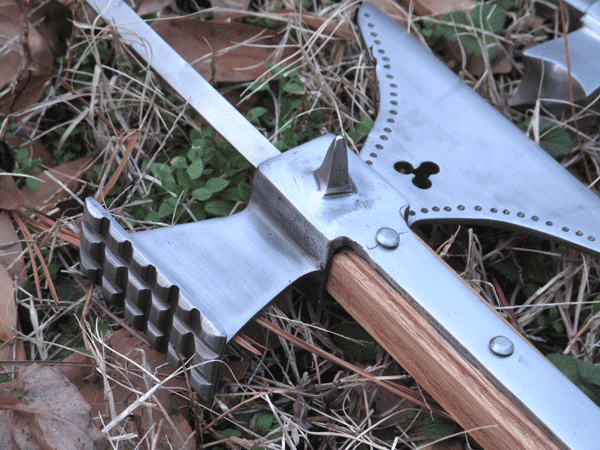
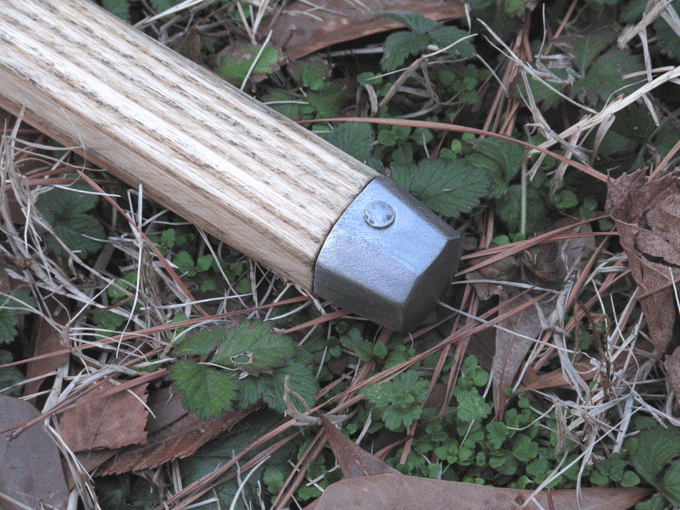
Done! What a pleasure to have a relatively straightforward and simple project for a change! Results are below, showing details and scale. I didn't take great care with the finish of the piece because I mean for it to be a relatively plain infantry weapon. It's very solidly built though. The only significant modification to the original parts is that I faceted the "pommel" to reflect the faceting of the haft (had to add back the filework at the top of the facets, of course). That cap is VERY thick, so there's plenty of material to allow for that treatment. You also see here the other project I was working on during this time--a new, dedicated arms and armour book case, with a very tall shelf in the middle that should be just the right height to display, say, a nice German or Italian breast with fauld. :D It's enticingly empty at the moment but I'm gradually moving my A&A books over through the course of this week. The juxtaposition is intentional--the books and research are the foundation of this work.
 Attachment: 220 KB
Attachment: 185.32 KB
Attachment: 185.15 KB
Attachment: 186.68 KB
Attachment: 156.39 KB
Attachment: 150.5 KB
Attachment: 130.23 KB
Attachment: 69.18 KB
Not bad, Sean! How did you go about making the nails for the langets?
Wow, that turned out great! The lines are very clean, lean and mean. :cool:
I personally prefer function over embellishment, and this piece is all about function. Your haft transition from octagonal to square cross section is very clean and well executed. The last photograph really provides a good sense of scale.
Viewing the finished piece, I had flash-backs to the gruesome wound pathologies detailed in Blood Red Roses and Armour from the Battle of Wisby. :eek:
Sean,
Pretty nifty outcome.
A couple of months back, I picked up a MRL 17th C. hammer thinking about doing something similar. Done nothing with it up to this point, however it has a few "battle scars" ...... used it to rescue my ancient cat from a storm sewer. Also have the same MRL piece you so beautifully modified. Your project inspired me to visit Lowe's yesterday for handles....so thanks to you, I am off and running!
Always follow your projects with interest. Your references, period illustrations and photos are a real bonus.
Regards,
Dan
| Josh MacNeil wrote: |
| Not bad, Sean! How did you go about making the nails for the langets? |
Those are just ordinary bright nails (non-galvanized). I put them in a bench vise with the heads resting flat against the top of the vise and shaped 'em a bit with the ball of a peen hammer. Then I just cut the shafts to the length I wanted. I would have preferred true rivets, but I couldn't make that work with the countersunk langet holes. These nails are otherwise wonderful to cold peen, though. Very easy.
| Daniel Sullivan wrote: |
| Your project inspired me to visit Lowe's yesterday for handles....so thanks to you, I am off and running! |
Please start a project thread once you get rolling. :) I really enjoy seeing works in process and the reading the commentary, suggestions and historical documentation fellow forumites provide. There's a wealth of knowledge (and a touch of silliness) here at myArmoury that I love to tap into. It helps keep a guy sane in a less-than-sane world. ;)
Just finished a couple more pollaxe projects so I figured I'd just add them here. One is a repeat of the axe described in this thread, so not much new to say or show about it. The other is a GDFB pollaxe head (as mentioned above), which is cheap but comes VERY rough and unusable as-shipped. I cleaned it up a great deal, added detail, mounted it and created the rondel.
Here's a tip for langet nails: If you have a more refined piece like the French pollaxe, the easiest way to finish the nail heads is to chamfer the edges on a grinder. That's MUCH easier and faster than the hammered look and still looks historically plausible.
Another tip--use a pipe cap for a pommel/butt cap. :D I wanted the hammer's cap for the pollaxe but didn't want to leave the hammer without a cap.
Attachment: 218.11 KB

Attachment: 209.5 KB
Attachment: 181.07 KB
Attachment: 159.64 KB

Attachment: 243.92 KB
Here's a tip for langet nails: If you have a more refined piece like the French pollaxe, the easiest way to finish the nail heads is to chamfer the edges on a grinder. That's MUCH easier and faster than the hammered look and still looks historically plausible.
Another tip--use a pipe cap for a pommel/butt cap. :D I wanted the hammer's cap for the pollaxe but didn't want to leave the hammer without a cap.
Your pollaxe turned out very nice!
You obviously spent a considerable amount of time cleaning up the GDFB head as it looks great. The custom rondel you created is very clean and free hammer marks. Again, you must have spent a great deal of time polishing the piece.
Nice execution; I love seeing them side by side. :)
You obviously spent a considerable amount of time cleaning up the GDFB head as it looks great. The custom rondel you created is very clean and free hammer marks. Again, you must have spent a great deal of time polishing the piece.
Nice execution; I love seeing them side by side. :)
Yours was my inspiration, Scott! You know, I expected the rondel to be the hardest part but it turned out to be the easiest. I formed it cold on an anvil in about 10 minutes using the (rounded over) flat of a small ball pien hammer. Very few marks to clean up. No planishing at all and only a few passes with a sanding disc on a drill. The supports were easy, too. Just some welding rod, chopped up and heated to red.
Since I didn't want to inlet those thick langets my original plan was to cut channels for them in the rondel. Forgot the First Rule of the workshop: Measure twice, cut once. Made the haft hole too big on one axis, so had to close the shortest axis by spreading the steel to fill it. Worked perfectly and quickly. Wasn't able to make the chanells after all due to the changes, but it still looks decent.
Since I didn't want to inlet those thick langets my original plan was to cut channels for them in the rondel. Forgot the First Rule of the workshop: Measure twice, cut once. Made the haft hole too big on one axis, so had to close the shortest axis by spreading the steel to fill it. Worked perfectly and quickly. Wasn't able to make the chanells after all due to the changes, but it still looks decent.
Page 2 of 2
You cannot post new topics in this forumYou cannot reply to topics in this forum
You cannot edit your posts in this forum
You cannot delete your posts in this forum
You cannot vote in polls in this forum
You cannot attach files in this forum
You can download files in this forum
All contents © Copyright 2003-2006 myArmoury.com — All rights reserved
Discussion forums powered by phpBB © The phpBB Group
Switch to the Full-featured Version of the forum
Discussion forums powered by phpBB © The phpBB Group
Switch to the Full-featured Version of the forum