| Author |
Message |
Shahril Dzulkifli

|
 Posted: Fri 14 Mar, 2014 4:34 am Post subject: Sword Project Posted: Fri 14 Mar, 2014 4:34 am Post subject: Sword Project |
 |
|

This type of sword really takes me to the Renaissance period!
“You have power over your mind - not outside events. Realize this, and you will find strength”
- Marcus Aurelius
|
|
  |
 |
Julien M

|
 Posted: Fri 14 Mar, 2014 5:23 am Post subject: Posted: Fri 14 Mar, 2014 5:23 am Post subject: |
 |
|
Nice job Sean!
That calls for a wire wrap with Turkish knots...Are you going for that? I really like the combo complex hilt+sturdy blade, which is why I picked an A&A town guard. Not nearly enough replicas of these types around.
Cheers,
J
|
|
  |
 |
Sean Flynt

|
 Posted: Fri 14 Mar, 2014 6:58 am Post subject: Posted: Fri 14 Mar, 2014 6:58 am Post subject: |
 |
|
I haven't decided about the grip. Wire would certainly be appropriate and I know how to do it. I just need to order wire and experiment with some different sizes.
Then, I also have the wonderful leather you provided, which also would be appropriate for an English sword of the period. One of the Mary Rose complex-hilt swords had a grip with no wire binding and traces of fabric at top and bottom (tassles)?
I originally planned to use shagreen, but I think that's not the direction I want to go.
I've taken some time off to wrestle with a cat fence and to make a sword for my niece's birthday, but I'm hoping to finish this project by April 1.
-Sean
Author of the Little Hammer novel
https://www.amazon.com/Little-Hammer-Sean-Flynt/dp/B08XN7HZ82/ref=sr_1_1?dchild=1&keywords=little+hammer+book&qid=1627482034&sr=8-1
|
|
   |
 |
Sean Flynt

|
 Posted: Mon 31 Mar, 2014 8:03 am Post subject: Posted: Mon 31 Mar, 2014 8:03 am Post subject: |
 |
|
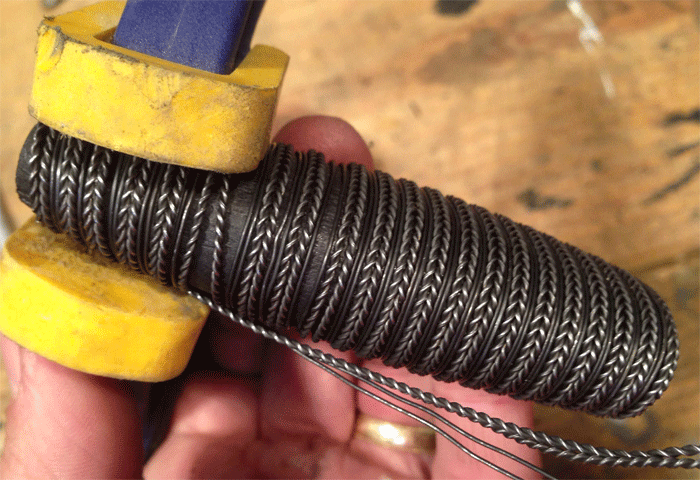
I got a good start on a wire binding, but ran into trouble on the "downhill" portion of the upper half of the grip. The wire just wouldn't stay on. I worked bottom-to-top, and wonder if I might have been smarter to work top-to-bottom. Needing to finish the project this weekend, I decided to postpone the wire for a more elaborate project that really needs it. Back to the plain leather for this one.
So, my theoretical knowledge and previous experience with wire was not sufficient for a full wire binding. If any of you can suggest a way around the problem of the wire slipping upward as the grip tapers, I'm all ears.
 Attachment: 215.97 KB Attachment: 215.97 KB
-Sean
Author of the Little Hammer novel
https://www.amazon.com/Little-Hammer-Sean-Flynt/dp/B08XN7HZ82/ref=sr_1_1?dchild=1&keywords=little+hammer+book&qid=1627482034&sr=8-1
|
|
   |
 |
Sean Flynt

|
 Posted: Mon 31 Mar, 2014 8:16 am Post subject: Posted: Mon 31 Mar, 2014 8:16 am Post subject: |
 |
|
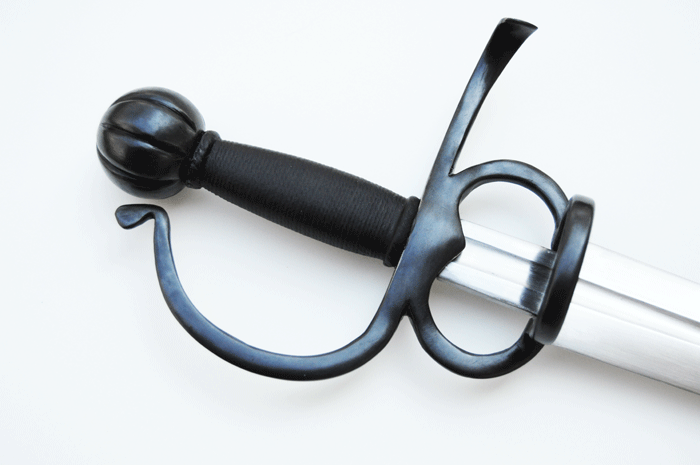
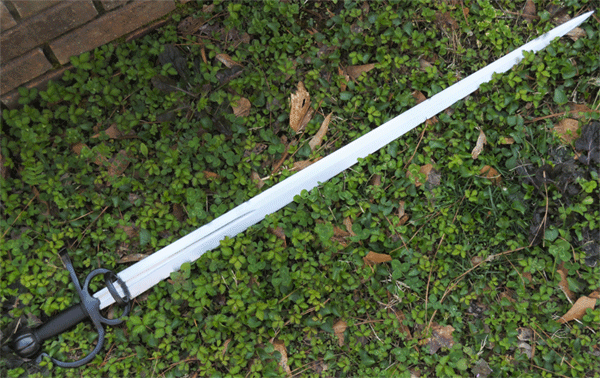
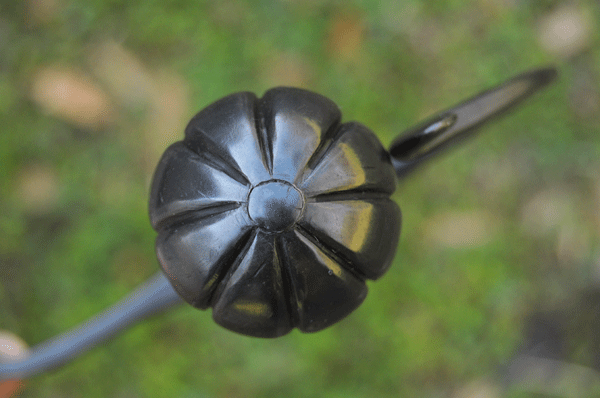
The finished project. I won't develop a scabbard right now, but might do that eventually.
I rushed assembly, and it shows in the peen, which is a bit sloppy. I assembled with epoxy and positioned the pommel, then realized I didn't know where my hammer was! I had to use a hammer less suited to the work. I also left a bit too much tang and had to pound it more than usual, resulting in work hardening and cracking in places. It looks better in person than it does here, but it's not very neat.
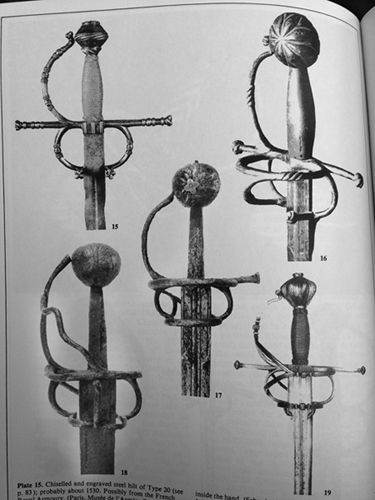
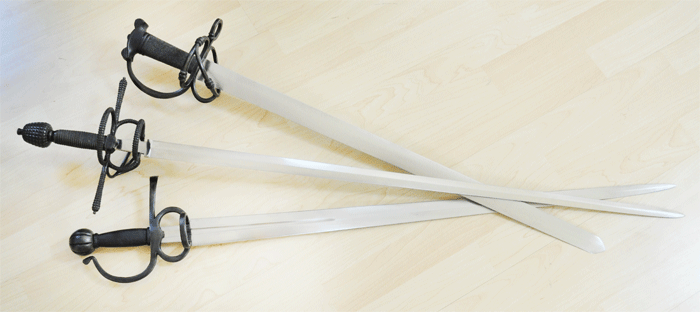
The historical photos (from Norman) show the various inspirations for this "fantasy" piece--Type 40 and various complex-hilt Continental swords.
The group shot is not meant to be a qualitative comparison 
Overall 39.5"
Blade 33.75"
Grip 3 3/8"
POB 4.5" below quillon block
COP 22.5" below quillon block
Weight 2.7 lbs.
 Attachment: 184.49 KB Attachment: 184.49 KB

 Attachment: 162.09 KB Attachment: 162.09 KB
 Attachment: 133.23 KB Attachment: 133.23 KB
 Attachment: 229.47 KB Attachment: 229.47 KB
 Attachment: 156.91 KB Attachment: 156.91 KB
 Attachment: 127.64 KB Attachment: 127.64 KB
-Sean
Author of the Little Hammer novel
https://www.amazon.com/Little-Hammer-Sean-Flynt/dp/B08XN7HZ82/ref=sr_1_1?dchild=1&keywords=little+hammer+book&qid=1627482034&sr=8-1
|
|
   |
 |
Glen A Cleeton

|
 Posted: Mon 31 Mar, 2014 2:30 pm Post subject: Posted: Mon 31 Mar, 2014 2:30 pm Post subject: |
 |
|
Looks very nice Sean.
Something you might try the next time for the wire is to start with a rod or dowel equal or smaller to the smallest diameter your handle will have. Wind more than you will use, then slide the coil off of the mandrel/dowel while working it to conform to the cross section once the handle is full. Then continue to wring and push it tight. Use a band clamp (smooth hose clamp). By pre wrapping at a smaller diameter, it will not be fighting you as much.
The more contoured wire grips must need a lot of patience and certainly more bending tools to form those spiral jobs.
Even just working round cord on a taper needs three hands at times.
Cheers
GC
.
|
|
  |
 |
Dean F. Marino

Location: Midland MI USA Joined: 24 Aug 2011
Posts: 229
|
 Posted: Mon 31 Mar, 2014 3:39 pm Post subject: Posted: Mon 31 Mar, 2014 3:39 pm Post subject: |
 |
|
This has GOT to be hard... on any grip, when wrapping steel, cord, or leather - the thing being wrapped will try to go towards the area with a smaller diameter. If you think about it, it's a consequence of whatever tension you are applying.
A pre-wrap could be a good thing with wire (I've never done this) - I can see that a pre-wrap should act to shape the wire.
If it still wants to "scoot" to the low diameter areas? I would consider going VERY SLOWLY - and ANCHORING the wrap each wind (are you using Epoxy? - 5 minute, and let it SET each wrap for a good 2 hours).
This is conjecture on my part - I have not doe a wire wrapped grip (yet).
In edhil, hai edhil. In edain, hai edain.
|
|
  |
 |
Bryan Heff

|
 Posted: Mon 31 Mar, 2014 3:41 pm Post subject: Posted: Mon 31 Mar, 2014 3:41 pm Post subject: |
 |
|
Maybe some sort of adhesive to lock the wire down...do a couple turns, wait, a bit more adhesive, more turns etc?
The church is near but the roads are icy. The tavern is far but I will walk carefully. - Russian Proverb
|
|
  |
 |
Bryan Heff

|
 Posted: Mon 31 Mar, 2014 3:48 pm Post subject: Posted: Mon 31 Mar, 2014 3:48 pm Post subject: |
 |
|
Ha, Dean beat me to it. The other thought is some kind of softer under layer, like leather to help with the friction of the wire wanting to slide down the wood. I have done a simpler wire wrap just a single twisted wire, maybe less taper on the grip and did not run into problems with it wanting to slide. You have more going on for sure.
I wonder if the direction of your wire twists plays a part in which way it wants to run...plays a part as well...if that makes sense?
My one attempt at a wire wrap.
http://www.sword-forum.com/viewtopic.php?f=18&t=20523
The church is near but the roads are icy. The tavern is far but I will walk carefully. - Russian Proverb
|
|
  |
 |
Boris Bedrosov
Industry Professional

Location: Bourgas, Bulgaria Joined: 06 Nov 2005
Posts: 700
|
 Posted: Mon 31 Mar, 2014 10:28 pm Post subject: Posted: Mon 31 Mar, 2014 10:28 pm Post subject: |
 |
|
Very nicely - congratulations!
And although you call this sword "fantasy", for me it's look historical enough and well-balanced. I really like it!
Waiting to see the scabbard.
"Everyone who has the right to wear a long sword, has to remember that his sword is his soul,
and he has to separate from it when he separates from his life"
Tokugawa Ieyasu
Find my works on Facebook:
Boris Bedrosov's Armoury
|
|
   |
 |
Julien M

|
 Posted: Tue 01 Apr, 2014 3:41 am Post subject: Posted: Tue 01 Apr, 2014 3:41 am Post subject: |
 |
|
I like it Sean, though I thought this would have deserved your wire wrap. Why the rush? 
It does not look like you cut the blade shorter - will you do that at some point?
Nice work on the pommel, I don't think your peen is messy at all.
Edit: blackened hilt are becoming your trademark, is this a matter of taste or a short cut to fast track the finish (I've used this before and I don't like hand sanding hence the question  ) )
|
|
  |
 |
Sean Flynt

|
 Posted: Tue 01 Apr, 2014 7:26 am Post subject: Posted: Tue 01 Apr, 2014 7:26 am Post subject: |
 |
|
The rush was self-imposed. I've just dragged this project out for far too long, mainly due to the small increments of time I've had to reduce that hilt. Only three bars of the original hilt remain. That seems crazy, and I'm not keen to work on another such project any time soon. If I could weld...
Another factor here is that the hilt is a compromise--not really what I would want it to be, ideally. Again, I didn't want to invest more time in solving the wire problem for something I was not terribly excited about. So, this one goes on the shelf until I need the space and decide to sell it. The good news is that I refined my finishing skills and took another step toward fabricating pommels.
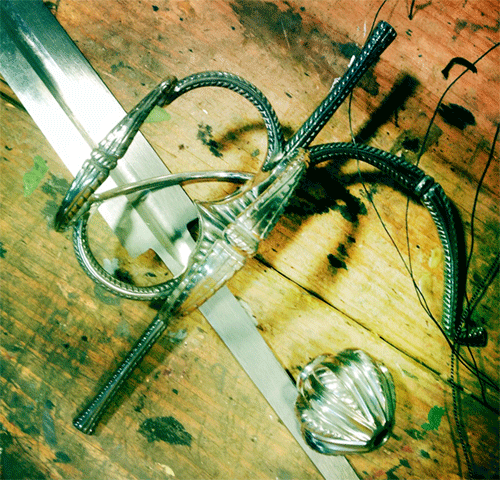
I'm also looking at this complex hilt sitting on the back of my bench. Mounted single-hand, it would really need a wire wrap. It's somewhat oversized, though, so I'm also considering removing the knucklebow and mounting it as a later Italian longsword/bastard sword. That also could use a wire binding, but it's not as essential.
That's not my next project. I need to work on something simple.
On the black hilts: This is aesthetic affinity, an attraction to forms and decorations that were common historically but not often reproduced. I've also gotten pretty good at it, so it's readily accessible. And although my collection is 3 black to 1 bright, that will be changing in the near future. If I come up with another German bastard sword I might sell the Type 40 (though I must emphasize that I don't make this stuff for sale--I make it to learn and scratch a particular creative itch). I like bright hilts, too, and don't want my collection to look like props from "Johnny Cash: Zombie Hunter".
 Attachment: 185.23 KB Attachment: 185.23 KB
-Sean
Author of the Little Hammer novel
https://www.amazon.com/Little-Hammer-Sean-Flynt/dp/B08XN7HZ82/ref=sr_1_1?dchild=1&keywords=little+hammer+book&qid=1627482034&sr=8-1
|
|
   |
 |
Sean Flynt

|
|
   |
 |
P. Frank

|
 Posted: Tue 01 Apr, 2014 11:46 pm Post subject: Posted: Tue 01 Apr, 2014 11:46 pm Post subject: |
 |
|
|
I think it is really quite lovely I must say.
|
|
  |
 |
|
|

