| Author |
Message |
|
Jesse Frank
Industry Professional
Location: Tallahassee, Fl Joined: 04 May 2005
Posts: 144
|
 Posted: Fri 20 May, 2005 5:29 am Post subject: Seax Tutoral Posted: Fri 20 May, 2005 5:29 am Post subject: Seax Tutoral |
 |
|
Hi everybody.
I introduced myself on another thread, but I'll do it again here 
Well, my name is Jesse Frank, and I have been involved in bladesmithing for several years. I do mostly migration era/viking stuff, but I've recently been diving into the japanese nonferrous world of mokume gane, and recently started in on a tanto, so we'll see where that takes me

I thought you all might get a kick out of a seax that I've been working on.
I decided I wanted to make a traditionally pattern welded seax out of one bar of mild steel, in preparation for my upcoming projects from my own self made iron.
It started out as a roughly 3' bar of mild steel, cut into 4" lengths. I carburized seven, and four were left alone. Four HC bars for the edge, and the core layered with the remainder.
Here is the core billet welded and etched.

Here is the whole thing with the cores drawn, twisted, and squared, and the edge welded, drawn and squared. It is ready to be wired and welded. The whole of the work was done by hand; Garret Mcormack helped out with an 8lb sledge.
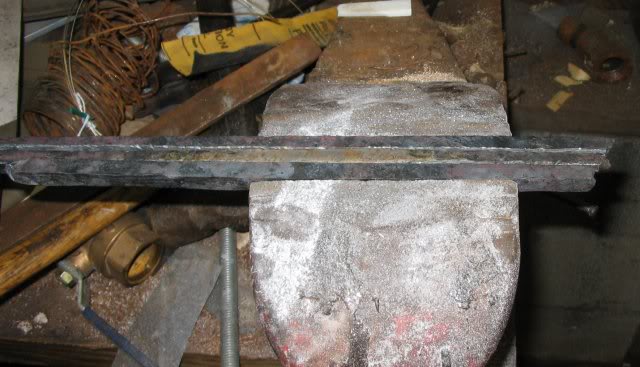
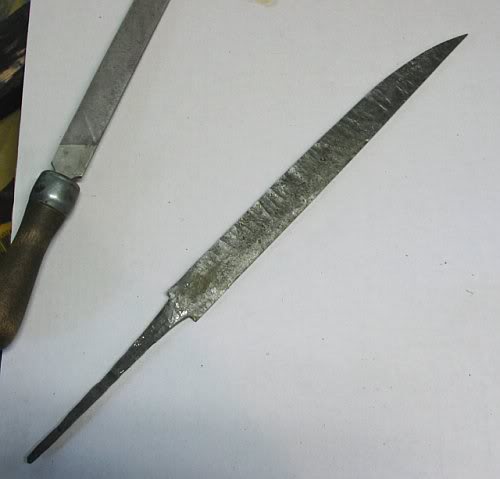
Here it is forged and profiled. I took the cross peen to the spine to make the blodida pattern more pronounced in places. I want it to look sort of wild and organic.
|
|
  |
 |
|
Jesse Frank
Industry Professional
Location: Tallahassee, Fl Joined: 04 May 2005
Posts: 144
|
 Posted: Fri 20 May, 2005 5:35 am Post subject: Posted: Fri 20 May, 2005 5:35 am Post subject: |
 |
|
Here it is fresh from the sen

Here it is after rough filing
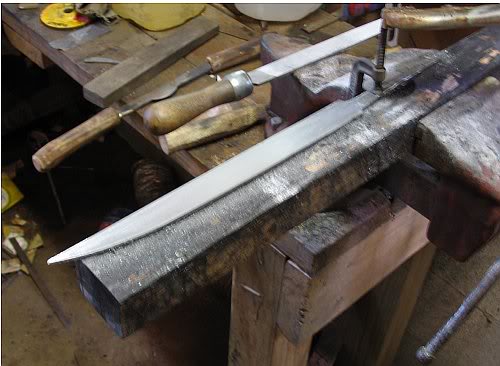
Here it is with a quick etch, still with a file finish after heat treat

More to come.
Last edited by Jesse Frank on Fri 20 May, 2005 5:47 am; edited 1 time in total
|
|
  |
 |
|
Aaron Schnatterly
|
 Posted: Fri 20 May, 2005 5:41 am Post subject: Posted: Fri 20 May, 2005 5:41 am Post subject: |
 |
|
Looks pretty cool, Jesse! Thanks for sharing this interesting project with us. Perhaps one day, I'll try my hand at something like this... someday. For now, I'll just watch and learn.
Definitely post some finished product pics, would you please?
-Aaron Schnatterly
_______________
Fortior Qui Se Vincit
(He is stronger who conquers himself.)
|
|
   |
 |
|
Jesse Frank
Industry Professional
Location: Tallahassee, Fl Joined: 04 May 2005
Posts: 144
|
 Posted: Fri 20 May, 2005 5:50 am Post subject: Posted: Fri 20 May, 2005 5:50 am Post subject: |
 |
|
I sure will...Hopefully I'll put the handle on today 
|
|
  |
 |
|
Jesse Frank
Industry Professional
Location: Tallahassee, Fl Joined: 04 May 2005
Posts: 144
|
 Posted: Fri 20 May, 2005 2:16 pm Post subject: Posted: Fri 20 May, 2005 2:16 pm Post subject: |
 |
|
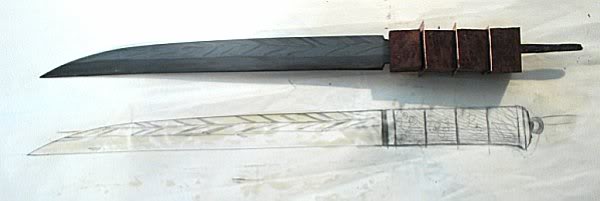
Here it is with the drawing of the handle, and some of the handle components.
|
|
  |
 |
|
Patrick Kelly
|
 Posted: Fri 20 May, 2005 2:28 pm Post subject: Posted: Fri 20 May, 2005 2:28 pm Post subject: |
 |
|
What kind of ferrous components are you thinking of for the handle, bronze, steel?
Bone would be a great addition in there.
"In valor there is hope.".................. Tacitus
|
|
   |
 |
Nathan Robinson
myArmoury Admin


|
|
    |
 |
|
Jesse Frank
Industry Professional
Location: Tallahassee, Fl Joined: 04 May 2005
Posts: 144
|
 Posted: Fri 20 May, 2005 3:37 pm Post subject: Posted: Fri 20 May, 2005 3:37 pm Post subject: |
 |
|
Thanks, guys 
I'm gonna put thin copper spacers in there, hopefully it'll look cool. I've got some mastadon bone I'm gonna use for the first and last pieces. That is some dense stuff! 
Looks like I won't be able to get to the handle 'till tuesday.......
|
|
  |
 |
|
Patrick Kelly
|
 Posted: Fri 20 May, 2005 5:23 pm Post subject: Posted: Fri 20 May, 2005 5:23 pm Post subject: |
 |
|
Very nice Jesse. Will this be for sale or is it a personal project?
"In valor there is hope.".................. Tacitus
|
|
   |
 |
|
Aaron Schnatterly
|
 Posted: Fri 20 May, 2005 5:33 pm Post subject: Posted: Fri 20 May, 2005 5:33 pm Post subject: |
 |
|
| Patrick Kelly wrote: | | Very nice Jesse. Will this be for sale or is it a personal project? |
I really thought so as well.... and I'm hoping he just sold it! 
-Aaron Schnatterly
_______________
Fortior Qui Se Vincit
(He is stronger who conquers himself.)
|
|
   |
 |
Steve Grisetti

|
 Posted: Sat 21 May, 2005 4:32 am Post subject: Posted: Sat 21 May, 2005 4:32 am Post subject: |
 |
|
|
Jesse - thanks for sharing the progress photos. They really help in understanding the process.
|
|
  |
 |
|
J. Padgett
Location: In a comfy chair Joined: 17 Nov 2003
Posts: 137
|
 Posted: Sat 21 May, 2005 8:26 am Post subject: Posted: Sat 21 May, 2005 8:26 am Post subject: |
 |
|
I also love these kind of threads. It amazes me how someone can take just a bunch of steel, and turn it into something beautiful especially you crazy blokes who do pattern welding. 
|
|
  |
 |
|
Jesse Frank
Industry Professional
Location: Tallahassee, Fl Joined: 04 May 2005
Posts: 144
|
 Posted: Sat 21 May, 2005 11:00 am Post subject: Posted: Sat 21 May, 2005 11:00 am Post subject: |
 |
|
Thanks everybody 
It is spoken for.
If there is interest, I'll be more than happy to continue with more threads like this. It's really fun 
I hope it gets people fired up to do it.
I won't be able to get back to it 'till tuesday, gotta work  dern bills dern bills 
|
|
  |
 |
Tom Carr

|
 Posted: Sun 22 May, 2005 9:56 am Post subject: Posted: Sun 22 May, 2005 9:56 am Post subject: |
 |
|
| Jesse Frank wrote: | Thanks everybody 
If there is interest, I'll be more than happy to continue with more threads like this. It's really fun 
 |
Please do! I am enjoy this very much! Beautiful work on the sax!
|
|
   |
 |
Steve Grisetti

|
 Posted: Sun 22 May, 2005 2:05 pm Post subject: Posted: Sun 22 May, 2005 2:05 pm Post subject: |
 |
|
| Tom Carr wrote: | | Jesse Frank wrote: | Thanks everybody 
If there is interest, I'll be more than happy to continue with more threads like this. It's really fun  |
Please do! I am enjoy this very much! Beautiful work on the sax! |
Ditto. More, please!
|
|
  |
 |
|
Jesse Frank
Industry Professional
Location: Tallahassee, Fl Joined: 04 May 2005
Posts: 144
|
 Posted: Tue 24 May, 2005 10:22 am Post subject: Posted: Tue 24 May, 2005 10:22 am Post subject: |
 |
|
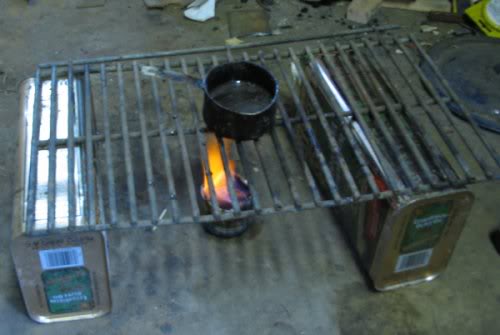
Here is the glue that I make, called cutlers resin. It's a mixture of pine pitch, beeswax, and wood or bone shavings. It needs to be heated, I use a little achohol burner I made for it.
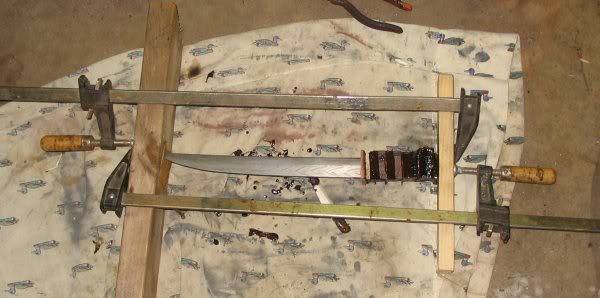
Here it is all glued up and clamped.
|
|
  |
 |
|
Aaron Schnatterly
|
 Posted: Tue 24 May, 2005 10:36 am Post subject: Posted: Tue 24 May, 2005 10:36 am Post subject: |
 |
|
This is REALLY coming together nicely! Thanks for the update, Jesse!
The little bit of research I have done on Cutler's Resin has yielded some interesting information - strength, durability, flexibility, utility for affixing dissimilar materials, the ability to hold up under disparate expansion, waterproof qualities, and the fact that it doesn't creap through material. What I didn't find was an explanation on how it is to work with. Could you enlighten me a bit?
It looks pretty straight-forward, and I just may have to try this stuff out with an upcoming project.
-Aaron Schnatterly
_______________
Fortior Qui Se Vincit
(He is stronger who conquers himself.)
|
|
   |
 |
|
Chuck Wyatt
|
 Posted: Tue 24 May, 2005 11:16 am Post subject: Posted: Tue 24 May, 2005 11:16 am Post subject: |
 |
|
Excellent work Jesse! You’re making the future Seax owner very happy and a lot of people envious.
This is a great thread, a lot of my non sword fan friends think the prices for swords and most weapons are outrageous,
They don't understand the time and effort that is put into creating process. After I send them to this thread hopefully they will.
|
|
   |
 |
|
Jesse Frank
Industry Professional
Location: Tallahassee, Fl Joined: 04 May 2005
Posts: 144
|
 Posted: Tue 24 May, 2005 6:23 pm Post subject: Posted: Tue 24 May, 2005 6:23 pm Post subject: |
 |
|
Thanks, guys.
The cutlers resin definitely has a learning curve to it. It needs to be worked hot, so it's easy to scald yourself. In some ways, it's not as user friendly as epoxy, but you have the ability to fix things pretty easily. I stick it in the oven at 200f for 15 minutes or so to soften it up. If you decide to collect pitch locally, make sure and test out different kinds of sap. There can be a huge difference between tree types. Look for stuff that's already dried, runny sap is not much good.
A lot of this info I got from a guy named Tai Goo, who does presice work in a primitive style. Really neat stuff. A good portion of it I got at Don Foggs forum.
|
|
  |
 |
|
Joel Chesser
|
 Posted: Tue 24 May, 2005 9:06 pm Post subject: Posted: Tue 24 May, 2005 9:06 pm Post subject: |
 |
|
Im always impressed by anyone who can do this kinda stuff, i KNOW i'd mess it up some how. But i have to say that's a pretty nice piece you have going. You can definitly see a little bit of your work with Japanese weapons influencing this piece a bit. but the overall look is quite impressive.
..." The person who dosen't have a sword should sell his coat and buy one."
- Luke 22:36
|
|
  |
 |
|
|

