| Author |
Message |
Sean Flynt

|
 Posted: Tue 16 May, 2006 8:06 am Post subject: My New Halberd Posted: Tue 16 May, 2006 8:06 am Post subject: My New Halberd |
 |
|
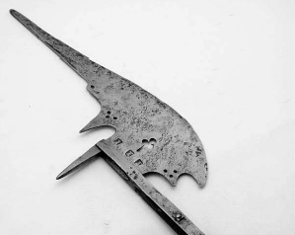
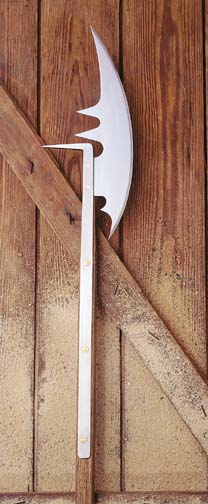
I've gotten this piece just about where I want it to be, so I grabbed a quick shot in bad light. That's probably the best I'll be able to do for awhile due to an upcoming move. I did want to go ahead and share this, though, because I know some folks are getting the MRL German Halberd.
This piece is not made by Windlass, as far as I can tell. It's stamped "India," but the construction differs from the MRL piece. Possibly Depeeka or older Windlass. I bought the head dismounted and rusted in places--just what I wanted!
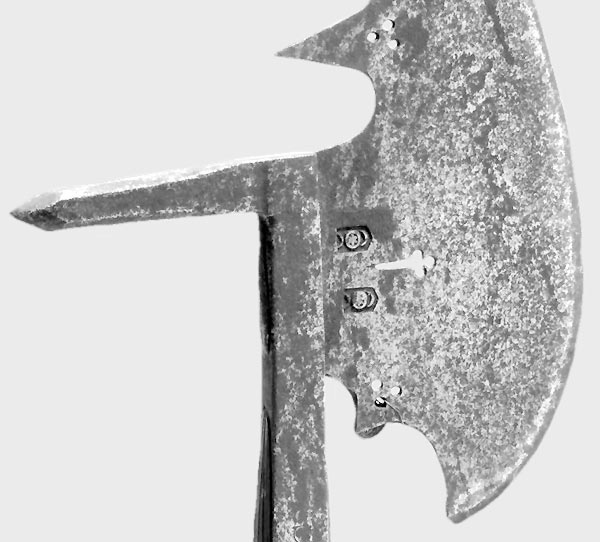
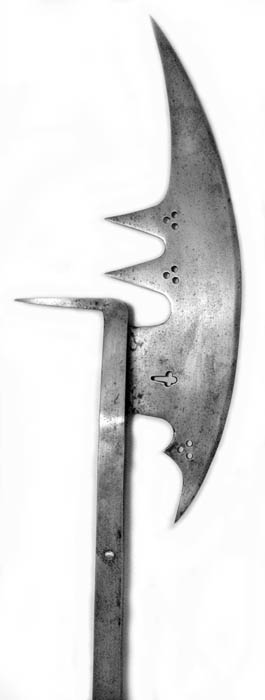
I mounted the head to an overall length of 7'. The langets are so broad that it seemed best for the haft to be fully covered on two sides and flush with the edges of the langets on the other two. The ends of the langets are inset and flush with the lower part of the haft, which is octagonalized (square section with chamfered edges). The antiquing of everything as per my usual methods went well. As you can see, I drilled the blade to match the various originals of this type (south German, ca. 1500). They all have these groups of piercings as well as the trefoil/cross. The drilling was very simple and quick, but gives the piece a much more authentic look. The smaller images show originals of this type.
Total cost: ~ $100, including all parts, tools, etc.
 Attachment: 17.25 KB Attachment: 17.25 KB

Attachment: 27.49 KB
Attachment: 80.54 KB
-Sean
Author of the Little Hammer novel
https://www.amazon.com/Little-Hammer-Sean-Flynt/dp/B08XN7HZ82/ref=sr_1_1?dchild=1&keywords=little+hammer+book&qid=1627482034&sr=8-1
|
|
   |
 |
|
Russ Ellis
Industry Professional
|
| Posted: Tue 16 May, 2006 8:11 am Post subject: |
|
|
Nice job Sean! The drilling was a good touch as well. Now I'm REALLY thinking about how to put those "eyelash" marks on the roncone. Any ideas? I can't wait to see a full length shot of the piece when you have the time.
TRITONWORKS Custom Scabbards
|
|
|
|
|
Sean Flynt
|
| Posted: Tue 16 May, 2006 8:19 am Post subject: |
|
|
I also wondered how you would be able to mark the blade deeply when it's cold. I assume you'd need very hard tools--Maybe you could pick up a couple of cheap nail sets and grind/file the ends to a simple shape that would allow you to build up the design with lots of little marks. Surely there's something in the Dremel tool chest that would precisely cut into steel. I bet the A&A folks could suggest something. Also, I know folks have gotten decent results with etching by covering the area with wax, with a dam of wax all around the design area, then scratching the design through the wax and filling the area with hot vinegar. I think there's a common chip etching compound available in small quantities at Radio Shack as well. Something like that probably would give you the nicest looking results.
-Sean
Author of the Little Hammer novel
https://www.amazon.com/Little-Hammer-Sean-Flynt/dp/B08XN7HZ82/ref=sr_1_1?dchild=1&keywords=little+hammer+book&qid=1627482034&sr=8-1
|
|
|
|
|
|
Russ Ellis
Industry Professional
|
| Posted: Tue 16 May, 2006 8:25 am Post subject: |
|
|
| Sean Flynt wrote: | | I also wondered how you would be able to mark the blade deeply when it's cold. I assume you'd need very hard tools--Maybe you could pick up a couple of cheap nail sets and grind/file the ends to a simple shape that would allow you to build up the design with lots of little marks. Surely there's something in the Dremel tool chest that would precisely cut into steel. I bet the A&A folks could suggest something. Also, I know folks have gotten decent results with etching by covering the area with wax, with a dam of wax all around the design area, then scratching the design through the wax and filling the area with hot vinegar. I think there's a common chip etching compound available in small quantities at Radio Shack as well. Something like that probably would give you the nicest looking results. |
Hmm etching might be just the ticket! Not exactly historical but should approximate the look... Hey where are you moving to?
TRITONWORKS Custom Scabbards
|
|
|
|
|
Sean Flynt
|
|
|
|
|
Bill Grandy
myArmoury Team


|
| Posted: Tue 16 May, 2006 8:53 am Post subject: |
|
|
Wow, Sean, the drilling made all the difference! That looks great!
HistoricalHandcrafts.com
-Inspired by History, Crafted by Hand
"For practice is better than artfulness. Your exercise can do well without artfulness, but artfulness is not much good without the exercise. -anonymous 15th century fencing master, MS 3227a
|
|
|
|
|
Jean Thibodeau

|
| Posted: Tue 16 May, 2006 8:54 am Post subject: |
|
|
| Sean Flynt wrote: | I also wondered how you would be able to mark the blade deeply when it's cold.
Surely there's something in the Dremel tool chest that would precisely cut into steel. I bet the A&A folks could suggest something. |
What cuts fastest with a dremel is a cutting wheel and when I want a wider cut and slowdown the speed of depth of cut, going too deep to quickly, I stack many cutting wheels at a time on the tool holder: Anything from 2 to 5 or 6 cutting wheels.
I don't know what they use for their cutting wheels but it seems to cut much faster at an equal width regular stone on a shank that come with the dremel: These others seem dead slow when cutting hardened steel.
The cutting wheels are very fragile so cutting a curve can break a single cutting wheel if too much lateral pressure is put on the wheel changing the direction of cut . Stacked wheels are lest prone to turn into dust. ( Wear eye protection.  ) )
For cutting lines or filework nothing cuts better or faster than the cutting wheels with the dremel tool.
Once a line has been started it become easier not skipping out of the line making it deeper. Oh, one can also grind in a fuller quickly if used at 90° using the diameter of the cutting wheels to cut a fuller about 1/2" wide.
Note: Easy to cut but not easy to keep the fuller strait if done freehand: Some sort of dremel holder might work and a way to slide a blade back and forth in a strait line exactly the same way to get a nice even fuller . Some hand finishing to remove ripples in the fuller might make it look less modern machine cut. Oh, I haven't tried to do anything to make such a tool holder set-up and this is just a suggestion about what might work: A bit of practice on scrap might be a good idea.
Oh, even with the hardest steel the cutting wheel will cut the steel like butter.
You can easily give up your freedom. You have to fight hard to get it back!
|
|
|
|
|
Sean Flynt
|
|
|
|
|
Jean Thibodeau
|
| Posted: Tue 16 May, 2006 9:22 am Post subject: |
|
|
| Sean Flynt wrote: | | Good ideas, Jean. I especially like the idea of the stacked cutting disks. I used one those disks to make the "tail" of the cross on my halberd. It's shocking how quickly those wheels can go through steel of that thickness. Mostly, I use them to cut off the nails that I use as rivets. |
I discover the stacking thing years ago cutting file work on the back of a folding knife: Looks like the filework on some Scottish Dirks. Look at the stacked cutting wheels a sculpting tool much more than just for cutting, works a bit like people who sculpt Totem Poles with chain saws at a smaller scale.
You can easily give up your freedom. You have to fight hard to get it back!
Last edited by Jean Thibodeau on Tue 16 May, 2006 9:46 am; edited 1 time in total
|
|
|
|
|
Greg Griggs

|
| Posted: Tue 16 May, 2006 9:29 am Post subject: |
|
|
Neat looking Halberd Sean. I like what you've done with it.
Not one shred of evidence supports the notion that life is serious.
|
|
|
|
|
|
George Hill
Location: Atlanta Ga Joined: 16 May 2005
Posts: 614
|
| Posted: Fri 19 May, 2006 4:14 am Post subject: |
|
|
Wow. It's like a whole new weapon after your modifications. When you have time, I would very much like to see some shots of it from an angle where you can see the mounting on the shaft.
To abandon your shield is the basest of crimes. - --Tacitus on Germania
|
|
  |
|
Sean Flynt
|
| Posted: Fri 19 May, 2006 7:54 am Post subject: |
|
|
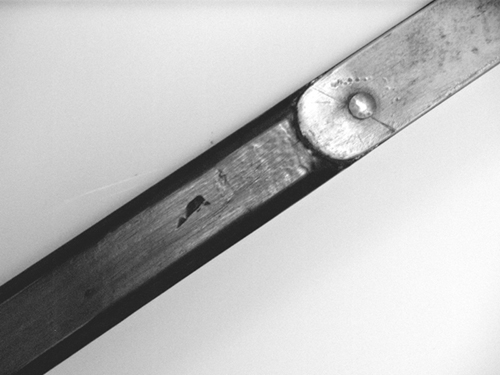
Hey, George! I don't have any other angles on the head, but since you owned the head, maybe you'll be able to picture the mounting when I say that above the bottom of the langets, all wood surfaces sit flush with the steel. The photo below, while truly awful, will at least give you some idea of how I inset the bottom of the langets and shaped and antiqued the haft. This piece helped me understand why there were carpenters who specialized in hafting polearms. When you start insetting langets and dealing with different levels at the head end, it can be challenging to previsualize how all the levels and surfaces will interface once the head is mounted.
Basically, I had to plane down a 2x2 so that the area of the langets was recessed, then I had to create a long pyramid shape at the top of the haft. The base of that pyramid needed to be flush with the level of the langet platform on two sides, but needed a shoulder on the other two sides. I found that the best solution was to leave lots of material extending beyond that shoulder and beyond the langets. After I had mounted the head and rivetted the langets I went back with the block plane and shaved down all the protruding wood. Then I sanded everything so all wood surfaces would be flush with the steel. Given the amount of shifting that could occur during mounting and rivetting, I think there was no other way to get the surfaces perfectly flush. If I had screwed up the final planing, I'd have been out of luck , though. All this meant that I had to antique and stain the haft only after mounting the head, and that was kind of a pain. I would hesitate to speculate how many hours I have invested in this piece, but the haft certainly was the most challenging part of the project.
The final test consisted of slipping my hands up and down, from below the haft over the join with the langets and up to the head, and that revealed no snags or problem surfaces.
Attachment: 88.22 KB
-Sean
Author of the Little Hammer novel
https://www.amazon.com/Little-Hammer-Sean-Flynt/dp/B08XN7HZ82/ref=sr_1_1?dchild=1&keywords=little+hammer+book&qid=1627482034&sr=8-1
Last edited by Sean Flynt on Fri 19 May, 2006 9:48 am; edited 1 time in total
|
|
|
|
|
|
George Hill
Location: Atlanta Ga Joined: 16 May 2005
Posts: 614
|
| Posted: Fri 19 May, 2006 8:02 am Post subject: |
|
|
| Sean Flynt wrote: | | Hey, George! I don't have any other angles on the head, but since you owned the head, maybe you'll be able to picture the mounting when I say that above the bottom of the langets, all wood surfaces sit flush with the steel. |
No, I don't have one of these, and I never did. I strongly considered picking one up, but I haven't done so as yet, because I'm saving for an Atrim. I do have one of the MRL Glaives though, and I think I can picture what you mean when you say below the langets, as I have seen the German 'halberd' in person before.
I'm most curious about the cross section of the peice as you have mounted it, and how that cross section looks inbetween the langets. the new picture helps me visualize it though. For a moment I thought it was poking out under then langets, but now that I reread your original post, and look at the new picture, I can visualize it much better.
How did you do the drilling of the holes? A mounted drilled press?
To abandon your shield is the basest of crimes. - --Tacitus on Germania
|
|
|
|
|
|
George Hill
Location: Atlanta Ga Joined: 16 May 2005
Posts: 614
|
| Posted: Fri 19 May, 2006 8:10 am Post subject: |
|
|
Oh, just because I think it's very worth seeing the two togeather, I'm going to try an attachment for the first time.
Just look at the amazing degree to which this peice has gone through! If the original looked half as good, I'd have bought it ten times over.
Attachment: 17.25 KB
Sean's Halberd.
Attachment: 28.85 KB
MRL's original.
To abandon your shield is the basest of crimes. - --Tacitus on Germania
|
|
|
|
|
Jean Thibodeau
|
| Posted: Fri 19 May, 2006 9:19 am Post subject: |
|
|
Sean;
Really looks great and much more appealing than it's original state: It now looks like the real thing aged but not a corroded relic. What one might look like after a generation of use in period or even today in a museum if it had always been stored under good conditions.
Funny how more " real " and substantial it looks in this state while the pristine new condition make it look almost lighter or flimsy in a Picture ?
Gee if they came out like this when purchased I think they would sell at twice the price. ( Well maybe not twice the price but twice as appealing.  ) )
You can easily give up your freedom. You have to fight hard to get it back!
|
|
|
|
|
Sean Flynt
|
| Posted: Fri 19 May, 2006 9:27 am Post subject: |
|
|
Sorry, George! I had you confused with the original owner. The cross section of the haft between the langets is perfectly rectangular. Below the langets it's a larger rectangle with edges chamfered as shown to make it marginally octagonal. Those chamfers make a big difference in handling and comfort, by the way. They allow you to have a larger section that's still easily gripped. Squared edges would require the section to be a bit smaller (and thus weaker).
As for the drilling--I just cut a little triangle out of cardboard and placed that where I wanted my trios of holes (I eyeballed the placement because originals are somewhat irregular), then marked the steel at each point of the triangle (a permanent marker is good for this). You should use the shank end of your large drill bit to determine how much space you'll need to leave between the points of the triangle. Then I just used a regular hand drill and metal-cutting bits. I used a small bit for each hole first, then followed with a bit the size of the desired final hole. For the trefoil cross I again just eyeballed everything to avoid a machine-perfect look. I placed the large bit shank down on the steel and traced around the base with the marker, then did the same thing two more times, making sure each tracing slightly overlapped the others. Then I used the small bit to drill starter holes there and one hole a short distance toward the socket. Then I drilled out the trefoil holes and used a dremel cutting wheel to cut two lines from the trefoil to the little hole near the socket. After a small amount of filing to soften the edges of all these holes I sanded everything down until all the brown rust was gone, then waxed everything.
-Sean
Author of the Little Hammer novel
https://www.amazon.com/Little-Hammer-Sean-Flynt/dp/B08XN7HZ82/ref=sr_1_1?dchild=1&keywords=little+hammer+book&qid=1627482034&sr=8-1
|
|
|
|
|
|
Bill Duncan
|
| Posted: Thu 01 Jun, 2006 7:38 pm Post subject: |
|
|
Oh my god is that really my old halberd?
Sean home run Hoss she looks great!
Dunc
May you live as long as you want but never want for as long as you live
|
|
 |
|
Sean Flynt
|
|
|
|
|
Greyson Brown

|
| Posted: Fri 02 Jun, 2006 7:08 am Post subject: |
|
|
Looks really good, Sean. Are you going to attach a little metal ID disk with some wire like the original you pictured? You could use something like that to make it look like it is in a museum or private collection, and also take credit for your work.
-Grey
|
|
|
|
|
Sean Flynt
|
| Posted: Fri 02 Jun, 2006 7:27 am Post subject: |
|
|
| Greyson Brown wrote: | Looks really good, Sean. Are you going to attach a little metal ID disk with some wire like the original you pictured? You could use something like that to make it look like it is in a museum or private collection, and also take credit for your work.
-Grey |
 Great minds think alike! I've been debating whether or not to do just that. I have some brass wire and brass sheet, and thought I might put my initials on one side of a brass disc, the date on the other. Great minds think alike! I've been debating whether or not to do just that. I have some brass wire and brass sheet, and thought I might put my initials on one side of a brass disc, the date on the other.
-Sean
Author of the Little Hammer novel
https://www.amazon.com/Little-Hammer-Sean-Flynt/dp/B08XN7HZ82/ref=sr_1_1?dchild=1&keywords=little+hammer+book&qid=1627482034&sr=8-1
|
|
|
|
|
|
|

