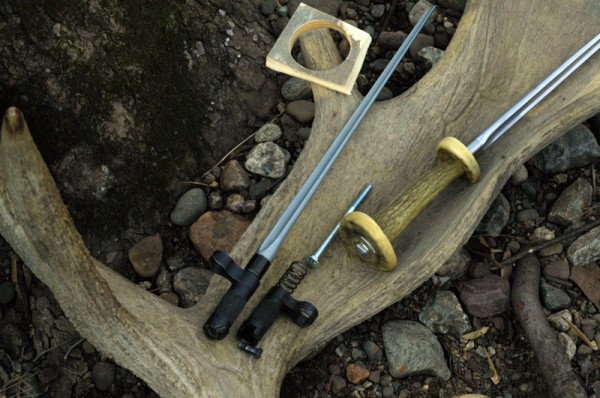
SKS-Rondel Conversion
A long while ago I picked up a few SKS bayonets, figuring they were excellent candidates to convert to cheap and usable rondel daggers. They can be had for mere dollars and are dedicated thrusters, with a fullered triangular blade section, leaving little left to do but construct a suitable hilt. Some time back I also rescued a pair of moose antlers from the curb, believing their destiny could be better fulfiled as knife handles than as landfill. I am not aware of any historical rondel daggers having fully organic discs, much less ones of antler, so I consider this just a fun interpretive piece, made for a minimum of time and expense.

Construction:
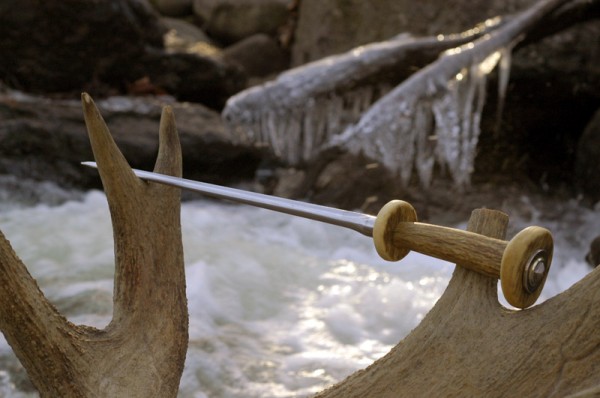
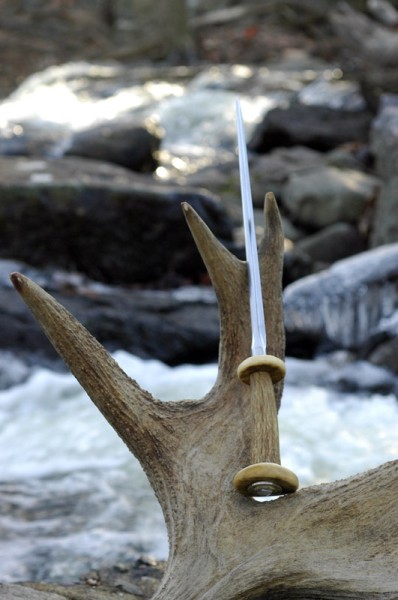
The SKS bayonet was stripped down and cleaned, the parkerizing sanded off, and the tip re-ground to create a tapered point rather than the original "chisel" end. It was then sanded and polished with OOO steel wool. The end of an antler palm was cut off and discs cut from it using a hole saw. The discs were then drilled for appropriate center-holes, the bottom disc matching the diameter of the bayonet's tang (it has a convienent "step" already in it for the disc to sit against). A tine of antler was cut to size for a grip and bored through and stepped up to fit precisely over the bayonet tang. The pieces were sanded and finished with a 50/50 mix of turpentine and boiled linseed oil to bring them back to "life".

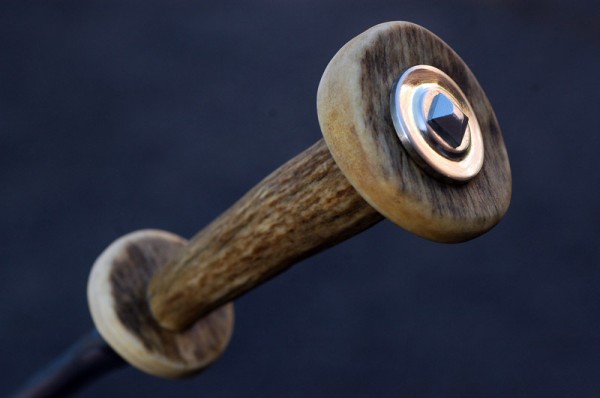
In order to piece everything together, I intended to run a bolt through the hilt and thread it into the end of the tang of the bayonet, so I drilled and tapped a 1/4"-20 hole for a carriage bolt. The head of the bolt was then ground to a "pyramidal" shape, leaving just enough of a square base so that I could later tighten it with a wrench. Everything was test fitted several times, the hilt pieces dremeled and sanded until they fit together snugly, matching all their natural curves. Once everything was in place, along with a metal hardware "widget" that I used as a washer under the bolt head, I set the components aside.

Each hilt piece was masked, and a batch of epoxy resin mixed up, adding enough Cab-O-Sil (a thixotropic) to keep it from running everywhere. I then coated the tang and the inside of the discs and grip with resin, filled the grip with a balance of resin to take up the space not occupied by the tang and bolt (which is not much), and put everything in place. The bolt was then tightened down, the fit checked, and given a final torqueing before wiping off the little excess resin which had escaped. Once all had set, the masking was removed and I was left with something I find a joy to hold and behold.

Stats:
Overall length: 17 1/2"
Blade length: 12 3/8"
Overall hilt: 5 1/8"
Grip: 4"

Upper (pommel end) disc diameter: 2 1/4"
Lower (blade end) disc diameter: 1 3/4"


 Attachment: 56.44 KB
Rodelonracksm.jpg


 Attachment: 59.97 KB
Rondelupsm.jpg


 Attachment: 32.61 KB
Rondelhiltsm.jpg


 Attachment: 87.86 KB
Rondelpartssm.jpg

A friend of mine in both our salle and our Ren faire guild also has a Rondel made out of an SKS bayonet. The person who made it for him used a wood handle though, but he also twisted the blade (basically reforged it) so that it twists around like a Narwal's horn. I have to say that it's the most scary looking and functioning weapon I've ever seen!

He's told me that he's used it to plow right through metal barrels, both sides of car doors and several old pieces from his old plate harness with no problems at all. With some justification he says Rondels are the real thing that a Knight would fear in battle. ;-)
That's pretty cool Eric :D

If you come out to train Saturday please bring it with you.
Very nice, I have a few of those laying around that I never got around to converting. Could you go through the process of securing the tang in detail (for us non-handy type guys)? thanks!
Thats really cool. I like how you ground down the carriage bolt so now it almost looks like one of the peened tangs you see on some of the Albion swords. Well done :)
Ah, if I had only seen this thread before I threw out that SKS bayonet...

Thanks for posting this. It's a good example of how much can be done with minimal investment. My congratulations on your resourcefulness and creativity!
Thanks for the great post. I filed one to a triangular shape and redid the tip but was having a problem with the hilt design. Now i'll try your bolt method.

Matt
sks daggers
Outstanding! I have a couple such bayonets that are gathering dust for want of such a project! I have no idea why I didn't think about drilling and taping the tang like that.
Thank you all very much for the compliments. I should be making a couple more of these with different materials/methods, so I'll post back on those when I have.

Nicholas Zeman wrote:
Could you go through the process of securing the tang in detail (for us non-handy type guys)? thanks!


Certainly. It's pretty straightforward, but I would like to preface this be stating that I view the method of bolting I employed merely as a means to keep the components together during assembly. I relied principally on the resin fill for structural integrity and to create a hilt which is permanent enough that it would need to be either ground, smashed, or burned off. That being said, here is the procedure I followed:

1. Remove the screw, socket, and spring from the bayonet, if so equipped. This will reveal the tang, with transverse hole through it's end. My original idea had been to drill through the end of the tang and run a bolt or threaded rod into a nut placed in this hole - but it'd have to be a pretty small nut.

2. Place the bayonet in a vise, tang up. Heat the end of the tang with a torch to cherry red and let it cool slowly. This will anneal the metal, which is other wise pretty tough and difficult to drill, much less tap. The vise (or other large clamp of your choice) will act as a heatsink and prevent the rest of the blade from losing temper.

3. Once the tang has cooled, grind or file a small flat spot on its end. This will make it easier to find and mark its centre. Go ahead and mark a starting point with a centre punch.

4. Drill a hole through the end on the end with a bit appropriate to the size of the tap you intend to use. I only drilled through to the transverse hole, you may choose to keep going.

5. Tap the hole. Go slowly. Use LOTS of oil.

6. Clean everything up, test for fit to your bolt/rod and cut it to length as necessary. Assemble. Be merry.

This was simply the method I happened to use, but there are of course numerous other options. Alternatively, one may cut off the end of the tang completely down to the hole and drill/tap into this. Or, you may chose to run a die over the tang itself and use a threaded collar to extend its length. Use your imagination and ingenuity to create bladed bliss from household items.

Page 1 of 1

Jump to:  
You cannot post new topics in this forum
You cannot reply to topics in this forum
You cannot edit your posts in this forum
You cannot delete your posts in this forum
You cannot vote in polls in this forum
You cannot attach files in this forum
You can download files in this forum


All contents © Copyright 2003-2006 myArmoury.com — All rights reserved
Discussion forums powered by phpBB © The phpBB Group
Switch to the Full-featured Version of the forum