| Author |
Message |
Kirk Lee Spencer

|
 Posted: Wed 12 May, 2004 8:04 am Post subject: Posted: Wed 12 May, 2004 8:04 am Post subject: |
 |
|
| Nathan Bell wrote: |
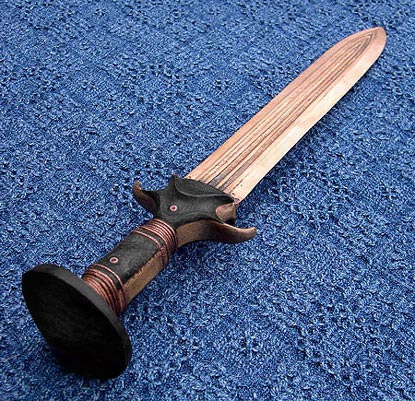
I may have missed it above, but what sort of wood did you use for the grip panels? It looks quite nice with the bronze, in "character" and grain.
Nice work, do you take commissions?  |
Hi Nathan good to hear from you...
I used some curly oak I found at Home Depot... It is near the heartwood.
I used a dark Red Oak Stain and burnished the wood lighter at wear points on the hilt.
Hand rubbed boiled linseed oil to finish.
I am working on a post which will go into much more detail on how it came together...
ks
Two swords
Lit in Edens flame
One of iron and one of ink
To place within a bloody hand
One of God or one of man
Our souls to one of
Two eternities
|
|
  |
 |
Kirk Lee Spencer
|
| Posted: Wed 12 May, 2004 8:25 am Post subject: |
|
|
| Jonathon Janusz wrote: |
my thoughts on the cutting ability came from the refinement on the edges (or lack thereof) on the example i examined; i'm guessing this is where about half a pound of the pound and a half of bronze that disappeared came from. i guess i had never thought of this sword as being just a blank before.
two more questions - first, how are the grip plates attached? are they epoxied or are they held in place simply by the pins and copper wrap?
second, is the Achilles Thrusting Sword somewhere on your projects list? with how nice this piece turned out i would like to see your take on that one 
. . . always did like bronze. . .
thanks again! |
Hi Jonathon...
Most of the weight reduction came from the pommel... I doubt changing the blade cross section altered the mass much.
I always use expoxy and superglue (the ancients also used glues, and mastics, and resins to hold the components together. Thats my story and I'm sticking to it! )
I am sure that the copper wire binding does help hold the plates on... but the rivets (remaniscent of the rivet heads on cast on hilts of later Halstat hilts are for looks only). I guess I could have drilled all the way through but I didn't... 
I drilled a few millimeters and inserted a short section of bronze wire and then shaped it to look like a rivet head. 
As for Albion's Achilles Thrusting Sword... It would make a nice project. I doubt that I would do it though. I have a very specific goal for my collection. I want 15 swords: 3 bronze, 3 celtic, 3 migration/viking, 3 knightly and 3 complex hilts.
In each case I hope to have classic swords in terms of looks but show a steady evolution of all components (pommel, grip, cross, blade) from one sword to the next. That being said, the Achilles sword was not one of my three bronze swords. The three bronze sword I will be working on are:
The Odysseus here,
A Naue II with the Halstat Top Hat type pommel
And a bronze antenna sword.
Thanks for the interest....
ks
Two swords
Lit in Edens flame
One of iron and one of ink
To place within a bloody hand
One of God or one of man
Our souls to one of
Two eternities
|
|
|
|
|
|
Ryan A. C.
|
| Posted: Wed 12 May, 2004 9:34 am Post subject: |
|
|
I never thought I'd fall in love with a bronze piece, but that was before I saw that beauty. It's amazing just how good looking that sword is! You did an awesome job on the hilt and blade.
I want one.
|
|
|
|
|
Kirk Lee Spencer
|
| Posted: Wed 12 May, 2004 12:56 pm Post subject: The Birth of "Odysseus" |
|
|
I am very grateful for all the compliments and for opportunities to redo another. It is tempting but I really do not have the time right now
and, I have this fear that if I were to do commission work it would begin to take the fun out of it. I like it much better as a hobby. However, I would encourage others to try their hand at it. It is really rewarding (after all the mistakes, and heartaches, and redesigns, and restarts, and do-overs).
Here is one scenario of how it might have been done in the Bronze Age. They would take two large rectangular blanks of wood and heat the sword hilt and burn the wood into the hilt channel (or maybe they just carved it to fit). Then they would crimp the edges of the flange to bite into the side of the wood blanks. Then using blades, or files, or rough stones, or bronze rasps they would sculpt the wood into a comfortable grip and pommel. The grip plates could then be secured by drilling holes through and inserting a thick copper wire rod. Each end of this rod would be punched to widen the rod and rivet the wood in place. Then the copper wire binding could be applied to add an even more secure attachment of the grip plates.
I have tremendous respect for craftsmen who do all the work the way it was done in the past (I was even a buckskinner once and tried to recreate the 19th century fur-trading days for a few days). And yet, I have a hard enough time redoing swords when I cheat and use epoxies, super glue and power tools
If I didnt cheat I would probably loose my mind
I dont have that much patience.
Here is a step-by-step discussion of how the Odysseus sword came together
Weight Reduction:
To compete with the feel of the originals Albions Odysseus needed to go on a diet and loose about 30-40 percent of his body weight. Odysseus carried most of his weight in the pommel, so I began there. I visited a friend with a drill press. C-clamped the blade to the deck and began cutting holes through the center of the pommel working my way out to about 3/8 inches from the edge. I drilled the holes all the way through, leaving sort of thick honey-comb pattern between the holes for support. I then did the same thing moving down the grip. The holes were smaller and less numberous here because this part of the sword was fairly close to the mass distribution of the originals. The holes would also provide more surface area for the epoxy (or J.B.s ancient cutlers resin).
The horns are thicker than those of the original, especially along the edges. I took a felt tip marker and drew the medial lines along the inside and outside of each horn. The thickness would remain along this central line, but moving out from this line, the edges would be shaped to approach those on the original. I used a coarse stone bit in the dremel. Little by little I tried to make the horns looked much like those on the original. Actually the horn of the orginal were a little too pointed for my taste so I left more mass here. (This is the nice thing about having so much bronze to work with.) You can see the difference if you look at the edge view of the hilt in the archeological drawing at the beginning of the thread and compare it to the same view later in my post on the hilt work. When grinding dont forget the dust mask (Keep it by your grinder and please wear it!)
The blade also needed some weight reduction. This was also done using a coarse stone grinding attachment on my dremel tool. When I tried to just grind along the whole edge at once, I found that I was grinding more in some areas than in others. It was much easier to keep the removal even by grinding out bites or consecutive lines of material (like if you were chiseling away the material).
Most of the mass removal in the blade was along the blade edges, to take it from an apple seed profile to a V shaped or even slightly hollow ground look. Once the blade was near the geometry of the original, I began grinding in circles to give it a peened look and then using a sanding cylinder on the dremel, I ground out most of the peen marks. I then used 100 grit sand paper to give a satin look. The very edge was polished with very fine emery cloth and steel wool.
Attaching the Grip Plates:
I found a nice kiln dried, one inch thick, piece of curly oak at my neighborhood Home Depot Store. Luckily it was a plank near the heartwood (That is what gives the radial pattern you see on the top of the pommel). To get the thickness needed for the pommel, I had to glue two pieces together using wood glue and clamps. I took these two blocks of oak and, on each one I drew an outline of the hilt with a pencil. I went to my friends shop and cut outside this line with his band saw. (Without a band saw you could drill holes along the lines and then cut through the webbing with a coping or hack saw.)
If I were doing it over, I would not cut the grips to match the hilt at this point. One of my biggest headaches was getting these shaped wood blocks to line up with the outline of the hilt when I tried to apply slippery epoxy and then clamp both sides at once. One side would shift and then when I got it lined up the other side would shift getting exopy everywhere. Makes me mad just thinking about it!
I would suggest that the rectangular blocks be expoxied in place and then afterwards, once everything has set up, roughly shaped to match the hilt with band saw or drilling and then more refined shaping with dremel or wood rasps.
Before the grip plates are attached the blade should be prepared for a very tight bond. Here is what I did: The surface of the hilt on either side is irregular from the casting. This surface needs to be flat so that the wood blocks will sit flush. I laid the hilt on the surface of a belt sander until it was ground to a flat smooth surface (wear gloves and dont get your knuckles on the grinder). If you dont have a belt sander a large bastard file would work.
To increase the surface area and bonding strength, I took some very coarse sandpaper and roughed up the inside channel of the hilt. I also took a knife and cut grooves in the undersides of the grip plates that wound be in contact with the hilt. To further increase the attachment of the grip plates, I took some finishing nails and drove them into the grooved underside of the wooden blocks leaving the heads sticking out. This extra surface area would grip the epoxy in the hilt channel and help anchor the plates in the epoxy.
I made a mistake here
As I was shaping the grip later, the point ends of these nails showed through on the outside. Once the grip was finished I had to drill out these metal portions and fill with wood filler. A better way to do this would be to put staples or small brads in the wood at a low angle near the very center of the block so that they would be less likely to show through on the outside.
Now comes the messy part
Fill the hilt channel with epoxy (I used J.B. weld after it thickens a bit). Then place epoxy on one side of the wood blocks. Then clamp a block on either side of the hilt. The extruding epoxy that hardens on the bronze parts of the hilt will be ground off later. Set this Sword Sandwich Contraption aside and let it set up for a day or so.
Shaping the Grip Plates:
With lines of drilled holes or band saw, cut the wood away until it is close to the outline of the hilt edge (seen in plan view). Using a wood rasp and coarse dremel sanding cylinders to shape the wood down to the edge of the bronze (seen in planThink of a cookie cutter cutting out the general shape).
I started with the pommel and worked my way down. First take a ruler and felt tip pen. Measure from the highest point of the pommel to the end (half the diameter of the pommel). Take this length, and from the center point of the pommel-top, make mark ever so often as you move in a circle around the center point. Connect the dots and you will have a circle on the pommel top (or you could use a drafters compass if you have one).
You can then take a drill and drill holes along the outer edge of this circle. The final shaping to the line can be done on a belt sander. I took my hand belt sander and clamped it vertically to my workbench and sanded down to the edge of the circle. With a coarse sanding cylinder in my dremel and wood rasp I shaped the outer edges of the pommel to create the dome shape at the top of the pommel.
Two things I discovered at this point:
1.When the Albion version was up-scaled 3 inches from the original, the width of the pommel was increased to where it would dig into your wrist when used in a chopping motion. So I ground off the edge of the pommel until it did not contact my wrist when swinging (about a quarter inch was removed).
2.The very top edge of the bronze part of the pommel must be ground ever so slightly to produce the dome shape
If you look at the picture of the original you will notice this same clipping of the very edge of the summit of the pommel.
In shaping the grip, I drew a rough outline of what I wanted the edge-on profile to look like (not plan view but edge view). I then drilled holes on the outside of this line then cutting it away through the ribbing between the holes with dremel cutting tool. Then the grip was carved into a rough shape with wood rasp and coarse sanding cylinder. Then with a medium sanding cylinder on the dremel, the grip was shaped into final form. Some of the bronze on the outside edges of the grip will need to be shaped to create a comfortable grip. The outer most edges of the bronze part of the hilt were then ground using a diamond bit to appear as if the flanges had been peened into the wooden grip plates (see earlier picture of edge-on view of hilt).
The lower part of the hilt was sculpted using dremel sanding cylinders and wood cutting bits. It was important to draw the different elements at different times to direct the shape. It is also important to grip the sword hilt ever so often to see where wood needs to be removed to make it comfortable when the index finger is extended into the horns. It is this trial and error method that led to the overall bull-horn design. (This was the most interesting part of the project
because not only a pair of bull horns, but a bull head evolvedThe hooks become the ears and the lower shape becomes the snout
the rivet almost like a ring through its noseOkay my imagination is carrying me away!)
Rivets:
As mentioned earlier the rivets are not real
They could be
just get a drill press and drill through the sword in these places and then insert a copper rod and peen its ends. I was afraid that I would not be able to match up the rivets on both sides. So I just drilled shallow holes filled with epoxy and inserted the copper rods and let it set up. I then used a dremel with diamond bit to shape the surface of the rod to look like the punch mark on a rivet. (When grinding the surface of the copper wire/rod flush with the surface of the wood, go slow letting the copper cool. If you do it quickly as I did, the copper will get so hot it will burn the wood. However, it does give a nice charred halo around the rivets as if the copper itself has darkened the wood.)
Binding:
For the binding I found some plastic coated 14-18 gauge (cant remember exactly
if I ever knew) electrical wire lying around the garage. The plastic was stripped off the wire and coarse sandpaper was used to rough up the wire. I then drilled a small hole at the edge of bronze near the grip and secured the end of the wire with epoxy. After the epoxy set up, I put superglue in the area that is to be bound and slowly wrap the copper wire around allowing the super glue to anchor it to the wood. To give a little character to the wire I took the dremel with pointed diamond bit and put small pits in the surface. (When I stained the grip, the stain got into these pits and made them a little more noticeable than what I had intended. I might get some steel wool and burnish it down a little more.)
Finishing:
I used several coats of a red oak stain to give a very dark cherry look as a color base. I then took steel wool and emery cloth and worked out from wear points on the hilt to give it a used look. The wear points were determined by holding the sword and swinging it
paying attention to how and where the pressure points moved as the weapon was moved.
Lastly about three coats of boiled linseed oil was hand-rubbed and burnished into the wood.
And thats how it was done
.
I would encourage those who like this sword, and like working with your hands, to give it a try
If something doesnt work, just set it aside for awhile, think about it, and pick it up later.
If you dont like working with your hands, then I would not mind if you wanted to give these instructions and design pictures to a professional craftsman to make one for you.
Thanks for taking time to read this long post
Respectfully submitted,
Kirk Spencer
Two swords
Lit in Edens flame
One of iron and one of ink
To place within a bloody hand
One of God or one of man
Our souls to one of
Two eternities
|
|
|
|
|
Tom Carr

|
| Posted: Wed 12 May, 2004 11:27 pm Post subject: |
|
|
|
Hey Kirk! That is one bronze beauty you have there! Absolutelly perfect! Makes me want to get one of those.
|
|
 |
|
|
Andrew Zander
Location: Silverdale, WA Joined: 18 May 2004
Posts: 19
|
| Posted: Tue 18 May, 2004 3:04 pm Post subject: |
|
|
Kirk,
This is exceptional craftsmanship!
---------------------------------------------
Perhaps the good folks at Albion Armorers could offer a modification similar to this for both their Achillies and Odysseus swords  I would imagine a standardized grip modification would help keep costs down a bit. I would imagine a standardized grip modification would help keep costs down a bit.
A. Zander
|
|
 |
|
Tom Carr
|
| Posted: Wed 19 May, 2004 2:32 pm Post subject: |
|
|
I got a hands on look at the Odysseus today and all I have to say is it is better than the pictures. It Feels right in the hand and the workmanship outstanding. Turns out that Kirk lives a half mile away from me and we got together today and had lunch and talked sharp pointy things. I hope to do some work with Kirk on some projects. He has a very good eye for detail.

|
|
|
|
|
|
Russ Ellis
Industry Professional
|
| Posted: Thu 20 May, 2004 6:25 am Post subject: |
|
|
Nicely done Kirk. It's a beautiful piece that you have constructed there.
TRITONWORKS Custom Scabbards
|
|
|
|
|
Sean Flynt

|
|
|
|
|
Matt G

|
| Posted: Thu 20 May, 2004 6:24 pm Post subject: |
|
|
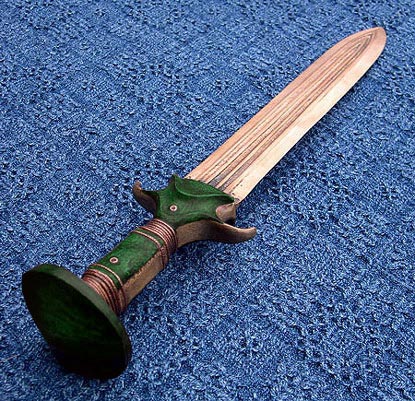
| Sean Flynt wrote: | Brilliant! Stunning! Still, I can't help but wonder what it'd look like green...  |
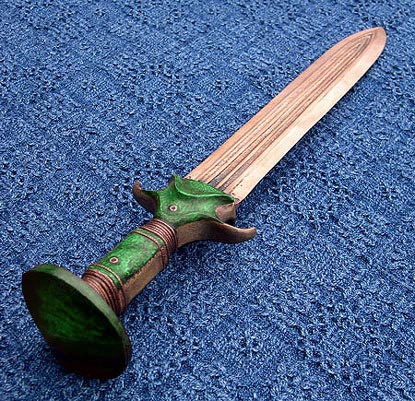
Here's a couple of photoshopped versions of the sword in green... interesting how the darker colors contrasts the bronze and copper so well.
 Attachment: 77.97 KB Attachment: 77.97 KB
Attachment: 78.09 KB
Attachment: 78.62 KB
"Speak what you think today in words as hard as cannon-balls and tomorrow speak what tomorrow thinks in hard words again, though it contradict every thing you said today."
Ralph Waldo Emerson (1803 - 1882)
|
|
 |
|
Sean Flynt
|
|
|
|
|
Kirk Lee Spencer
|
| Posted: Sat 22 May, 2004 11:41 am Post subject: |
|
|
| Matt G wrote: | | Sean Flynt wrote: | | Brilliant! Stunning! Still, I can't help but wonder what it'd look like green... |
Here's a couple of photoshopped versions of the sword in green... interesting how the darker colors contrasts the bronze and copper so well. |
Matt...
Impressive work. I had thought of using Ebony for the grip material... If so it would have looked like your first pic.... Not bad at all. I really like the darker look against the bright bronze. I have a rough cast Kopesh I got from Manning Imperial...
http://www.manningimperial.com/item.php?item_id=114
I had considered using ebony for the handle material. Your picture has convinced me to go this way.
thanks
ks
Two swords
Lit in Edens flame
One of iron and one of ink
To place within a bloody hand
One of God or one of man
Our souls to one of
Two eternities
|
|
|
|
|
Kirk Lee Spencer
|
| Posted: Sat 22 May, 2004 11:51 am Post subject: |
|
|
| Tom Carr wrote: | I got a hands on look at the Odysseus today and all I have to say is it is better than the pictures. It Feels right in the hand and the workmanship outstanding. Turns out that Kirk lives a half mile away from me and we got together today and had lunch and talked sharp pointy things. I hope to do some work with Kirk on some projects. He has a very good eye for detail.
|
Tom...
It was nice to have a chance to meet you in person. Thanks so much for the kind words and support. I look forward to future projects...
Take care.
ks
Two swords
Lit in Edens flame
One of iron and one of ink
To place within a bloody hand
One of God or one of man
Our souls to one of
Two eternities
|
|
|
|
|
Kirk Lee Spencer
|
| Posted: Sat 22 May, 2004 11:59 am Post subject: |
|
|
| Sean Flynt wrote: | | I love the wood as-is. It's a darkly patinated bronze blade I'd like to see! That might not make much sense with the gorgeous, intact grip, I guess.... |
Hi Sean...
After I took the pictures that are posted, I tried to make it green with the Ammonia tent idea you shared with us. I used ammonia from the grocery store and I think it was not strong enough. So I will try to get some industrial strength and try it again. However, the fullers are already starting to turn green. I will probably let the sword weather naturally. If the blade does become Vertegris I will post another picture for you.
Thanks Sean
It's good to hear from you again....
ks
Two swords
Lit in Edens flame
One of iron and one of ink
To place within a bloody hand
One of God or one of man
Our souls to one of
Two eternities
|
|
|
|
|
Matt G
|
| Posted: Sat 22 May, 2004 6:36 pm Post subject: |
|
|
| Kirk Lee Spencer wrote: |
Impressive work. I had thought of using Ebony for the grip material... If so it would have looked like your first pic.... Not bad at all. I really like the darker look against the bright bronze. I have a rough cast Kopesh I got from Manning Imperial...
http://www.manningimperial.com/item.php?item_id=114
I had considered using ebony for the handle material. Your picture has convinced me to go this way.
|
Kirk,
Glad that picture came in handy!
I'm really looking forward to seeing your completed khopesh! Besides the grip plates, will the khopesh be modified in ways similar to your Odysseus (Stock removal on the blade and general weight reduction, etc.)?
Matt
"Speak what you think today in words as hard as cannon-balls and tomorrow speak what tomorrow thinks in hard words again, though it contradict every thing you said today."
Ralph Waldo Emerson (1803 - 1882)
|
|
|
|
|
Sean Flynt
|
| Posted: Mon 24 May, 2004 7:21 am Post subject: |
|
|
Hmmm...I wonder if brass and bronze simply react at significantly different rates and in differing intensity. I also used ordinary grocery store ammonia, and noticed that while my brass hilt furniture reacts very quickly and strongly, my brass scabbard furniture does not. I assume that's because these are slightly different alloys. If so, that might explain the dramatically different results with bronze. I recall someone here saying something about copper content...Is there a chemist in the house?
-Sean
Author of the Little Hammer novel
https://www.amazon.com/Little-Hammer-Sean-Flynt/dp/B08XN7HZ82/ref=sr_1_1?dchild=1&keywords=little+hammer+book&qid=1627482034&sr=8-1
|
|
|
|
|
Kirk Lee Spencer
|
| Posted: Mon 24 May, 2004 10:37 am Post subject: |
|
|
| Matt G wrote: | | Kirk Lee Spencer wrote: |
Impressive work. I had thought of using Ebony for the grip material... If so it would have looked like your first pic.... Not bad at all. I really like the darker look against the bright bronze. I have a rough cast Kopesh I got from Manning Imperial...
http://www.manningimperial.com/item.php?item_id=114
I had considered using ebony for the handle material. Your picture has convinced me to go this way.
|
Kirk,
Glad that picture came in handy!
I'm really looking forward to seeing your completed khopesh! Besides the grip plates, will the khopesh be modified in ways similar to your Odysseus (Stock removal on the blade and general weight reduction, etc.)?
Matt |
Hi Matt...
I doubt that I will need to do much stock removal on this Canaanite Khopesh... It is really light already even in its rough-cast-right-out-of-the-mold state. I will do some fullering to give it a little character but this should not remove too much bronze. The ebony and ivory grip plates should look great against the bronze.
I have several other projects ahead of this one so it may be awhile. Once its finished I will post it though.
Thanks for your interest and help Matt...
ks
Two swords
Lit in Edens flame
One of iron and one of ink
To place within a bloody hand
One of God or one of man
Our souls to one of
Two eternities
|
|
|
|
|
Robert Zamoida

|
| Posted: Tue 25 May, 2004 6:12 pm Post subject: |
|
|
Wow Kirk, that is absolutley lovely! Did you draw inspiration for the hilt from The Ancient Greece of Odysseus by Peter Connoly?
Rob Zamoida
"When your life is on the line, you want to make use of all your tools. No warrior should be willing to die with his swords at his sides, without having made use of his tools."
-Miyamoto Mushashi, Gorin no Sho
|
|
|
|
|
Kirk Lee Spencer
|
| Posted: Thu 27 May, 2004 5:35 am Post subject: |
|
|
| Robert Zamoida wrote: | | Wow Kirk, that is absolutley lovely! Did you draw inspiration for the hilt from The Ancient Greece of Odysseus by Peter Connoly? |
Hi Robert
Thanks... I'm glad you like it.
I remember reading Connoly's work on Greece, Rome and Ancient Israel. All were very good. I don't remember if his reconstructions had any bearing on this design... I suspect that they did. The most direct influence came from archeological drawings of flang-hilted swords which retained some of their grip plates. Here are a few examples.
ks
Attachment: 87.98 KB
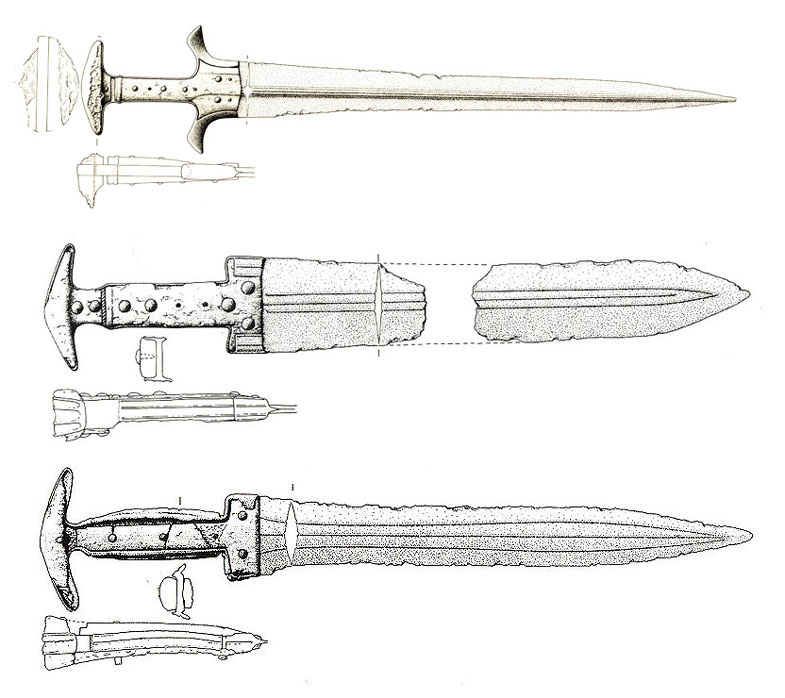
Three Bronze Age Flang-Hilted Swords with Organic Hilts in Place
Two swords
Lit in Edens flame
One of iron and one of ink
To place within a bloody hand
One of God or one of man
Our souls to one of
Two eternities
|
|
|
|
|
|
|

