
| myArmoury.com is now completely member-supported. Please contribute to our efforts with a donation. Your donations will go towards updating our site, modernizing it, and keeping it viable long-term.
Last 10 Donors: Daniel Sullivan, Anonymous, Chad Arnow, Jonathan Dean, M. Oroszlany, Sam Arwas, Barry C. Hutchins, Dan Kary, Oskar Gessler, Dave Tonge (View All Donors) |
| Author |
Message |
|
Matthew Amt
|
 Posted: Tue 24 Nov, 2009 6:58 am Post subject: Posted: Tue 24 Nov, 2009 6:58 am Post subject: |
 |
|
DEFINITELY wear a mask when working bone!! Plants and flowers love bone dust, lungs hate it. From your description of the stink, presumably you're using power tools for this? I tried my Dremel at first, but took to using only hand tools (rasp, files, sandpaper) for making grips, and have never looked back. MUCH less stink, the dust tends to make 2 neat piles (wear a MASK anyway!), and with practice the whole job takes only an hour or so.
Yes, wood shims should be all you need to make the grip fit snugly. My gladius grip doesn't even have shims, and I've never had a problem.
Looking good, carry on!
Matthew
|
|
   |
 |
|
Luke Zechman
Location: Lock Haven Pennsylvania Joined: 18 Jan 2009
Posts: 278
|
| Posted: Tue 24 Nov, 2009 10:19 am Post subject: |
|
|
I would say that I have worked this about 95% with a double cut half round bastard. I busted out the dremel for the very last part of getting the six sides flat and even. I resisted the urge to use it because I found that when using the dremel I inevitably get moving right along, and sometimes that means not paying close enough attention to what I am doing. Shaping it by hand means slower progress and more attention to detail. I am still new at all this, and every time I work on this project I encounter new experiences.
After I had gotten the six sides planed out I began laying out the plans for for the finger groves. I sectioned out the length of the handle into four equal lengths. I then went in with a scroll saw and cut a line around the handle where the trough of each finger would lay. The I went in with a small round double cut file using the cut as a guide and cut in a small half circle trough. Then finally I went in with a large half round double cut bastard using the small troughs as a guide. It seemed to me that this would work better then just going in the large one first. It actually made the cutting go quite quick.
I will be posting pictures of the finished grip later tonight after school. I expect this project to be done sometime soon since Thanksgiving break starts today!!! Just have to finish carving the pommel, finish rounding out the brass nut that I bought at Lowes (just so happens to thread onto the tang) and find a good brass washer to place between the pommel and the nut.
I will be needing some advice on peening this sword sometime in the near future. I would hate to get this far and mess it up with a bad peen. After this is done I am onto creating a scabbard!
|
|
|
|
|
|
Luke Zechman
Location: Lock Haven Pennsylvania Joined: 18 Jan 2009
Posts: 278
|
| Posted: Tue 24 Nov, 2009 1:46 pm Post subject: |
|
|
Here is the almost finished grip. Still want to sand it all down and soften the edges, and I obviosly must remove it from the remaining part of the bone. Its too bad because that extra bit of bone at the bottom would make a comfortable pommel.
Here she is.
 Attachment: 22.21 KB Attachment: 22.21 KB
|
|
|
|
|
Maurizio D'Angelo

|
| Posted: Tue 24 Nov, 2009 3:08 pm Post subject: |
|
|
| Luke Zechman wrote: |
I will be needing some advice on peening this sword sometime in the near future. I would hate to get this far and mess it up with a bad peen. |
I think with a flame to heat the piece mounted can ruin the wood.
You may warmed many times the terminal part of the tang, this serves to remove the hardness and the risk of crack. Assembly. You can peened with little heat, the steel does not splinter.
I hope it help.
The grip is beatiful. 
Ciao
Maurizio
|
|
 |
|
|
Ken Speed
|
| Posted: Tue 24 Nov, 2009 3:58 pm Post subject: |
|
|
Great job Luke!
You know if you look at your photo and deliberately forget what it actually is, your sword hilt looks sculptural like a Baptismal font or a pedestal for a bust.
|
|
|
|
|
Julien M

|
| Posted: Wed 25 Nov, 2009 1:59 am Post subject: |
|
|
I'm amazed by your progress on this...design and execution are top notch.
To be honnest this project is probably one of the most impressive I've seen so far.
Bravo!
Cheers,
Julien
|
|
|
|
|
|
Matthew Amt
|
| Posted: Wed 25 Nov, 2009 7:40 am Post subject: |
|
|
Very nice work! The only change I'd recommend is to "sharpen" the peaks between the grooves, since that's how the originals usually were. The ends can stay flattened, though.
I often just make my own washers for things like this, so that I get any size, shape, and thickness that I want. Round or square is fine, not much bigger than the nut.
It's gonna look good when it's all done!
Vale,
Matthew
|
|
|
|
|
|
Luke Zechman
Location: Lock Haven Pennsylvania Joined: 18 Jan 2009
Posts: 278
|
| Posted: Wed 25 Nov, 2009 12:07 pm Post subject: |
|
|
|
I should have this project assembled by the end of the day with pictures of the completed sword. The finish on the wooden parts will not be done to completion as the repeated oiling and hand polishing will take time. I am wedging everything into place right now, and i just heated up the end of the tang to reddish orange to remove any temper. Stay tuned, completion is near.
|
|
|
|
|
|
Luke Zechman
Location: Lock Haven Pennsylvania Joined: 18 Jan 2009
Posts: 278
|
| Posted: Wed 25 Nov, 2009 1:56 pm Post subject: |
|
|
I am finally done with the sword!!!!! WOW what a rush! OK so here are the final stats and comments on the rest of the process...
I had done numerous assemblies and fiddling with small fitting problems. My main concern was that everything was in line and solid. I tapped in walnut wedges wherever there had been gaps around each piece. This things just feels so rock solid. All the pieces had to be tapped into place, and I must admit I was just waiting for the pommel or cross to split in half. (yikes) Before placing the pommel on the tang I heated the end with a torch to reddish orange to soften the metal / remove any hardening. Then I placed on a washer and threaded a regular six sided nut onto the tang. I used a wrench to slowly tighten the nut until all the pieces had been compressed and the sword hummed when held at the cross and was tapped laterally at the pommel. It has a very nice hum when tapped. Then I removed the six sided nut and replaced it with on that i had rounded. Then the peening commenced. I removed a little excess tang since the final product is shorter then my plan was. Then i began tapping firmly without wailing on it. It took a lot of tapping but after about 5 minutes the peen was done. I left the little hammer marks because I think it looks cool. The sword was completed!!!
Comments... Matthew... I left the squared spaces in between the finger groove because i both liked how they felt and looked. I realize that this is not common ,but I can't imagine that it never happened back then. Either way i want to thank you so much for all your advice, Legio XX webpage and knowledge. I would not have been able to do this without you. I would also like to thank anyone else that offered advice on this project... you made this safer, quicker, easier, more fun and less painful. THANK YOU ALL!!!!
Julien... I am very flattered by your comment since I really really like the projects that you do, and also appreciate your style and level of quality. I always look forward to seeing your work.
Finished Statistics (Compared to Original)
Blade Length: 18.5in or 47cm ---- original 22in or 55.9cm
Hilt Length: 6.5in or 16.5cm ----original 7.5in or 19cm
Grip: 3 1/8in or 8cm
Overall: 25in or 63.5cm ---- original 29.5 in or 75cm
POB: 4.5in or 11.4cm below hilt ---- original 3.5in or 8.9 cm below hilt
Weight: Lighter then original which was 1lb 14oz .
Additional comments.
The grip on this sword is very firm. The bone section is short enough that when gripped firmly the hand is pushed out onto the pommel and cross. This locks everything into place, and makes the sword feel like an extension of the arm. The sword feels a little end heavy. I may go back in and remove some of the beefiness from the tip. I originally left it that way to simulate period swords that had sturdy tips. Who knows maybe I will just leave it.
This project is not finished. I now will be making a scabbard and suspension, which will probably consist of a baldric. I kind of wanted to get away from the red scabbard you so commonly see with Roman replicas. What other colors where common? I have also seen pale blue, which appeals to me more then then the red.
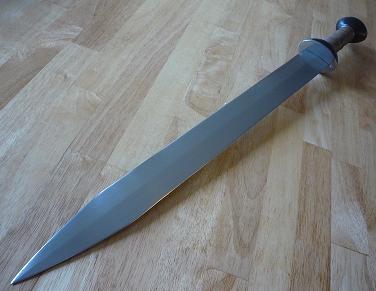
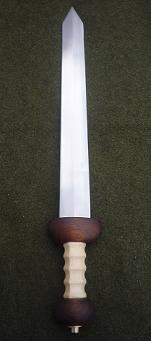
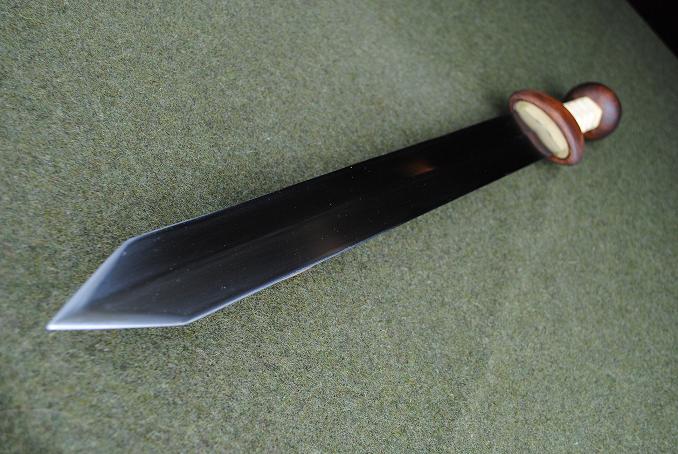
OK here are the pictures. One of the whole sword. One of hilt detail. One of me holding the sword for perspective. Notice the dreary day here in PA which made for ideal picture taking light. Oh and one of the original "Gladii"
Attachment: 29.22 KB
Attachment: 33.93 KB
Attachment: 54.5 KB

Attachment: 30.99 KB
|
|
|
|
|
|
Nathan Gilleland
|
| Posted: Wed 25 Nov, 2009 11:08 pm Post subject: |
|
|
Beautiful work!
I've been following this thread closely, looking forward to each new update. I must say, it gives hope to all of us who lack the ability to customize their swords like you have done.
Simply wonderful.
Seek Honor before Wealth,
Truth before Honor,
God Before all
|
|
|
|
|
|
Luke Zechman
Location: Lock Haven Pennsylvania Joined: 18 Jan 2009
Posts: 278
|
| Posted: Thu 26 Nov, 2009 12:37 am Post subject: |
|
|
|
Thank you very much Nathan. I don't know why I waited so long to actually do something like this. Fitting it all together in the end felt amazing. I checking for responses of this thread i suddenly realized how dreadful those pictures are. I will be posting some better pictures in the near future.
|
|
|
|
|
Artis Aboltins

|
| Posted: Thu 26 Nov, 2009 2:12 am Post subject: |
|
|
|
Indeed, your work is very inspuring - showing what can be done with limited ammount of equipment and supplies. This is how a non-special looking item can turn into somethng that is a true pleasure to behold. And, indeed, it would be very nice to see more detailed pictures.
|
|
|
|
|
|
Matthew Amt
|
| Posted: Thu 26 Nov, 2009 6:25 am Post subject: |
|
|
Hey, congrats, nice gladius! Yes, conversions like this can make VERY satisfying pieces. Glad to be of assistance.
Scabbard color, hoo--I'm coming up blank, though there has to be some pictoral evidence. Probably mostly from later mosaics and frescoes, though. Actually, for many years all the Indian-made repro gladii had black leather, so that was by far the predominant color for reenactors. The current trend towards red is a healthy one, I'd say, but there are other options. In the end, while there is good evidence for the scabbard being made of leather-covered wood, I don't think there is any surviving coloration. The leather could have been dyed, but it could also have been *painted*, or it may simply have been oiled or greased or waxed to make it natural brown. But even brown can look excellent with brass and tinned brass fittings.
Good job!
Matthew
|
|
|
|
|
|
Luke Zechman
Location: Lock Haven Pennsylvania Joined: 18 Jan 2009
Posts: 278
|
| Posted: Thu 26 Nov, 2009 9:58 am Post subject: |
|
|
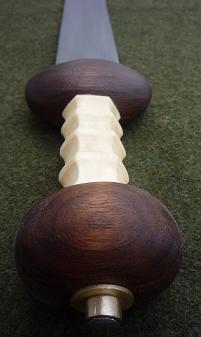
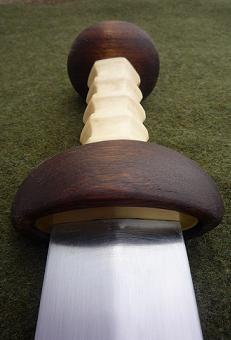
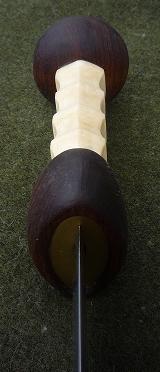
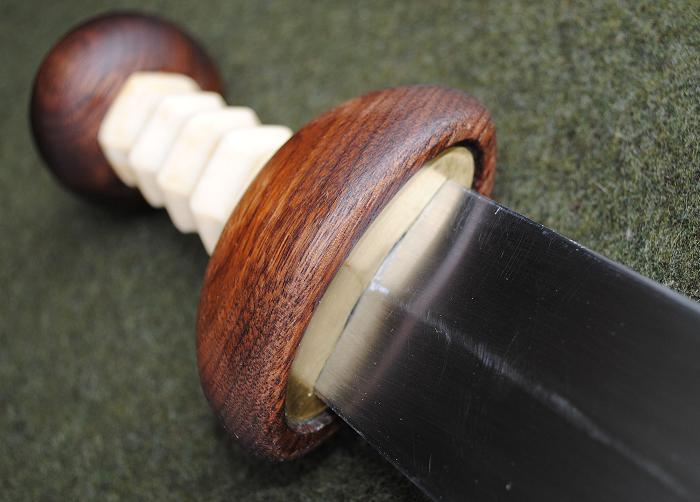
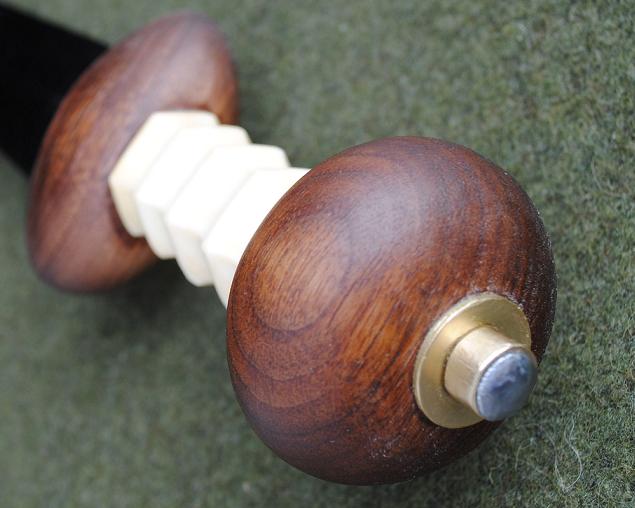
Here are some better pictures showing hilt detail, and a side profile. Enjoy and thanks for the encouraging comments.
Attachment: 24.05 KB
Attachment: 25.76 KB
Attachment: 20.28 KB
Attachment: 24.25 KB
|
|
|
|
|
Maurizio D'Angelo
|
| Posted: Thu 26 Nov, 2009 10:26 am Post subject: |
|
|
WOW, great job. From the photos it looks good. Satisfaction for us all.
Thanks for posting, Luke
Ciao
Maurizio
P.S
When even the scabbard is finished, dressed like a true Roman, and get your photos.  
Just kidding, of course
|
|
|
|
|
Paul Hansen

|
| Posted: Thu 26 Nov, 2009 11:50 am Post subject: |
|
|
|
Very nice work Luke!
|
|
|
|
|
Nathaniel C.

|
| Posted: Thu 26 Nov, 2009 12:10 pm Post subject: |
|
|
I've been fallowing this thread with quite some interest. This made me completely rethink my current gladius project. I hope it comes out close to a nice a yours.
I'm really looking forward to seeing what you do for the scabbard.
|
|
|
|
|
|
Luke Zechman
Location: Lock Haven Pennsylvania Joined: 18 Jan 2009
Posts: 278
|
| Posted: Thu 13 May, 2010 4:19 pm Post subject: |
|
|
|
It has been a while since I have participated much in this forum due to work and school obligations, but school is over for the summer, and I am back at my projects. Spent part of the day refining the shape of the hilt. I rounded out part of the cross guard, and made the pommel more circular. If you refer back to my original plans the pommel was almost like a flattened sphere. I liked the design, but this didn't leave much room for the hand when swinging the blade. I took about an 1/8 of an inch off of the diameter of the pommel, and this solved the problem. I also rounded out the nodes between the finger indentations, which gives the handle a more organic feel. It was great to hang this sword on my wall for the past couple months and just look at it.. It ultimately allowed me to be very certain about what changes i wanted to make, and now I am very pleased with the end product. I have obtained a high quality camera, and will be taking high resolution pictures very soon. After that i will be working on another project (bronze sword Ewart Park) before I come back to this one, and the scabbard that I still intend to make.
|
|
|
|
|
|
Luke Zechman
Location: Lock Haven Pennsylvania Joined: 18 Jan 2009
Posts: 278
|
| Posted: Wed 19 May, 2010 11:44 am Post subject: |
|
|
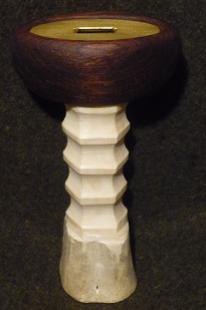
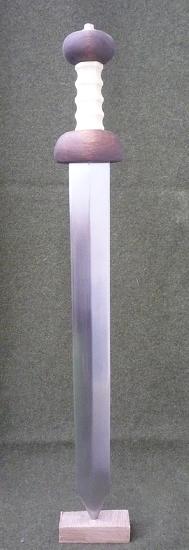
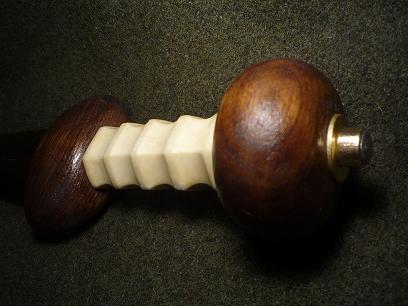
Here are some better quality picture that I have taken. I still need to rub the wooden parts a bit more for a better finish, but all in all this is the finished shape. The reshaped pommel and grip give the sword better handling characteristics, while the reshaped cross give the sword's hilt a less blocky appearance.
Attachment: 79 KB
Attachment: 75.46 KB
Attachment: 97.1 KB
Attachment: 114.55 KB
[ Download ]
|
|
|
|
|
|
Philip Montgomery
|
| Posted: Wed 19 May, 2010 12:39 pm Post subject: |
|
|
| Luke Zechman wrote: | | I am finally done with the sword!!!!! WOW what a rush! OK so here are the final stats and comments on the rest of the process |
Luke, thank you so much for documenting this process. I just ordered a Mainz bare blade from Albion, and I was fretting about how to add a handle. Your gladius is amazing. I love that handle. You have inspired me.
Philip Montgomery
~-----~
"A broken sword blade fwipping through the air like a scythe through rye does demand attention."
|
|
|
|
|
|
|
You cannot post new topics in this forum
You cannot reply to topics in this forum
You cannot edit your posts in this forum
You cannot delete your posts in this forum
You cannot vote in polls in this forum
You cannot attach files in this forum
You can download files in this forum
|
All contents © Copyright 2003-2024 myArmoury.com — All rights reserved
Discussion forums powered by phpBB © The phpBB Group
Switch to the Basic Low-bandwidth Version of the forum
|

