| Author |
Message |
Sean Flynt

|
 Posted: Tue 06 Jul, 2004 6:37 am Post subject: Another MRL Grip Upgrade Posted: Tue 06 Jul, 2004 6:37 am Post subject: Another MRL Grip Upgrade |
 |
|
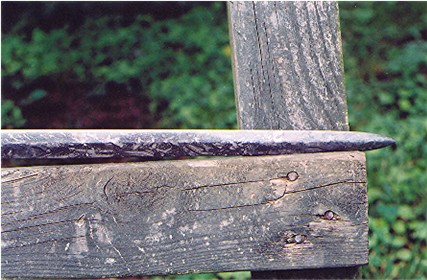
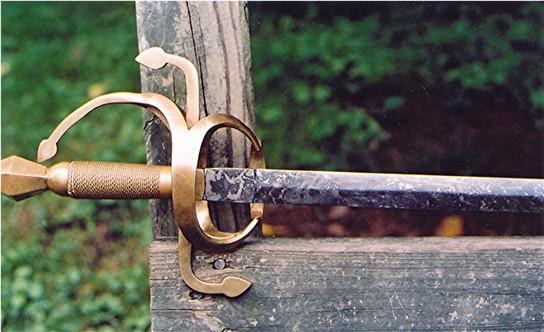
Here's the new grip for my Windlass/MRL Scottish Backsword. The original (see it here: http://www.myArmoury.com/review_mrl_scot.html ) didn't suit my taste or the antique finish I wanted. After leaving the grip unwrapped and antiqued for awhile I decided to give it a simple, utilitarian grip appropriate for a cheap Dutch sword of dubious quality (to paraphrase the author of Scots Armies of the English Civil Wars, which features modern illustrations of many similar weapons). I suspect that wood and twisted wire would be more in keeping with infantry swords of the day, but the wood/cord/leather seems a reasonable and much less complicated alternative.
For details of the process, see this thread: http://www.myArmoury.com/talk/viewtopic.php?t=1814
NOTES: I discovered that not all chamois is alike. I bought another chamois that was a bit more expensive and also a bit too thick for my purposes. Lesson learned. Get the cheap, thin stuff and experiment to determine what works best. Also, for this grip I used only wood glue, so the process should be more reversible than if I used epoxy as described in the falchion thread. Although I like the irregularities of the natural hemp cord, you can avoid those with a more finely wound synthetic or natural cord. You can see the start of the seam in the first view below. It's a bit better than the first project, but not as well-finished as I would like.
 Attachment: 110.96 KB Attachment: 110.96 KB
Attachment: 103.76 KB
Attachment: 98.12 KB

-Sean
Author of the Little Hammer novel
https://www.amazon.com/Little-Hammer-Sean-Flynt/dp/B08XN7HZ82/ref=sr_1_1?dchild=1&keywords=little+hammer+book&qid=1627482034&sr=8-1
|
|
   |
 |
William Goodwin

|
| Posted: Tue 06 Jul, 2004 7:27 am Post subject: |
|
|
Very nice Sean, indeed. Now, how did ya' antique out the blade? May consider doing my MRL Scottish Back-Sword.
William
aka Bill
|
|
|
|
|
Sean Flynt
|
| Posted: Tue 06 Jul, 2004 8:48 am Post subject: |
|
|
I'ts not too difficult. The hardest part is removing the lacquer from hilt and blade. You can either start with a sanding sponge and various grades of sandpaper, or apply Citrustrip first, followed by steel wool. Depending on the thickness of the lacquer, the latter method may work and save you lots of sanding. If it doesn't work, you'll still have to sand, and you'll also have to clean up the mess left by the stripper. Once the salt and vinegar have had a chance to work, you’ll know if you missed any spots of lacquer. They’ll remain bright, and require that you re-sand those spots. The details of the hilt are especially fiddly. Don’t fret. Repeated cleanings and start-overs in different areas adds to the overall effect.
Folks use different fluids for the rusting. I prefer salt and vinegar (no particular formulation) in an old household cleaner spray bottle. You need a bottle that can produce a fine mist. Once the steel is free of lacquer, just spray and wait. Multiple sprayings and cleanings with fine steel wool work best for me. The repeated rusting and cleaning adds depth to the finish, as does normal aging. The finish of my backsword darkened significantly over time. I cleaned it a bit with steel wool for the photos and finished it with Renaissance Wax. NOTE: The blade and hilt are of different kinds of steel, and thus react at different rates and to different degrees. Adjust rusting times as needed.
There are a several threads here that will provide examples and details:
My antiqued MRL German infantry hanger:
http://www.myArmoury.com/talk/viewtopic.php?t=1278&highlight=
My antiqued Albion Kern Axe:
http://www.myArmoury.com/talk/viewtopic.php?t=1636&highlight=
My antiqued “floating CS” sword:
http://www.myArmoury.com/talk/viewtopic.php?t=1075&highlight=
Kirk Lee Spencer's antiqued MRL Arbedo sword:
http://www.myArmoury.com/talk/viewtopic.php?t=446&highlight=
Be sure to post the results if you try this!
-Sean
Author of the Little Hammer novel
https://www.amazon.com/Little-Hammer-Sean-Flynt/dp/B08XN7HZ82/ref=sr_1_1?dchild=1&keywords=little+hammer+book&qid=1627482034&sr=8-1
|
|
|
|
|
Kirk Lee Spencer

|
| Posted: Tue 06 Jul, 2004 9:08 am Post subject: |
|
|
Sean...
Very nice work... I really like the contrasting colors and the rough surface of the grip.
ks
Two swords
Lit in Eden’s flame
One of iron and one of ink
To place within a bloody hand
One of God or one of man
Our souls to one of
Two eternities
|
|
|
|
|
Sean Flynt
|
| Posted: Tue 06 Jul, 2004 9:22 am Post subject: |
|
|
Here again, learning on the job has its rewards. Since my new chamois was too thick I had to use some of the material from the falchion project. But I'd already dyed that dark red. A quick dunk in brown dye darkened it significantly but left the red base color. The shoeshine brush, with leftover brown, black and cordovan polish, further darkened the leather and brought out the different colors. All this gives the grip a well-used look that works well with the steel. A happy accident, basically.
-Sean
Author of the Little Hammer novel
https://www.amazon.com/Little-Hammer-Sean-Flynt/dp/B08XN7HZ82/ref=sr_1_1?dchild=1&keywords=little+hammer+book&qid=1627482034&sr=8-1
|
|
|
|
|
William Goodwin
|
| Posted: Tue 06 Jul, 2004 9:23 am Post subject: |
|
|
Thanks for the instuctions Sean. Here's some pics of my swept-hilt I did using the "mustard acid etch" method. If I do thw back-sword I'd like a more uniform look.
Cheers,
William
aka Bill
Attachment: 51.5 KB
|
|
|
|
|
William Goodwin
|
| Posted: Tue 06 Jul, 2004 9:26 am Post subject: |
|
|
One of the hilt....
Attachment: 63.45 KB
|
|
|
|
|
Sean Flynt
|
|
|
|
|
William Goodwin
|
| Posted: Tue 06 Jul, 2004 10:49 am Post subject: |
|
|
Thanks Sean,
The brass is just natural. I've carried this sword for doing re-enactments for about 4 yrs. now(that's it in my avatar), so it's been through hell and back.(soaked in down-pouring rain, covered in mud, run over by a car, sat on, stepped on,etc). The vinegar & salt in the mustard does a good job because of the paste like consistancy.
Bill
|
|
|
|
|
Alexi Goranov
myArmoury Alumni


|
| Posted: Tue 06 Jul, 2004 11:15 am Post subject: |
|
|
| Sean Flynt wrote: | I'ts not too difficult. The hardest part is removing the lacquer from hilt and blade.
|
So there is laquer on the steel? WOW!!!! What happens if you cut with the blade and scratch it? I find it silly (for the manufacturers) to be laquering the blade, but maybe I am not understanding the discussion. Is that only MRL's "invention", and is it on all their products?
Thanks,
Alexi
|
|
|
|
|
Sean Flynt
|
| Posted: Tue 06 Jul, 2004 11:22 am Post subject: |
|
|
It's not on all MRL/Windlass replicas, but it's on almost all that I've seen. If you do much cutting, the lacquer will get scratched and look terrible. You'll at least have to take the lacquer off the blade. However, my most recent Windlass purchase, a "German Hanger," had only an oil coating on the blade. This protected the steel from India to Birmingham, AL, but easily cleaned off with mineral spirits. The brass hilt had a very thin coating of lacquer that came off easily with Citrustrip and steel wool. I know this replica was of recent manufacture because it was backordered. So, maybe Windlass/MRL have decided that they can save some money by not coating everything in heavy lacquer. We can always hope!
-Sean
Author of the Little Hammer novel
https://www.amazon.com/Little-Hammer-Sean-Flynt/dp/B08XN7HZ82/ref=sr_1_1?dchild=1&keywords=little+hammer+book&qid=1627482034&sr=8-1
|
|
|
|
|
|
|
You cannot post new topics in this forum
You cannot reply to topics in this forum
You cannot edit your posts in this forum
You cannot delete your posts in this forum
You cannot vote in polls in this forum
You cannot attach files in this forum
You can download files in this forum
|
All contents © Copyright 2003-2026 myArmoury.com — All rights reserved
Discussion forums powered by phpBB © The phpBB Group
Switch to the Basic Low-bandwidth Version of the forum
|

