| Author |
Message |
Julien M

|
 Posted: Sun 05 Dec, 2010 12:11 pm Post subject: Hilting a moat blade - Yeoman Posted: Sun 05 Dec, 2010 12:11 pm Post subject: Hilting a moat blade - Yeoman |
 |
|
Hi Guys,
I acquired a handful of Albion blades a while ago as some of you might remember from this thread here:
http://www.myArmoury.com/talk/viewtopic.php?p=194493
I was able to get started on one of these today, a Yeoman blade that is absolutely pristine thought was marked as "second" by the folks at Albion (yes, the fueller is very slightly leaning towards the right on one side...it's so subtle that I never noticed it until Owen (Bush) pointed that out to me.
I also have a sovereign with a fuller to fix, and I'm working on both hilts at the same time.
So below is the design I have in mind. You'll recognise the deltin DT2140 hilt components, inspired by the MET museum superb type XIV from the Morosini collection, for which I always had a particular fondness. The yeoman being a fairly typical type XIV, I was not surprised to see that this hilt design works very well with this blade (at least I think so  ). That's where I want to go for the guard. I got a spare yeoman pommel from the moat during my last stay in the US...so I'll use it instead of a bronze/brass one (unless someone here has a spare engraved one, from an old deltin or windlass/factory X...in that case PM me!). ). That's where I want to go for the guard. I got a spare yeoman pommel from the moat during my last stay in the US...so I'll use it instead of a bronze/brass one (unless someone here has a spare engraved one, from an old deltin or windlass/factory X...in that case PM me!).
I used a rectangular thick piece of mild steel that I heated at the forge and split in two, then made a punch replicating the sword tang profile, and punch through both pieces (the sovereign and yeoman blades have exactly the same profile, save for the fueller design, so it's a lot of time saved). That was the hardest part, and I managed to miss the punch and to land the hammer on my fist instead...twice! well, that's how you learn I suppose . I then stretched the quillons on the anvil, and started grinding the basic guard profile. Before removing too much material, I cleaned the guard slot in order to test the fit and see if the guard was well aligned at the blade shoulders...I sanded the tang a bit to fit the pommel...and that's where I am now. I realize that it doesn't look like much yet, but most of the hard stuff is done, and finishing the guard and assembly should be fairly quick from there.
Will post more after my next cession at Owen's workshop.
Cheers,
Julien


|
|
  |
 |
Julien M
|
| Posted: Thu 10 Feb, 2011 4:09 am Post subject: |
|
|
Hi Guys,
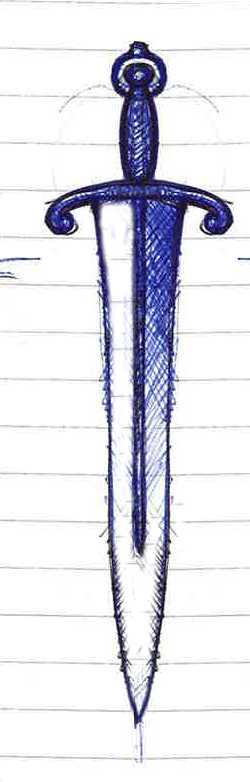
I'm off to the forge tomorrow to do a bit of work on this project and hopefully complete the guard. I've let things to rest for a while now and I was wondering if I should not change my initial design for the guard. One sketches after another the guard happen to change from a style 7 to a style 9 with curved ends and knobs 9, something looking like the quick sketch below).
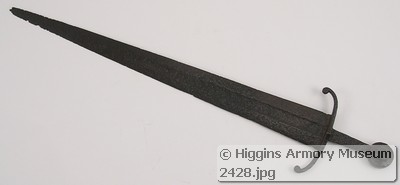
Now I have not been able to find any examples of types XIV with this kind of guard that one would expect more on a type XVIII for instance, save for the higgins museum type XIV (below).
What do you guys think? Would that seem appropriate to you?
Let me know (and fast!) before I approach the belt grinder
Cheers,
J
 Attachment: 12.51 KB Attachment: 12.51 KB
Attachment: 18.55 KB
|
|
|
|
|
Jean Thibodeau

|
| Posted: Thu 10 Feb, 2011 6:51 pm Post subject: |
|
|
Well maybe a type XIV later re-hilted ? It does look good to me aesthetically.
The drawing does seem to me to be a little out of proportion because with a 30' long blade it would have to be at least 4" wide but I'm guessing this is just the drawing and not the actual proportions. The fuller also looks narrower than the shown blade in the drawing.
Good luck with the work it should be interesting to see the final product.
You can easily give up your freedom. You have to fight hard to get it back!
|
|
|
|
|
Johan Gemvik

|
| Posted: Thu 10 Feb, 2011 7:01 pm Post subject: |
|
|
Does it have to be an exact replica of an original museum item? If not go for that nice curled guard, it looks really good.
"The Dwarf sees farther than the Giant when he has the giant's shoulder to mount on" -Coleridge
|
|
|
|
|
Julien M
|
| Posted: Fri 11 Feb, 2011 11:26 am Post subject: |
|
|
Just back from the workshop with an almost finished guard...that took me most of the day to complete (fitting the shoulder blades in a recess on the guard was painfull and time consuming, as I had to dig quiet deep inside the guard with the dremel to ensure a proper fit). I dropped the idea of a more complex design...for one I like this guard type a lot, and secondly this one is complex enough for my limited skills
I will give a go at wax+casting for more complex attempts.
Next steps include final tweaks to ensure both quillons are evenly curved (I need to lay the guard flat and draw it for that, because I've looked at this piece of metal all day and I can't tell anymore)...polish all components, then the final assembly (the pommel will be pushed down approx one centimeter down the tang, with sandwitch grip).
Hope you like it.
Cheers,
Julien


|
|
|
|
|
Julien M
|
| Posted: Fri 11 Feb, 2011 11:35 am Post subject: |
|
|
| Jean Thibodeau wrote: | | The drawing does seem to me to be a little out of proportion. |
Yes Jean it is completely out of proportion Just a very quick sketch to try to have a vague idea of how it would look.
|
|
|
|
|
Sean Flynt

|
|
 |
|
Jean Thibodeau
|
| Posted: Sat 12 Feb, 2011 4:17 am Post subject: |
|
|
| Julien M wrote: | | Jean Thibodeau wrote: | | The drawing does seem to me to be a little out of proportion. |
Yes Jean it is completely out of proportion Just a very quick sketch to try to have a vague idea of how it would look. |
Very nice work.  
You can easily give up your freedom. You have to fight hard to get it back!
|
|
|
|
|
Johan Gemvik
|
| Posted: Sat 12 Feb, 2011 2:46 pm Post subject: |
|
|
Well worth the extra dremel time.
Is both the pommel also from the moat sale? Did it need any finishing?
"The Dwarf sees farther than the Giant when he has the giant's shoulder to mount on" -Coleridge
|
|
|
|
|
|
John Coris
Location: European Union Joined: 11 Feb 2011
Posts: 33
|
| Posted: Sat 12 Feb, 2011 4:05 pm Post subject: |
|
|
Excellent work! How many workhours did it require?
Always excel and stay superior of others. (Homer - Iliad)
|
|
|
|
|
|
David Sutton
|
| Posted: Sun 13 Feb, 2011 4:55 am Post subject: |
|
|
Looking excellent Julien
'Reserve your right to think, for even to think wrongly is better than not to think at all'
'To teach superstitions as truth is a most terrible thing'
Hypatia of Alexandria, c400AD
|
|
|
|
|
Julien M
|
| Posted: Sun 13 Feb, 2011 10:31 am Post subject: |
|
|
Hey Guys,
Thanks for your comments, much appreciated as I admit that I dragged my feet a bit on that one, thinking "I should I've used wax on this". In the end I am happy I didn't and I'm not even sure it would have been faster or easier anyway.
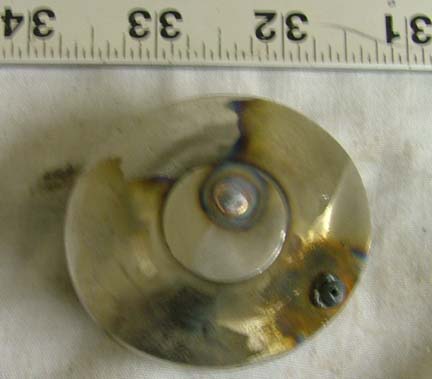
The pommel is one of the moat. It appeared to have severe faults and pits (that why it was one of the last to go, pic below) but all these happened to be very superficial and it was cleaned in no time.
Not sure how long it took me to do the guard...I'd say 4 hours at the forge to cut the chunk of metal, punch a basic tang slot, realign the guard once the slot was made. Shaping on the grinder is surprisingly not the hardest nor longest part really, as cleaning the slot and creating the recess and fit takes hours. All in all I'd say a day.
J
Attachment: 38.3 KB
|
|
|
|
|
Julien M
|
| Posted: Sat 22 Oct, 2011 8:48 am Post subject: |
|
|
I managed to spend a few hours on this project, after changing my mind again and again on the cross design (finally going for the higgins type XIV cross, as sketched above). Of course it's way more hassle, but I was not entirely satisfied with my first attempt. Since I had spent quiet a bit of time on the guard slot/recess already, I used the guard I'd previously made, heated it hot red, flatten it on the anvil and redid the curve. Then Owen (Bush) was kind enough to weld two pieces of square steel on the inside of each quillons. I sanded these flat on each side and I now have the material I need to make the knobbed quillons ends. Forging a symetrical arched cross with tapering quillons is quiet a headache really, it is never spot on...(I know, it does not necessarily have to be but I am hilting an albion machine made blade, with perfect lines).
The guard made by J Lundemo here (probably inspired by the higgins sword to some extend as well) is actually very close to what I am aiming at.
http://www.myArmoury.com/talk/viewtopic.php?p=233640
Hopefully I'll manage to finish and mount this project before the end of the year (Of course I have to clean the recess again after heating it in the forge, redo the finish of the guard entirely too...well I have to believe that I am in no hurry )
Cheers,
J

|
|
|
|
|
Julien M
|
| Posted: Sun 06 Nov, 2011 11:33 am Post subject: |
|
|
Hi guys,
I made some progress on this:
Re did the guard fit on the shoulder blades (the guard now stands firm when hammered into position, I corrected this by puting some weld on each side of the tang hole and dremeled again, as the previous fit was too loose).
I shaped the quillons ends, bended the branches again and again so that one one side matches to another (there is still a slight asymetry, which drives me crazy but I'll live with it).
I am starting to be very happy with this one. I still need to round the quillons further and polish the guard, then on to the wooden grip and final assembly. I'm not too far from my custom Yeoman now
Let me know what you think.
Cheers,
J


|
|
|
|
|
Dan Dickinson
Industry Professional

|
| Posted: Sun 06 Nov, 2011 3:12 pm Post subject: |
|
|
Fantastic, I love it!
I really love the yeoman as is, but also love the original at the higgins (in large part due to the guard)...and this looks like the perfect blend of the two.
What are you planning for the grip? Also, how much does the slightly heavier cross change the POB from the original?
Thanks and can't wait to see the finished project,
Dan
|
|
|
|
|
Tom Carr

|
| Posted: Sun 06 Nov, 2011 6:12 pm Post subject: |
|
|
|
I just swallowed my gum! That is fantastic. I have a love affair with Type XIV's and that one is a knock out!
|
|
 |
|
|
Joe Fults
|
| Posted: Sun 06 Nov, 2011 6:18 pm Post subject: |
|
|
Very impressed with your project.
"The goal shouldn’t be to avoid being evil; it should be to actively do good." - Danah Boyd
|
|
|
|
|
Julien M
|
| Posted: Mon 07 Nov, 2011 5:39 am Post subject: |
|
|
Hi Guys,
Thanks a lot for your comments.
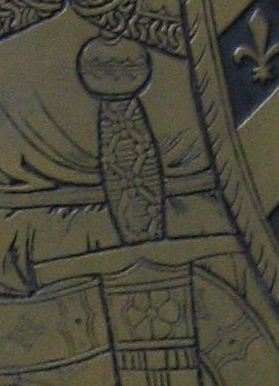
For the grip I am thinking of something like the below, which would take some experimenting first. If I can't be bothered I'll do a straight forward Albion style leather over cord wrap.
J
Attachment: 23.16 KB
|
|
|
|
|
|
Jeremy V. Krause
|
| Posted: Mon 07 Nov, 2011 9:03 am Post subject: |
|
|
This looks great Julien!
What kind of grip are you planning
|
|
|
|
|
|
Gregory J. Liebau
Location: Dinuba, CA Joined: 27 Nov 2004
Posts: 669
|
| Posted: Mon 07 Nov, 2011 9:26 am Post subject: |
|
|
| Julien M wrote: | | For the grip I am thinking of something like the below, which would take some experimenting first. If I can't be bothered I'll do a straight forward Albion style leather over cord wrap. |
In my opinion, this image is depicting the same sort of wrapping style on the grip as the Albion Chevalier sword, using decorated studs to secure the leather cord at the junctions. The reason we see so much of the wrap is merely because the artist was trying to put some dimension into the figure, methinks.
By the way, this is coming along great. I can't wait to see the finished piece!
-Gregory
|
|
|
|
|
|
|

