| Author |
Message |
Jean Thibodeau

|
 Posted: Fri 16 Jan, 2015 10:23 am Post subject: Posted: Fri 16 Jan, 2015 10:23 am Post subject: |
 |
|
| Aaron Hoard wrote: | Depending on what chemicals/process you use, you can get all sorts of colors. For example, here's a bronze box that has an amazing blue color.
 |
Very nice colour.
You can easily give up your freedom. You have to fight hard to get it back!
|
|
  |
 |
Jean Thibodeau
|
| Posted: Fri 16 Jan, 2015 10:44 am Post subject: |
|
|
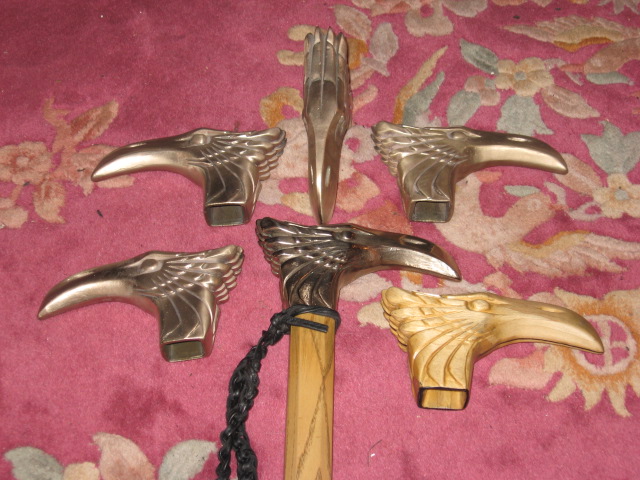
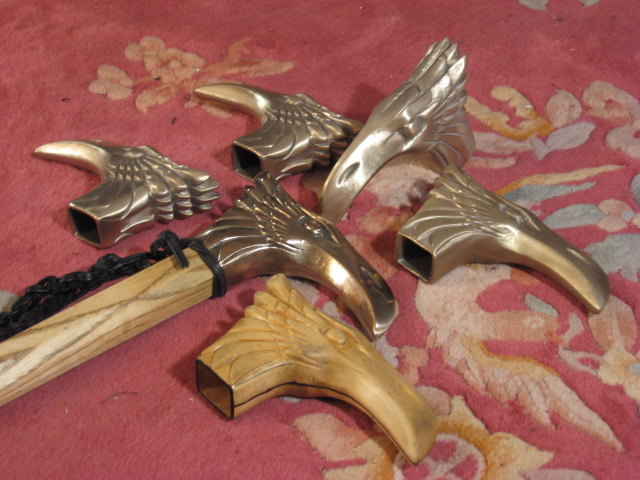
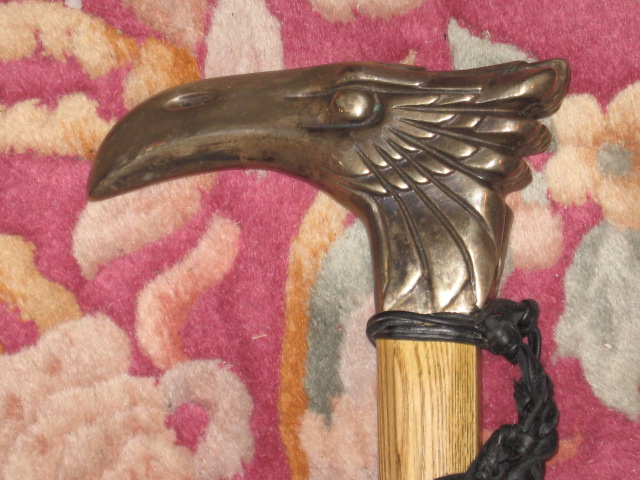
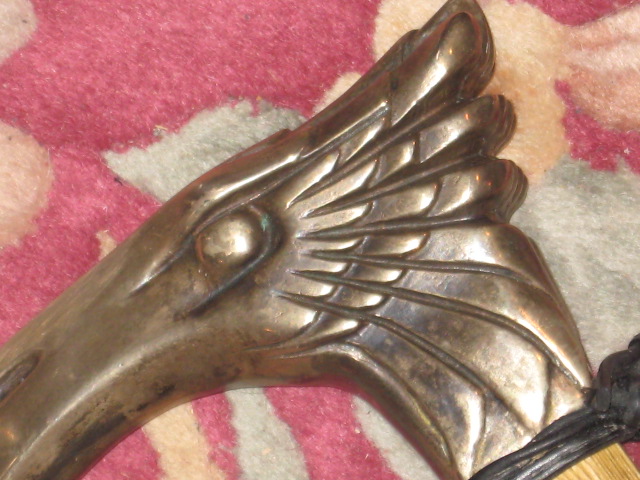
Tod send me the attached pics of the Bronze Eagle's head.
He mentioned that he was rushed so they are just quick flash pics, so these pics are not colour corrected/accurate and look a bit washed out, but they do show the results as far as casting fidelity to the original wooden model which seems very good.
I'm very happy with the results and some minor flaws seem to be from the original wooden model.
When I have the bronzes in hand I might do a little refining of shapes and make some line crisper using fine files, and I'll probably also do some hand polishing.
As mentioned before, each bronze may get a different treatment when used to make the whole walking stick and I might vary things like level of polish and maybe see what I might want to do with accelerated patination.
The details should suggest themselves when I have all the bronzes in hand.
The reproduction from the very complex wooden model seem very accurate to me based on these pics, and I'm impressed about how the even deep cuts in the design came out identical to the wooden model.
 Attachment: 268.44 KB Attachment: 268.44 KB
[ Download ]
Attachment: 267.76 KB
[ Download ]
Attachment: 316.19 KB
[ Download ]
Attachment: 288.92 KB
[ Download ]
Attachment: 302.74 KB
[ Download ]
You can easily give up your freedom. You have to fight hard to get it back!
|
|
|
|
|
Julien M

|
| Posted: Fri 16 Jan, 2015 1:00 pm Post subject: |
|
|
Mr Thibodeau, someone's going to walk the streets of Montreal in style very soon 
Looking forward to see the final piece.
J
|
|
|
|
|
Leo Todeschini
Industry Professional

|
| Posted: Fri 16 Jan, 2015 3:34 pm Post subject: |
|
|
Hi All,
I am very sorry to have not taken part in this more, but as Jean says, I am rather pushed at the moment. I finished building a house 2 days ago and leave the country for 3.5 months on Sunday - quite a lot to do.
The castings came back well defined and of good quality which is what I have come to expect from my foundry. What is did forget to mention is that due to the mass of the cast they have to cool the crucible down before pouring as otherwise you get bad differential shrinkage that causes cracks. Not an issue on small section parts but on skull crushers like this it is an issue.
As regards the coloration of bronze, there is a book that I saw years ago but don't own and I think it is called 'The coloration and patination of bronze' fairly self explanatory and most of the recipes used pretty regular chemicals if I remember right. Expensive but good.
Jean will be getting them in around 10 days I hope
Tod
www.todsworkshop.com
www.todcutler.com
www.instagram.com/todsworkshop
https://www.facebook.com/TodsWorkshop
www.youtube.com/user/todsstuff1
|
|
 |
|
Jean Thibodeau
|
| Posted: Fri 16 Jan, 2015 4:09 pm Post subject: |
|
|
Yes Tod sent me an e-mail with the information that each head weighs 2.2 lb or 1 kg: So the weigh is going to be
acceptable for a walking stick even if the wooden shaft ends up adding maybe another 2 or 3 pounds: it won't be a
light weight stick but not a boat anchor either.
I was afraid that they might be a lot heavier. ( I was expecting closer to 3 lb and really nervous that it might be closer to 5 lb )
Considering how busy Tod is currently I consider his customer service to be excellent as he has taken the time to reply to 3 of my e-mails in the last couple of days.
I am also very motivated to make more wooden designs to get made into bronze in the future, and I also now have a good idea about the size of a wooden head that will keep the weight reasonable when done in bronze.
You can easily give up your freedom. You have to fight hard to get it back!
|
|
|
|
|
|
Gregg Sobocinski
|
| Posted: Fri 16 Jan, 2015 6:50 pm Post subject: |
|
|
As Julien mentioned, those turned out GREAT! Kudos to Jean and Leo for the fine work!
I look forward to seeing what Jean will do with these. Based on his past work, I'll be admiring the results more than once!
|
|
|
|
|
Jean Thibodeau
|
| Posted: Fri 20 Feb, 2015 5:06 pm Post subject: |
|
|
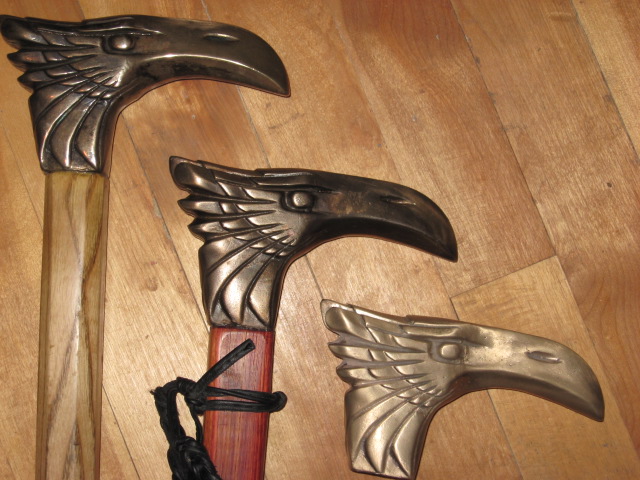
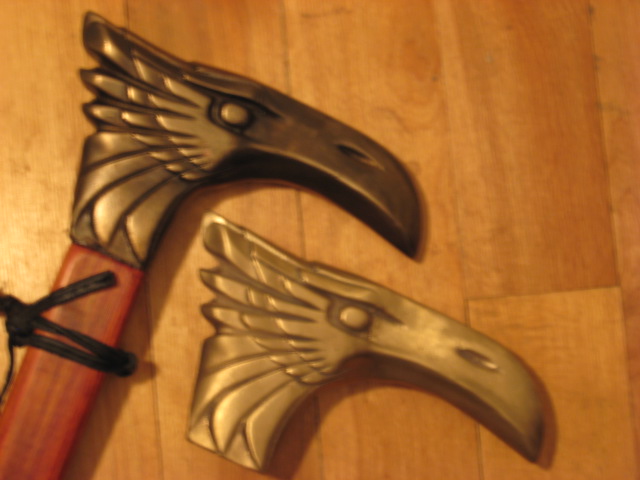
Here are some pics of the first stick I mounted using one of the castings.
I will also cross post pics on my " Walking Stick " Topic with a link to this Topic that shows the making of the wooden model and the whole story about the bronze castings, so on this topic I'll just show a few group pics of the top of the finished stick + some of the other castings next to the original wooden model.
On the " Walking Stick " Topic I'll show only a few pics already here but will add there more pics of the finished stick: I don't want to show too many of the same pics twice, although there will be a couple of repeats.
http://www.myArmoury.com/talk/viewtopic.php?t=25383&start=90
The mounted head is more highly polished and harder to photograph due to the very bright reflections.
I did a text with G96 Gun Blue Paste and it does produce a very dark patina. I re-polished the head to remove some revealed small pits and scratches on the beak part, but I'm probably going to do the panitation again as I like the look of it.
I ran out of the Gun Blue paste so I have to go and buy some more: The finish is sort of bluish dark green, but I'm not sure because I'm partially Red/Green colour blind and I have trouble distinguishing between some greens and some browns.
Pure red and pure green I can see the difference, but a lot less sure when the colours are not pure.
Attachment: 131.74 KB
Group pic.
Attachment: 117.6 KB
At an angle showing the heads from multiple angles.
Attachment: 89.4 KB
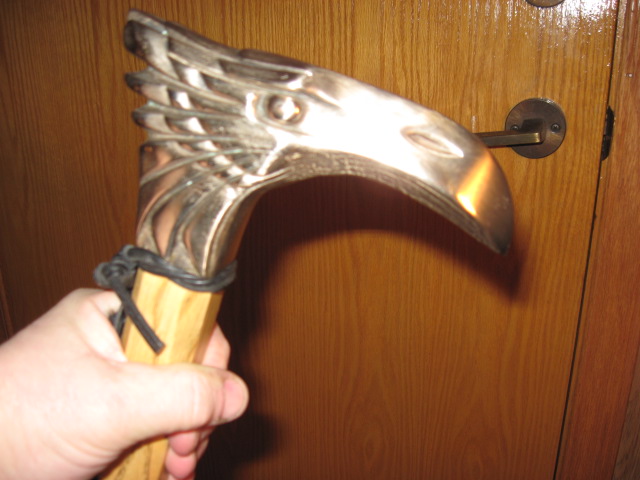
Stick in hand.
You can easily give up your freedom. You have to fight hard to get it back!
|
|
|
|
|
Leo Todeschini
Industry Professional
|
| Posted: Sun 22 Feb, 2015 5:28 am Post subject: |
|
|
Well Jean, they do look lovely all mounted up. Well done on the conception, design and execution of the sculpt.
They have come out as very interesting pieces. Obviously the slightly stern looking Eagle is a very North American theme and this has captured it very well, but as a previous poster said there is of course something of the bed de corbin about it that takes (relatively) modern looks and medieval ones and blends them. Nice job.
I did ask the foundry to take pictures during the process and i will chase these, but I am agin away from home for a bit in the back streets of New Delhi messing about with vehicles, so my ability to do this is a little limited.
Tod
www.todsworkshop.com
www.todcutler.com
www.instagram.com/todsworkshop
https://www.facebook.com/TodsWorkshop
www.youtube.com/user/todsstuff1
|
|
|
|
|
Aaron Hoard

|
| Posted: Sun 22 Feb, 2015 10:03 am Post subject: |
|
|
|
That really turned out nice. Perhaps I missed it - how are you going to attach it to the shaft?
|
|
|
|
|
Jean Thibodeau
|
| Posted: Sun 22 Feb, 2015 1:51 pm Post subject: |
|
|
| Aaron Hoard wrote: | | That really turned out nice. Perhaps I missed it - how are you going to attach it to the shaft? |
Well, one is already attached to a shaft .....   
If you look carefully at the wooden model making pics early in the Topic, and at the later finished castings, you should see the opening of the rectangular socket hole.
The socket hole is something like 1" X 1 1/8" X 2 5/8" deep, the shaft end was carved to match this shape, so the joint if very solid.
You can easily give up your freedom. You have to fight hard to get it back!
|
|
|
|
|
Aaron Hoard
|
| Posted: Sun 22 Feb, 2015 2:03 pm Post subject: |
|
|
|
So, are you glueing or pining it onto the shaft? (I guess that was my question)
|
|
|
|
|
Jean Thibodeau
|
| Posted: Sun 22 Feb, 2015 2:19 pm Post subject: |
|
|
| Leo Todeschini wrote: | Well Jean, they do look lovely all mounted up. Well done on the conception, design and execution of the sculpt.
They have come out as very interesting pieces. Obviously the slightly stern looking Eagle is a very North American theme and this has captured it very well, but as a previous poster said there is of course something of the bed de corbin about it that takes (relatively) modern looks and medieval ones and blends them. Nice job.
I did ask the foundry to take pictures during the process and i will chase these, but I am agin away from home for a bit in the back streets of New Delhi messing about with vehicles, so my ability to do this is a little limited.
Tod |
Thanks Tod, they did turn out very well, and the details of the sculpt where reproduced near perfectly in the bronze castings.
I'll certainly pursue the making of other designs as inspiration takes me and have other designs made in bronze in the future.
I think that the design was " subconsciously " influenced by Art deco, although I didn't directly refer to any existing art.
http://www.google.com/search?client=safari&am...p;tbm=isch
I also was influenced by native North American art, but again it sort of came out of me naturally: Some of it due to simplifying the shapes of feathers as geometric shapes.
The shape of the head is really somewhat different from an eagle and somewhat more a mythical predatory bird.
The Bec de Corbin and medieval War Hammers where also an influence of the shape of the final " Eagle " or what I might call a " Terror Bird " somewhat like the giant flightless birds of a few million years ago.
http://www.google.com/search?client=safari&am...p;tbm=isch
http://www.wired.com/2014/03/absurd-creature-week-terror-bird/
So, a lot of these images got mixed together in the design of this sculpture.
You can easily give up your freedom. You have to fight hard to get it back!
|
|
|
|
|
Jean Thibodeau
|
| Posted: Sun 22 Feb, 2015 2:26 pm Post subject: |
|
|
| Aaron Hoard wrote: | | So, are you glueing or pining it onto the shaft? (I guess that was my question) |
Ah, I'm glueing, thought is was odd that you hadn't notice the big square socket hole ......  
Basically using epoxy, and with the large surface area the adhesive should be more than enough, although in theory it could also be pinned.
One reason for not pinning is that should the shaft need to be replaced for any reason heating the head to 250°F would make the epoxy let go and using a pin makes removal seriously more challenging: With other stick designs I have added a pin at times mostly to the steel butt, but this seems to me like " overkill ".
If the socket hole was shallower pinning might be needed ?
You can easily give up your freedom. You have to fight hard to get it back!
|
|
|
|
|
Jean Thibodeau
|
| Posted: Wed 25 Mar, 2015 6:44 pm Post subject: |
|
|
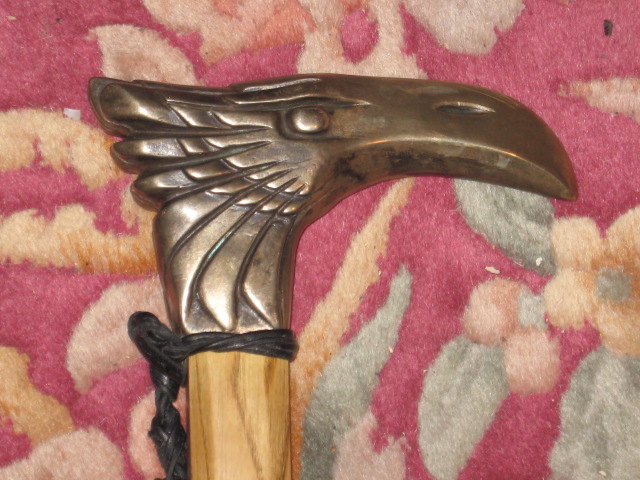
The patina of the first stick I made is turning darker naturally.
It seems that just taking it outside has an effect on the bronze compared to the other bronzes still in the shipping box and wrapped in bubble wrap and not exposed to air.
Just a few pics.
And again I can highly recommend using Tod's Foundry if one has a design one want made into bronze for a DIY project. although Tod can also do the model himself as a fully commissioned work, but at a higher price, if one doesn't have the time or the tools or the skills to do the wood carving themselves.
Attachment: 128.39 KB
Attachment: 129.07 KB
Attachment: 121.17 KB
You can easily give up your freedom. You have to fight hard to get it back!
|
|
|
|
|
|
Jean-Carle Hudon
|
| Posted: Wed 25 Mar, 2015 10:08 pm Post subject: aigle |
|
|
Beau travail Great work congratulations on a fine project.
Bon coeur et bon bras
|
|
|
|
|
Jean Thibodeau
|
| Posted: Thu 26 Mar, 2015 6:02 pm Post subject: Re: aigle |
|
|
| Jean-Carle Hudon wrote: | | Beau travail Great work congratulations on a fine project. |
Merci bien ....... Appreciate the comment and compliment.
You can easily give up your freedom. You have to fight hard to get it back!
|
|
|
|
|
Jean Thibodeau
|
| Posted: Fri 27 Mar, 2015 11:42 am Post subject: |
|
|
Oh, back to the Bronzes: I experimented with patination on another of my unmounted bronzes and it worked great even if it sounds a little " GROSS " i.e. the " URINE " patination method.
I used a " Not to be used ever again for food Tupper Wear container ", peed in it, added a little white vinegar to top off the liquid to above the bronze lying on it's side and put a cover on it.
In the bathroom sink I put the sealed container and filled the sink with very warm water to accelerate the chemical reaction.
The bronze came out much darker after I cleaned up everything. ( Pee is basically sterile so it's not as if I had to use " something worse ", it's just a mental barrier working with it .... LOL ).
The last thing I tried in addition was getting the oven up to 250/300°F and putting the bronze in the oven for a few hours and letting it cool slowly after I turned off the oven after about half an hour to be sure that the bronze reached 250°F. I opened the oven door after an hour or so so that fresh oxygen would reach the heated bronze .... not sure if all these steps are needed, but just letting you know everything I did.
The bronze is now even darker, and sort of a very rich dark reddish brown ( Or it could be a reddish dark green as I'm slightly colour blind and I have trouble with green and brown .... but it looks more reddish to me, so probably brownish ??? ).
The results are very attractive, I might later carefully polish just the edges of the shapes to contrast the dark patina with brighter highlights.
At least until the bronze is assembled to the shaft one can experiment and re-do the patination if one has polished off too much until one has the effect one wants.
Also when in use of the walking stick the patination will continue naturally and also acquire natural wear to give it character.
By the way I really love the look of the patinated bronze now, and all the urine has completely been washed off, so you can try to forget about the process, if it bothers you .... LOL.
[/b]
You can easily give up your freedom. You have to fight hard to get it back!
|
|
|
|
|
Jean Thibodeau
|
| Posted: Sat 28 Mar, 2015 6:18 pm Post subject: |
|
|
Oh, before you try the " Urine " patination method you could try first just the heat method of putting the bronze head in a pre-heated oven to 300°F and then turning off the heat after 20 minutes or so and let the bronze cool slowly and opening the oven door after a bit of time to let fresh oxygen get at the bronze: This may work all by itself .... if it doesn't produce a much darker patina then maybe the " Urine " soak is also needed ?
By the way the bronze was left in the " Urine " for at least 12 hours and the contained flipped from side to side occasionally to make sure that all contact surfaces where exposed ..... if left on one side only there might be a couple of areas where the bronze was in contact with the plastic container and it might produce a couple of untreated spots on the finish.
Attachment: 128.58 KB
Left: First stick natural patina.
Center: new stick with " Urine/heat " patina.
Right: Fresh from the foudry finish
Attachment: 79.04 KB
Just the new patina next to the original from the foundry finish.
You can easily give up your freedom. You have to fight hard to get it back!
|
|
|
|
|
|
|


