| Author |
Message |
Leo Todeschini
Industry Professional

|
 Posted: Tue 14 Jun, 2011 3:32 pm Post subject: Posted: Tue 14 Jun, 2011 3:32 pm Post subject: |
 |
|
Jean Thibodeau wrote | Quote: | Maybe you could expand on this as to why you now think that casting in the final shape is a better idea ?
Here are a few guesses:
A) The file work when bent into shape will close up on the insides of the curves and stretch/expand on the outside of the curves and this may distort the file work ?
B) The file work may cause uneven bending or difficulties in controlling curving process ?
C) I could be completely wrong in my guessing. |
A - it will do this anyway and the originals do this; thats fine.
B- Very true, but you just need to be careful bending to help avoid this.
C - Correct
basically the steel casting exhibited tendencies to behave as if it suffered badly from 'red short' and it was tough as hell as it was cast, but when it was heat manipulated it crumbled and became unusable.
Julien M wrote | Quote: | This looks great! What's the medium used? Super sculpey, painted?
Another one of your stuff I'm definitely looking forward to see. |
The masters are made in several stages. The sculpt was done in epoxy putty, then moulded in silicone, cast in polyurethane, detail sculpted in with some detail addition in epoxy and then painted. They will now be moulded in silicone, cast in wax, then lost wax in bronze.
Thanks for the good comments
Tod
www.todsworkshop.com
www.todcutler.com
www.instagram.com/todsworkshop
https://www.facebook.com/TodsWorkshop
www.youtube.com/user/todsstuff1
|
|
   |
 |
Leo Todeschini
Industry Professional
|
| Posted: Wed 13 Jul, 2011 12:25 pm Post subject: |
|
|
Here is the next tranche of work.
The Katzbalger will finally get assembled this week, the dagger components are off at the casters, but with their summer shut down coming it is touch and go whether I will get them back before they go.
In the meantime I have started the blade and the scabbad fittings.
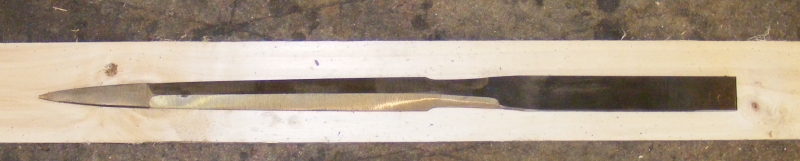
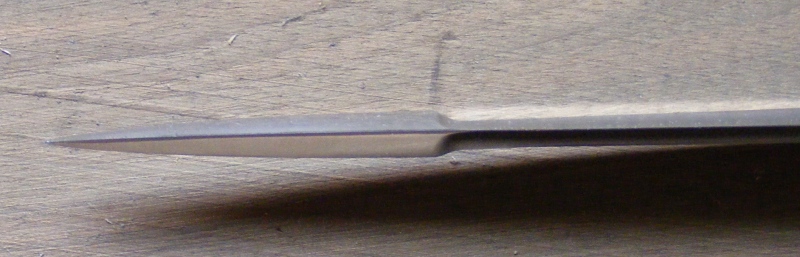
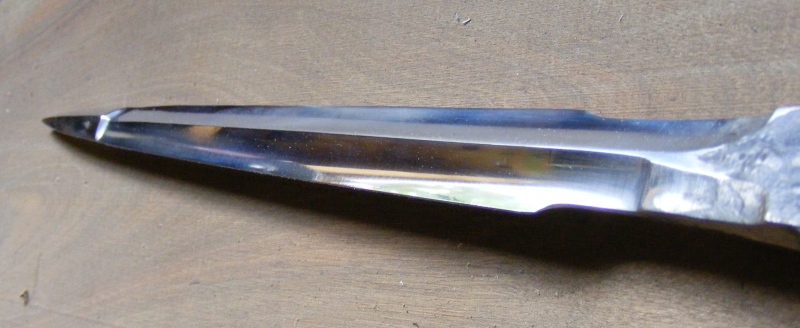
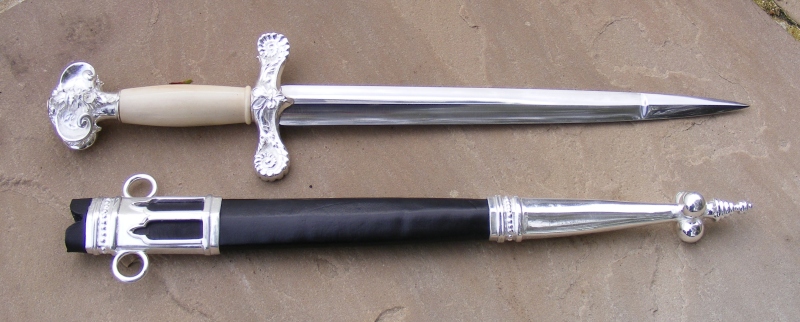
A couple fo Lansknecht daggers show a prominent central ridge and I rather like those at the moment and am trying to get better, so it seemed like a good excuse to go that way and likewise reinforced points.
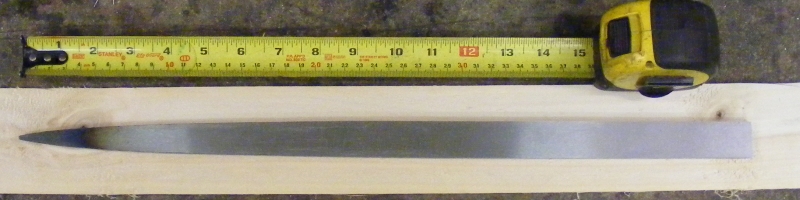
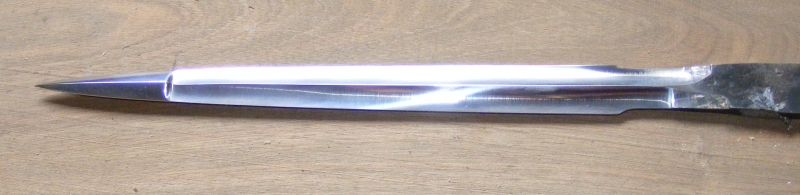
I have shown the blade starting from a piece of stock. After I profiled it I hardened and tempered it at full thickness, so I could easily dress out any warping as this would be tricky with a heavily hollow blade so I did the vast majority of the shaping once it was hard. Major bevels on first and then some very careful hollow grinding to leave the tip nice an neat. A slow and rather nervous process as one slip and it is back to the beggining.
The blade is 8mm thick and 25mm wide and about 270mm long. I will shape the tang in once I have the handle components back.
 Attachment: 129.48 KB Attachment: 129.48 KB
blade blank
Attachment: 106.5 KB
bevels in place
Attachment: 131.49 KB
hollows in place
Attachment: 106.43 KB
reinforced tip
Attachment: 120.32 KB
blade
www.todsworkshop.com
www.todcutler.com
www.instagram.com/todsworkshop
https://www.facebook.com/TodsWorkshop
www.youtube.com/user/todsstuff1
|
|
|
|
|
Leo Todeschini
Industry Professional
|
| Posted: Wed 13 Jul, 2011 12:37 pm Post subject: |
|
|
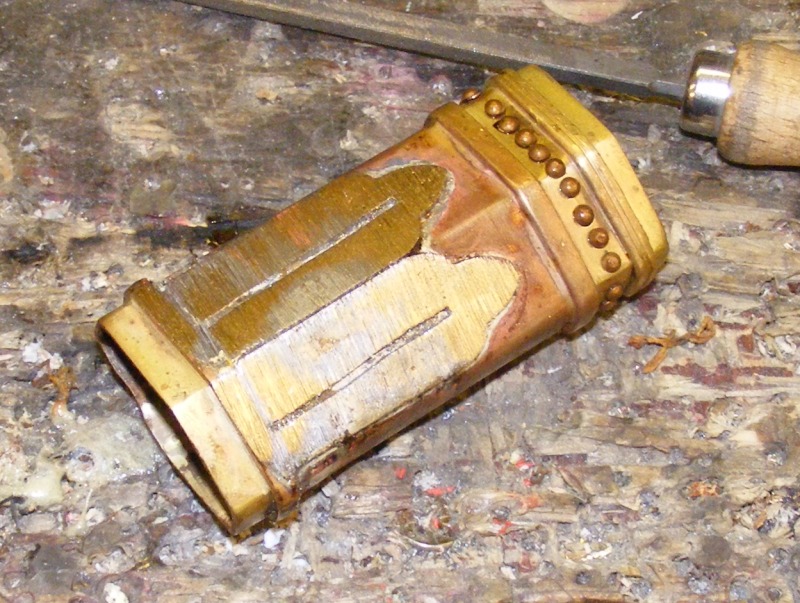
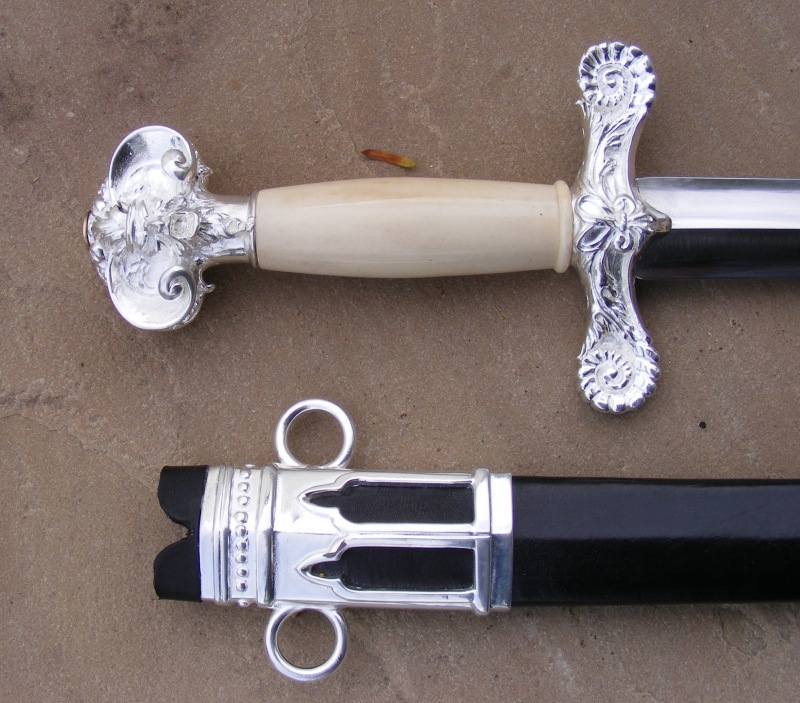
So then I started the scabbard.
The original intention was to make an all metal scabbard, but basically I there is simply no money in the budget to do this, so I have gone for a leather scabbard with fittings. However it will desrve a rather nice fitting set so here we go..........
I missed the first couple of stages as I forgot I was supposed to be taking pictures -sorry.
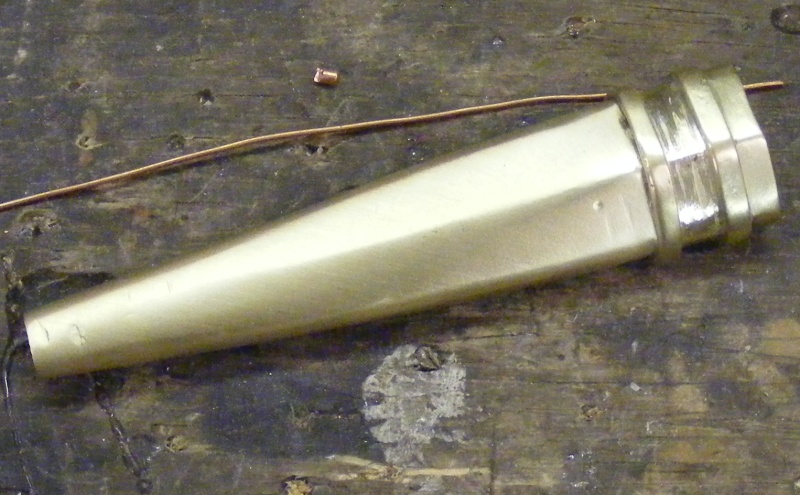
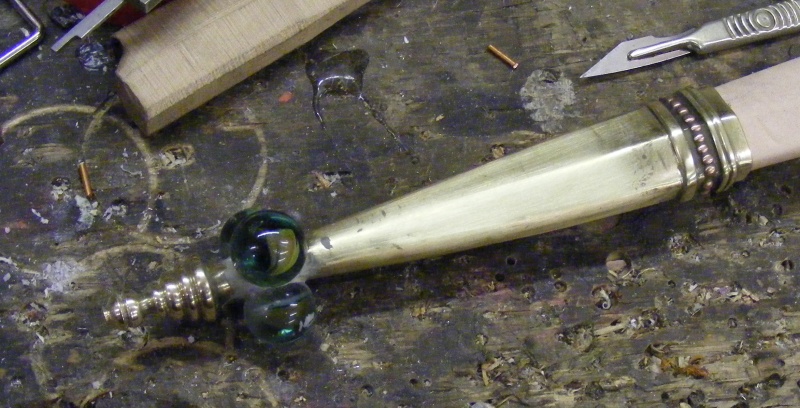
I formed a brass chape and then soldered on some detail strips. I drilled some holes and soldered in some rivets for detail, turned up a small finial in a typical Landsknecht style, fixed this is place and then added the three globes (marbles), which is also a very Landsknecht detail.
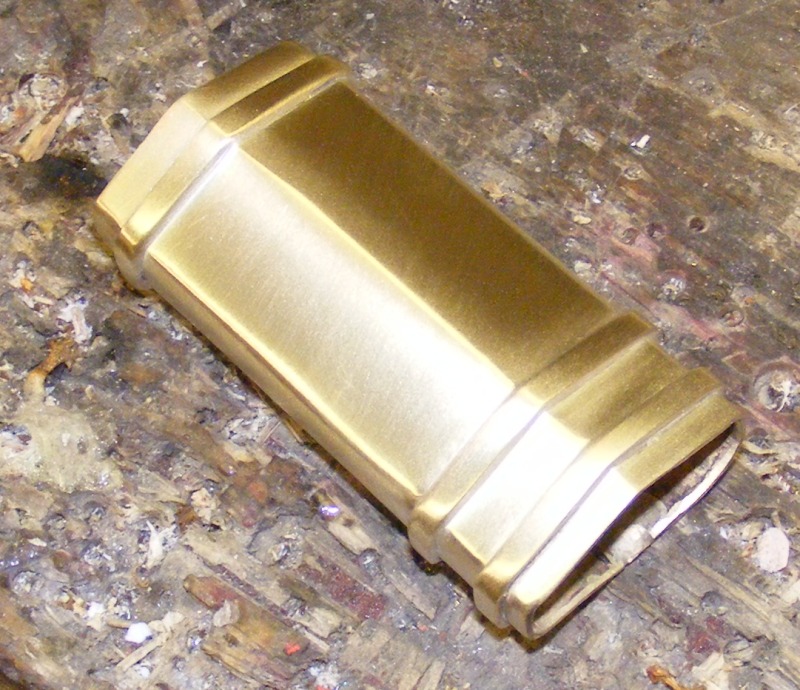
The mouth was also formed from brass, also leaving the central ridge defined. The detail strips were added and a matching set of rivets. I then fixed on two brass shaped panels for the arches with wire and soldered these in place, cut them out, filed them to shape and then soldered on the rings.
Both pieces will head off to the casters tomorrow.
I doubt I will get anything back for a month or so.
I hope you like the progress so far and one day I will be able to get a set of pictures of all the pieces together.
Tod
Attachment: 155.75 KB
chape with detail strips
Attachment: 157.56 KB
chape with balls
Attachment: 149.93 KB

mouth
Attachment: 181.9 KB
mouth with strips
Attachment: 178.93 KB
mouth with shaped brass plates
Attachment: 188.91 KB
scabbard with fittings
www.todsworkshop.com
www.todcutler.com
www.instagram.com/todsworkshop
https://www.facebook.com/TodsWorkshop
www.youtube.com/user/todsstuff1
|
|
|
|
|
Ben Anbeek
Industry Professional

|
|
|
|
|
Leo Todeschini
Industry Professional
|
| Posted: Wed 05 Oct, 2011 2:12 pm Post subject: |
|
|
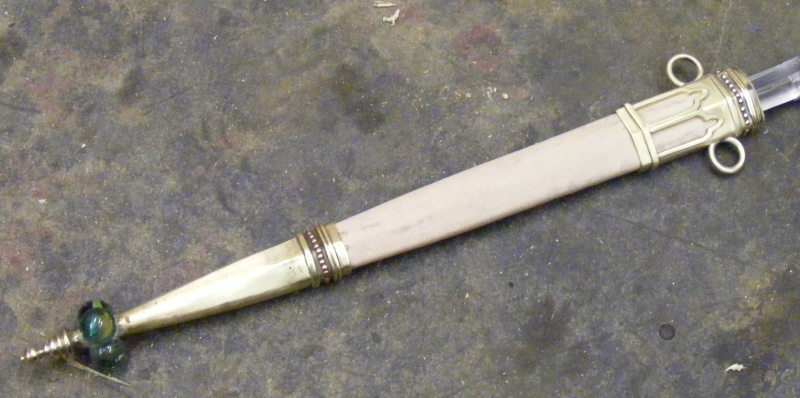
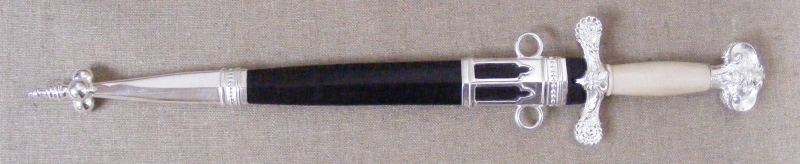
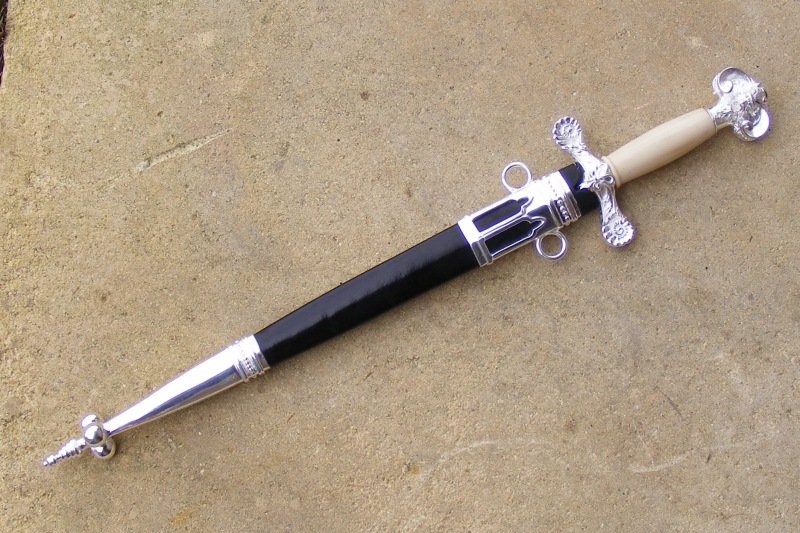
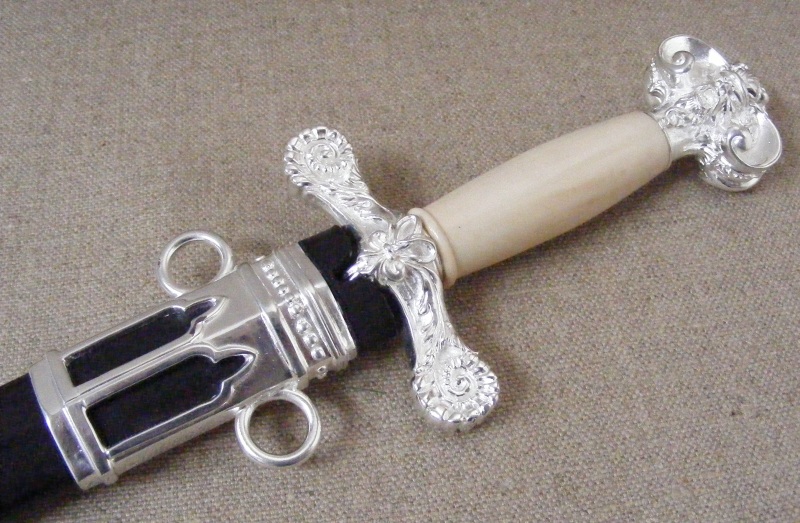
The project is coming toward an end after a year and I must say I am thankful for that.
I recieved back the scabbard fittings and the guard fittings and so last week I ground the tang onto the blade and fitted it all to the guard and pommel. The handle itself was made from a length of sambar antler.
All the fittings have been polished and are now on the way to the platers so I just have the final assembly to go.
The top of the scabbard will get finished when the fittings finally go on.
I hope you like the progress.
Tod
Attachment: 185.85 KB
Attachment: 199.35 KB

www.todsworkshop.com
www.todcutler.com
www.instagram.com/todsworkshop
https://www.facebook.com/TodsWorkshop
www.youtube.com/user/todsstuff1
|
|
|
|
|
|
Phil D.
|
| Posted: Wed 05 Oct, 2011 3:43 pm Post subject: |
|
|
That is incredible.
"A bottle of wine contains more philosophy than all the books in the world." -- Louis Pasteur
"A gentleman should never leave the house without a sharp knife, a good watch, and great hat."
|
|
|
|
|
|
Tim Lison
|
| Posted: Wed 05 Oct, 2011 10:49 pm Post subject: |
|
|
|
Wow. That is just great Tod!
|
|
|
|
|
Mark Routledge
Industry Professional

|
| Posted: Wed 12 Oct, 2011 6:18 am Post subject: |
|
|
I have just realised that my mouth has been agape all the way through looking at this. Literally catching flys ! I find it hard to say something that does not sound lame.
Your work is to be admired by all who see it Tod.
www.wessexwildcraft.com
|
|
|
|
|
Leo Todeschini
Industry Professional
|
| Posted: Mon 24 Oct, 2011 7:46 am Post subject: |
|
|
Thank you Mark.
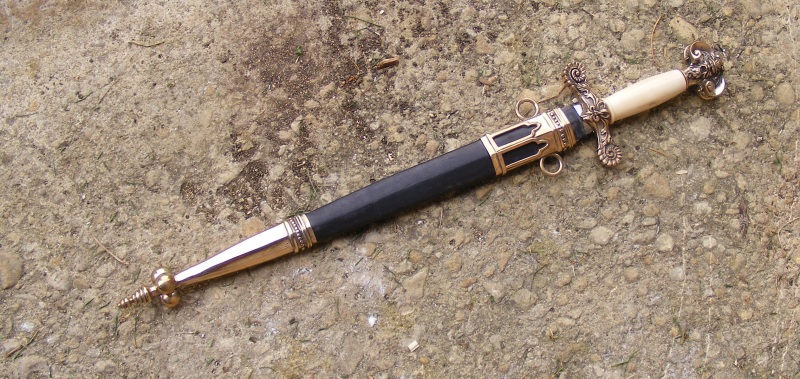
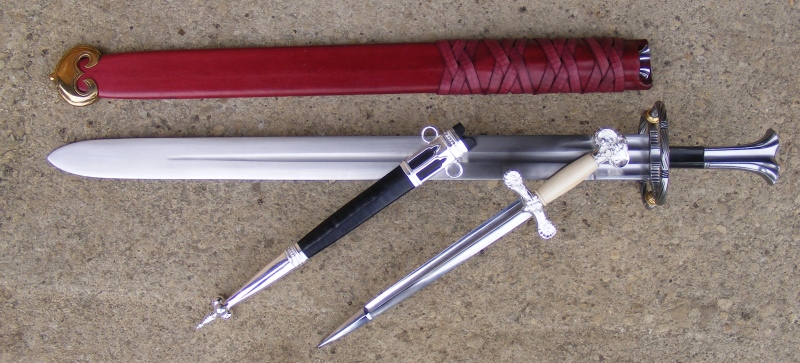
It has been a very long road and I am finally at the end of it.
The castings had been fettled when they came in a few weeks ago and they finally came back from the platers today with a new shiny coat of silver and so all that was left to do was put it all together.
I am never that fond of plating but I do think this ha come out well and will improve (IMHO) when it gets some tarnish into the detail. The down side of all that plating is that I simply cannot take any pictures of it worth a damn.
I hope you like the pieces and I hope you have enjoyed the progress of these pieces from the first file strokes.
I guess if the new owner is happy with them they will be on the way in a few days and then maybe we can wait for his opinions - I hope he likes them
Regards
Tod
Attachment: 190.12 KB
Attachment: 122.75 KB
Attachment: 188.9 KB
Attachment: 187.42 KB
Attachment: 152.31 KB
Attachment: 183.79 KB
www.todsworkshop.com
www.todcutler.com
www.instagram.com/todsworkshop
https://www.facebook.com/TodsWorkshop
www.youtube.com/user/todsstuff1
|
|
|
|
|
Nathan Robinson
myArmoury Admin


|
|
 |
|
|
William P
|
| Posted: Mon 24 Oct, 2011 7:59 am Post subject: |
|
|
four words to appraise this are all thats needed
'fit for a king'
|
|
|
|
|
|
Paul Watson
|
| Posted: Thu 27 Oct, 2011 1:06 am Post subject: |
|
|
Fantastic pieces Tod, really highlighting your skill. Strangely though I preferred the appearance of the dagger and scabbard prior to the plating.
I do not love the bright sword for its sharpness, but that which it protects. (Faramir, The Two Towers)
|
|
|
|
|
Lancelot Chan
Industry Professional

|
|
|
|
|
Leo Todeschini
Industry Professional
|
|
|
|
|
|
|

