| Author |
Message |
|
Dustin R. Reagan
|
 Posted: Thu 14 Jun, 2007 4:20 pm Post subject: Windlass German Bastard Sword Regrip Posted: Thu 14 Jun, 2007 4:20 pm Post subject: Windlass German Bastard Sword Regrip |
 |
|
Hello everyone!
This is my first regrip and the first sword-related project I've shared online.
First I'd like to thank myArmoury, for all the great available resources (special thanks to information provided by Sean Flynt, Greyson Brown & Peter Johnson on regrip how-to! Without this wealth of information, I know my grip would look less than half as good. )!
Thanks to Sean Flynt, I noticed the apparent quality of windlass's new german bastard sword. For the most part, I agree with the perception that windlass's offerings are definitely improving in quality. The hilt blueing on this piece is nice and relatively even (though it is chemically blued, not heat blued...don't know if that makes a difference in wear/tear, we shall see...). Handling is actually nice on this piece, as well. That is to say...I'm sure someone like Albion could make a better handling similar piece, but still...i can't complain about how it feels going through some german longsword forms with it. In fact, i was pleasantly surprised.
The only egregious aspect was the grip, in my opinion...bad, too slick black pleather (or maybe it was real, can't tell), sticthed up the side with bulky stitches. I had been meaning to learn to regrip a sword, this was the perfect chance!
Overall, I am very happy with how it turned out, especially considering it was my first attempt.
I'll do another post below talking about materials, procedures and lessons learned.
Here are some photos:
 Attachment: 117.71 KB Attachment: 117.71 KB
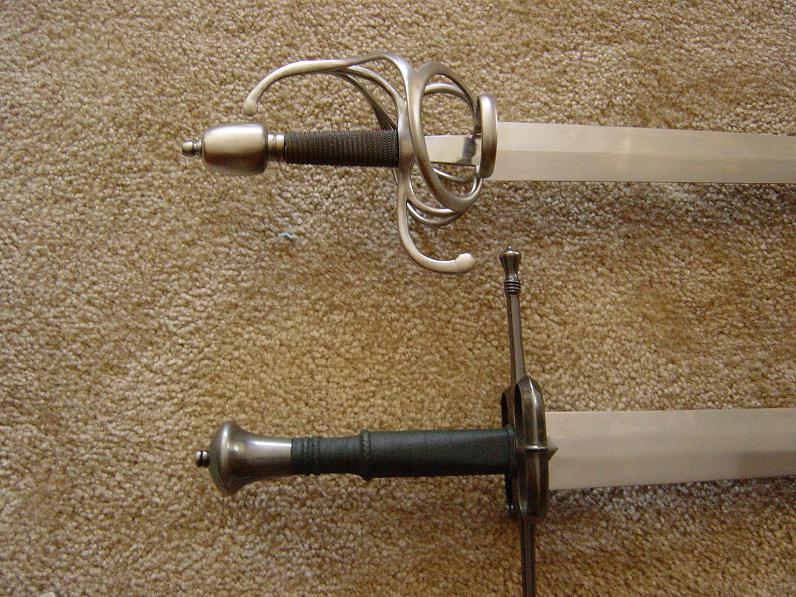
Alongside my A&A town guard sword.
Attachment: 121.98 KB
After dyeing the grip.
Attachment: 120.01 KB
With my collection [ Download ]
Attachment: 121.02 KB
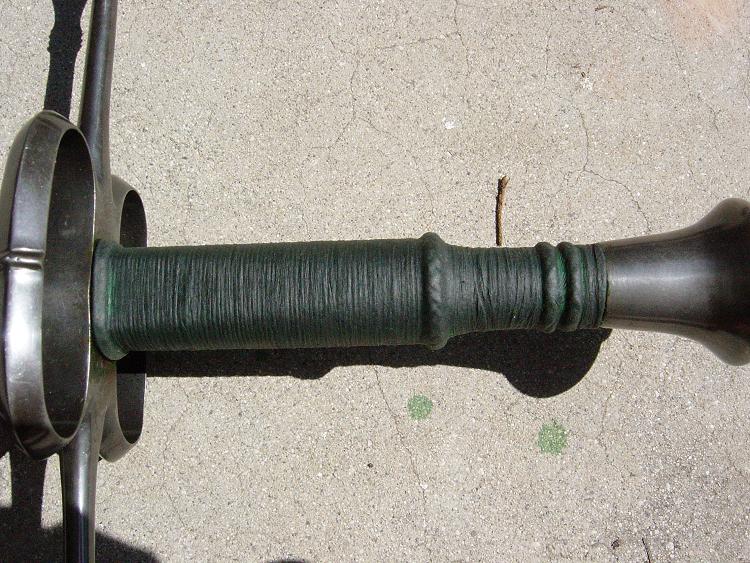
The "Ugly" side [ Download ]
Attachment: 119.63 KB
The "Pretty" side, right after removing the overwrap [ Download ]
|
|
  |
 |
|
Dustin R. Reagan
|
| Posted: Thu 14 Jun, 2007 4:37 pm Post subject: Windlass German Bastard Sword Regrip (pt. 2) |
|
|
Just wanted to go over how i did it.
First, off, I used much of the great advice offered by Sean Flynt, Greyson Brown, & Peter Johnson on sword grip wrapping, which can be found by searching the forums for "grip wrap" (you can throw in their names too, to help your search).
I used garment lining grade pig skin ( ~ 1.5 oz, the man at the store said ) from Tandy Leather. I searched around for 1 oz. vegetable tanned calf-skin, but with no luck. Apparently you can get this from specialty book binding shops, though it isn't cheap. Luckily, windlass had already wrapped the grip with decent twine and risers (though with the crappy original leather wrap, you could only see the risers...it was a surprise when i cut it off and there was twine wrap! ). I used "Titebond II: Premium Wood Glue" which, according the the blurb on the front is water-resistant, with a strong initial tack and fast set.
I cut out my leather with about a cm overlap (turned out to be too much ) on each edge and soaked it in tap water for 3 hours. Then i attempted to "skive" it (i think that's what it's called) with a safety beveler. This, i believe, would have worked much better dry, not when the leather was wet. Next time, I plan on doing this dry, and skiving the edges much more agressively (i.e. getting them thinner). I braced the sword with some clamps, applied glue to the leather, folded over the top & bottom edges (about .25 cm fold on the bottom and .5 cm fold on top) and went to work wrapping the leather around the grip. This was definitely the hardest part, and due to the waisted nature of the grip i, several times, had to take the leather off, and adjust the cut of the leather to better fit around the grip. Finally, i got it on reasonably and wrapped simple cotton twine as tightly as i could around the grip, but left it off of the risers...in the hopes that this would help define the risers...i think it helped, actually.
I left it to dry for ~20 hours. When I took off the overwrap, I was pleasantly surprised, though I did notice that the overwrap contributes a great deal to the texture of the grip! I didn't know this, and going forward, I will definitely apply the overwrap much more carefully/evenly, because there are some places that are a bit rough because of my uneven overwrap.
I dyed the grip dark green with alcohol-based dye i got from tandy leather. The first coat wasn't dark enough, so I lightly buffed the grip with the rough part of a kitchen sponge, then applied another coat. This was satisfactory, so I rubbed in a liberal amount of mink oil to coat/protect the grip.
Dustin
|
|
|
|
|
Chad Arnow
myArmoury Team


|
| Posted: Thu 14 Jun, 2007 4:46 pm Post subject: |
|
|
Dustin,
It looks pretty good. Certainly better than my first attempt.  You've got a nice collection, too. You've got a nice collection, too.
ChadA
http://chadarnow.com/
|
|
  |
|
Greyson Brown

|
| Posted: Thu 14 Jun, 2007 6:43 pm Post subject: Re: Windlass German Bastard Sword Regrip (pt. 2) |
|
|
| Dustin R. Reagan wrote: | | I used garment lining grade pig skin ( ~ 1.5 oz, the man at the store said ) from Tandy Leather. |
Was this stuff fairly stiff? I have used Tandys 1.5-2 oz. garment lining pigskin and like it well enough, but have trouble picking a section of the leather that isn't too stiff. It could be that I just didn't pay enough attention when I bought the leather, too.
| Quote: | | I searched around for 1 oz. vegetable tanned calf-skin, but with no luck. Apparently you can get this from specialty book binding shops, though it isn't cheap. |
Tandy sells this stuff as well (or at least did last time I looked), but you are right that it isn't cheap, especially since Tandy only sells stuff by the hide.
| Quote: | | I cut out my leather with about a cm overlap (turned out to be too much ) on each edge and soaked it in tap water for 3 hours. Then i attempted to "skive" it (i think that's what it's called) with a safety beveler. This, i believe, would have worked much better dry, not when the leather was wet. Next time, I plan on doing this dry, and skiving the edges much more agressively (i.e. getting them thinner). |
Yeah, skiving definitely works better for me when the leather is dry. I have made mistakes or changes that have required skiving while wet, and that just isn't much fun.
| Quote: | | I braced the sword with some clamps, applied glue to the leather, folded over the top & bottom edges (about .25 cm fold on the bottom and .5 cm fold on top) and went to work wrapping the leather around the grip. This was definitely the hardest part, and due to the waisted nature of the grip i, several times, had to take the leather off, and adjust the cut of the leather to better fit around the grip. Finally, i got it on reasonably and wrapped simple cotton twine as tightly as i could around the grip, but left it off of the risers...in the hopes that this would help define the risers...i think it helped, actually. |
I've never done a waisted grip and, frankly, am a little daunted by the idea. I'm sure I could do it, but there would be a bit of a learning curve to overcome. You did a really nice job.
| Quote: | | I did notice that the overwrap contributes a great deal to the texture of the grip! I didn't know this, and going forward, I will definitely apply the overwrap much more carefully/evenly, because there are some places that are a bit rough because of my uneven overwrap. |
I always struggle with getting the overwrap even. I get about 3/4 of the way down the grip and I just lose patience (or Mom calls needing help because the computer ate her disertation).
| Quote: | | I dyed the grip dark green with alcohol-based dye i got from tandy leather. The first coat wasn't dark enough, so I lightly buffed the grip with the rough part of a kitchen sponge, then applied another coat. This was satisfactory, so I rubbed in a liberal amount of mink oil to coat/protect the grip. |
The green is very nice! Green is my favourite color, but I am also very particular about what shade of green it. As a result, I don't have any green grips in my collection (I came close, but chlorophil turns brown pretty quick). Is that the Feibings dye? Is it just called dark green?
I really like the way mink oil applies for projects like this. I've only done one grip with it, so I don't know how well it holds up, but I would think it should be pretty good. It just about has to beat the beeswax I have used a few time in the past.
-Grey
"So long as I can keep the path of honor I am well content."
-Sir Arthur Conan Doyle, The White Company
|
|
|
|
|
|
Dustin R. Reagan
|
| Posted: Thu 14 Jun, 2007 7:10 pm Post subject: Re: Windlass German Bastard Sword Regrip (pt. 2) |
|
|
| Greyson Brown wrote: |
Was this stuff fairly stiff? I have used Tandys 1.5-2 oz. garment lining pigskin and like it well enough, but have trouble picking a section of the leather that isn't too stiff. It could be that I just didn't pay enough attention when I bought the leather, too.
|
Hmm, seeing as this is the first wrap I've done, I can't really say whether it was too stiff. I suppose it certainly would have helped had it been a bit more supple, yet after a soak, it was workable.
Speaking of 1 oz. calf-skin, the manager at Tandy claimed that they (Tandy) didn't even make it that thin! Have you ever used it for a wrap or a scabbard? If so, does it handle much differently than the thin pig-skin?
Thanks for the comments!
Dustin
|
|
|
|
|
Sean Flynt

|
| Posted: Fri 15 Jun, 2007 6:23 am Post subject: |
|
|
Excellent work, Dustin! I'm in the middle of a similar project for my GBS. I scrapped the entire grip, core and all, re-ground the base of the pommel and knocked the polish off the blade. Next step is to make a new core. I may grind down the quillon block, too, but haven't yet decided on that.
My GBS is going to need some thin shims between tang and cross to prevent rattling, which is annoying but not too unexpected. Overall, I'd say this is one of the best designed and poorly assembled MRL pieces I've owned. I'll most likely JB Weld the pommel and cross. Again, that's expected for $179. I really love the feel of this thing. It's just begs to cut, doesn't it?
You really do have a wonderful collection there, and it's to both your and WS's credit that your GBS looks right at home alongside your Albion and A&A pieces.
-Sean
Author of the Little Hammer novel
https://www.amazon.com/Little-Hammer-Sean-Flynt/dp/B08XN7HZ82/ref=sr_1_1?dchild=1&keywords=little+hammer+book&qid=1627482034&sr=8-1
|
|
|
|
|
Greyson Brown
|
| Posted: Fri 15 Jun, 2007 8:23 am Post subject: |
|
|
Well, I thought I had found 1 oz. stuff through Tandy, but I can't find it now. I also looked at several bookbindes for that and goat skin, so I have been thinking of one of those places. I know it was too expensive for me to justify, otherwise I would definitely have some.
I've only ever used chamois and pigskin for my grips. On scabbards I use Tandys 2.5-3 oz. kip tooling sides. That stuff is much more plyable and has a really nice soft smooth finish to it. When the tooling leather is damp, you can push a needle through it without much fighting. When the pigskin is damp, it still fights your needle quite a bit (I learned this when I used it to attach the fingers to my gauntlets).
-Grey
"So long as I can keep the path of honor I am well content."
-Sir Arthur Conan Doyle, The White Company
|
|
|
|
|
|
Dustin R. Reagan
|
| Posted: Fri 15 Jun, 2007 8:47 am Post subject: |
|
|
Thanks for the comments, Sean!
| Sean Flynt wrote: | | Excellent work, Dustin! I'm in the middle of a similar project for my GBS. I scrapped the entire grip, core and all, re-ground the base of the pommel and knocked the polish off the blade. Next step is to make a new core. I may grind down the quillon block, too, but haven't yet decided on that. |
Wow, sounds fun...did you modify the pommel to be narrower where it will meet with the grip? Are you going for a narrower, more streamlined waisted grip on this one? That's what I was thinking of doing, but since this was my first "fixer up-er", i decided to be a bit more conservative. Though, I am also in process of knocking down the finish...I've already done a differential sharpening on it ( that is, using files and various grit sharpening stones, put in a gradually blended bevel starting just below the center of percussion...and getting more keen along the edge toward the tip ). The edge bevel blends in with bevel of the blade and isn't a distinct secondary bevel. Now I need to repolish, as the blade is pretty scuffed up. What do you recommend? I'm thinking of 2 or 3 different grit sandpapers, and finish it off with those scrub pads (i forget what their called, but i use them already for polishing my albions).
| Sean Flynt wrote: |
My GBS is going to need some thin shims between tang and cross to prevent rattling, which is annoying but not too unexpected. Overall, I'd say this is one of the best designed and poorly assembled MRL pieces I've owned. I'll most likely JB Weld the pommel and cross. Again, that's expected for $179. I really love the feel of this thing. It's just begs to cut, doesn't it?
|
Yes, it's definitely a cutter...hmm, mine, though, may be assembled a bit better? There is no rattling, and everything feels very solidly assembled (even after doing hard strikes to a solid wooden pell).
| Sean Flynt wrote: |
You really do have a wonderful collection there, and it's to both your and WS's credit that your GBS looks right at home alongside your Albion and A&A pieces. |
Thanks! I agree that, especially after the re-wrap (and even more so, i suspect, after my repolish is done), the GBS could pass as a sword worth $200 to $300 more than I paid for it. I think they've done a great job with the blade's cross section...how it goes from a subtle hexagonal shape, gradually to a lenticular cross section.
Good luck with your modifications! This stuff is addicting, and quite rewarding (especially when you get to share your results and talk shop here on myArmoury).
Dustin
|
|
|
|
|
|
Dustin R. Reagan
|
| Posted: Fri 15 Jun, 2007 8:52 am Post subject: |
|
|
| Greyson Brown wrote: | Well, I thought I had found 1 oz. stuff through Tandy, but I can't find it now. I also looked at several bookbindes for that and goat skin, so I have been thinking of one of those places. I know it was too expensive for me to justify, otherwise I would definitely have some.
|
Let me know if you can find this (any links would be appreciated), as I also read Peter Johnson's advice on goat skin...would love to try it out.
Oh, to answer your question on the dye I used, it is "Pro Dye" and the color is simply "Green (#22055-14)".
|
|
|
|
|
Sean Flynt
|
| Posted: Fri 15 Jun, 2007 10:55 am Post subject: |
|
|
Pommel: Yep, I was going to slim down the "stem" of that mushroom to something closer to the diameter of the original sword's pommel (Wallace #A477) but settled for slimming it down just a little bit because I didn't want to radically alter the weapon's balance. Also, I figured there was no point in having the pommel match A477 but leaving the cross and blade as-is and I don't have time right now to do that work. I ground down the pommel so that it is just slightly larger than the end of the factory grip (it was significantly larger, thus awkward looking up close).
I'll still make a grip more like A477's--flatter and more oval in section than the WS grip, broader at the waist but not much slimmer up top, though it will appear to be so given the broad waist. However, this will be a sword "in the style of 1510" rather than an attempt to replicate A477 in detail (that would take LOTS of work, including fullering the blade). I'll be sharpening the blade just as you did, with a file followed by a coarse stone, sandpaper, etc. It's a hard surface. I find that it's easy to scratch but difficult to finish evenly. Coarse sandpaper and lots of patience seems to be the solution to the factory mirror finish.
On the construction. Since the GBS I bought from Kult of Athena was cheaper than any other I found online, I assumed it might be a "second," with some sort of minor finish or assembly problem. The tang/cross fit is a matter of milimeters, but just enough to allow the blade to shift slightly. I could probably tighten the fit by some well-placed blows to the top of the quillon block with a ballpeen hammer, but thin shims or wedges will work just fine.
For those not familiar with A477, here's a shot supplied by Wallce Collection curator Tobias Capwell (see what a great job Dustin did on the grip?):
Attachment: 77.58 KB
[ Download ]
-Sean
Author of the Little Hammer novel
https://www.amazon.com/Little-Hammer-Sean-Flynt/dp/B08XN7HZ82/ref=sr_1_1?dchild=1&keywords=little+hammer+book&qid=1627482034&sr=8-1
|
|
|
|
|
Sean Flynt
|
|
|
|
|
Jared Smith

|
| Posted: Sat 16 Jun, 2007 4:05 am Post subject: |
|
|
I am wondering what type of cord you used for the wrap over the grip? And, where did you get it?
I found that bailing twine (hemp cord a little over 1/8" or 3 mm diameter) from the hardware store was too coarse and left fibers embedded in the finished grip. I have been considering very heavy fishing line or fine nylon "parachute cord."
Absence of evidence is not necessarily evidence of absence!
|
|
|
|
|
Chad Arnow
myArmoury Team
|
| Posted: Sat 16 Jun, 2007 10:10 am Post subject: |
|
|
I've used twine, but also had issues with left-behind fibers. Fortunately, they burn off easily, smoothing everything down.
ChadA
http://chadarnow.com/
|
|
|
|
|
|
|
You cannot post new topics in this forum
You cannot reply to topics in this forum
You cannot edit your posts in this forum
You cannot delete your posts in this forum
You cannot vote in polls in this forum
You cannot attach files in this forum
You can download files in this forum
|
All contents © Copyright 2003-2026 myArmoury.com — All rights reserved
Discussion forums powered by phpBB © The phpBB Group
Switch to the Basic Low-bandwidth Version of the forum
|

